When recording and mixing music in Pro Tools, you will inevitably come across the need to bounce stems. But what are stems in a DAW, why are they important, and when and how should they be bounced? In this guide, we’ll cover everything you need to know about stems and how to bounce stems in Pro Tools.
What Are Stems in Music Production?
When working within a DAW like Pro Tools, “stems” are like different pieces of your song’s puzzle. Imagine your song is made up of different sounds, like the snare drum. Instead of all the sounds mixed together, each sound has its own separate place, like its own track. When you put similar sounds together, like all the drum sounds, they become a single piece called a “stem.”
Stems are the foundation for your song project because they allow you greater flexibility, precision, and creativity in post-production. They allow you to design your sound on a fairly granular level.
When Would You Need To Bounce Stems in Pro Tools?
Bouncing stems in Pro Tools (or any DAW) is something you will inevitably need to do at some point. You may need to bounce stems in several situations, including the following.
- Collaboration: If you’re collaborating with other musicians or producers who use different digital audio workstations (DAWs), bouncing stems allows you to share your project in a format compatible with their software.
- Mixing and Mastering: Bouncing stems can simplify the mixing and mastering process. By rendering individual stems, you have more control over each element in your mix, making achieving a polished final product easier.
- Resource Management: Large sessions with numerous tracks can strain your computer’s resources. Bouncing stems helps reduce CPU load, making working on complex projects without performance issues possible.
- Backup and Archiving: Creating stem files serves as a backup for your project. If something goes wrong or you want to revisit a project years later, having the stems ensures you can recreate your mix accurately.
- Live Performance: When preparing for a live performance, having stems can be invaluable. You can trigger individual stems during the performance, providing greater flexibility and enhancing the overall sound.
Understanding when to bounce stems in Pro Tools empowers you to make informed decisions throughout your music production journey. In the following sections, we’ll break down everything you need to know about how to export stems in Pro Tools.
How To Bounce Stems In Pro Tools
Below, we offer a detailed, step-by-step guide on how to bounce stems in Pro Tools.
Preparing Your Session for Stem Bouncing
- Organization is Key: Begin by organizing your session, ensuring that all tracks are labeled and color-coded for easy identification. Clean up any unused or unnecessary tracks to streamline the process.
- Set Playback Range (Optional): If you want to bounce a specific section of your project, set the playback range by highlighting the desired region in your timeline. This step is optional but can be helpful.
- Check for Clip Gain and Automation: Ensure that there are no excessive clip gain adjustments or automation moves that could result in unintended volume changes during the bounce. Make necessary adjustments if required.
- Mute or Solo Tracks (Optional): Depending on your needs, you can mute or solo specific tracks before bouncing. This can be helpful when bouncing individual instrument stems or focusing on particular elements.

Choosing the Right Stem Settings
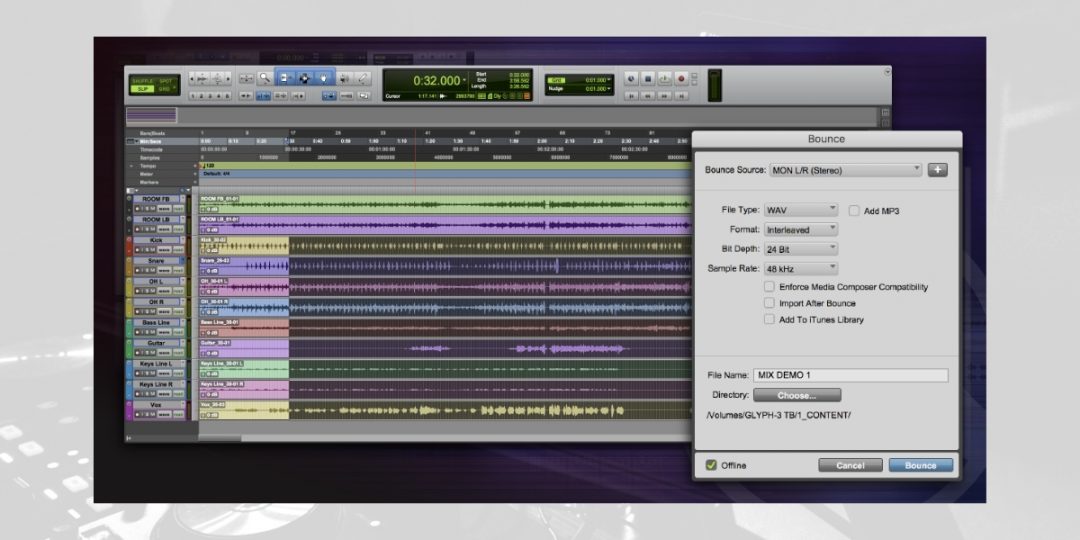
- Select the Bounce Source: Choosing the right bounce source in Pro Tools, whether it’s ‘Bounce to Disk’ or ‘Export,’ is crucial for several reasons. Firstly, it impacts the compatibility of your saved music with your specific Pro Tools version and other software or equipment you may use. Secondly, it affects the audio quality of your music, with ‘Bounce to Disk’ generally maintaining higher quality by exporting individual parts. Lastly, your choice influences flexibility in post-production. ‘Bounce to Disk’ allows for more precise editing and mixing since it exports separate parts, while ‘Export’ typically results in a single mixed file, limiting your ability to make changes. So, making the right choice ensures compatibility, optimal audio quality, and flexibility throughout your project
- Choose the Destination Folder: Specify the folder where you want to save your bounced stems. It’s a good practice to create a dedicated folder for this purpose.
- Select the File Format: Pro Tools offers various file formats for bouncing stems, such as WAV, AIFF, or even MP3. Choose the format that best suits your project’s needs. For maximum quality, WAV or AIFF is recommended.
- Set Bit Depth and Sample Rate: Configure the bit depth (usually 24-bit or 16-bit) and sample rate (typically 44.1 kHz or 48 kHz) based on your project requirements. Higher bit depths and sample rates provide better audio quality but result in larger file sizes.
Initiating the Stem Bounce
- Bounce Options: Pro Tools offers additional options, such as applying real-time effects during the bounce. Make sure to review these settings and adjust them as needed.
- Initiate the Bounce: Click the “Bounce” button to start the process. Pro Tools will render each selected track or group into separate audio files based on your settings.
- Naming Convention: Pro Tools usually names the bounced stems based on the original track names. Double-check the file names to ensure clarity and consistency.
- Review and Verify: Once the bounce is complete, listen to the stems to ensure they sound as expected and are free from errors or glitches.
By following these detailed steps, you’ll be able to prepare your Pro Tools session, choose the right settings, and successfully initiate the stem bounce, giving you the flexibility and control you need for your music production projects.
Managing and Exporting Bounced Stems
Once you’ve bounced your stems from Pro Tools, you will still need to keep them organized so that you can pull them up and share them as needed. This section will guide you through the steps required to organize, locate, and access your bounced stems for use in your music production.
Locating the Bounced Stems
After successfully bouncing your stems in Pro Tools, you’ll need to find where they’re stored. Pro Tools typically places them in a designated folder. To access your bounced stems, follow these simple steps:
- Follow the steps for bouncing your stems listed above.
- Open your computer’s file explorer (Finder on macOS or File Explorer on Windows).
- Navigate to the specified folder.
- Inside, you’ll find your neatly organized bounced stems ready for use.
- By following these steps, you can easily locate and access your exported stems for a smooth post-production process.
By following these steps, you can easily locate and access your exported stems for a smooth post-production process.
File Naming and Format Considerations
When it comes to file naming and formats for your bounced stems, precision is key. To keep your projects organized and compatible, follow these tips:
- Clear and Consistent Names: Use descriptive, consistent names for your stems. Include relevant details like instrument names, takes, and version numbers.
- File Formats: Choose the file format that suits your needs. WAV and AIFF are high-quality options for audio, while MP3 is more compressed. Ensure your format matches your project requirements.
Download our most popular resource: 6 Steps for Creating Radio Ready songs to learn the fundamentals of what goes into a professional mix from renowned Producer, Songwriter & Mixer Warren Huart, who has worked on several Grammy-nominated albums!
Closing Thoughts on Bouncing Stems In Pro Tools
Now that you know how to bounce stems in Pro Tools, it’s important to keep in mind that organization is your best friend. Stems empower you with creative control, whether for collaboration, mixing, or archiving. Keep your session tidy, select the right settings, and initiate the bounce confidently. Once you’ve mastered these steps, you’ll unlock new possibilities in your music production, bringing your artistic vision to life. Happy bouncing!


