A lot of people contemplate mixing vocals in Pro Tools, and whether it’s possible to do with strictly stock plugins. The short answer is “yes,” but it isn’t always obvious how to start. We’ll cover the basics of getting a vocal mix going using stock Pro Tools plugins and some simple ways to experiment with frequently used tools.
So You’ve Recorded Your Vocal Tracks, Now What?
Once the recording process is finished, the next step is mixing. Mixing involves bringing all of the elements of a song together so it sounds cohesive, polished, and nearly ready for consumption. It’s easy to mistake mixing as making each individual instrument sound its best on its own; the reality is that each instrument needs to sound its best in context, and for the song.
Since vocals are usually front and center, they’re one of the most important parts of a quality mix. Learning how to mix them effectively is a key step in becoming a better mixer overall, starting with the basics.
Pro Tools Offers a Range of Mixing Tools That Are Useful for Vocals
The great news is that Pro Tools offers quite a few stock tools that are very effective. We’re talking equalizers and compressors for clean-up, reverbs and delays for dimension, saturation for body and edge, and modulation for creative sounds. While we’re focusing on the fundamentals in this article, we’d highly encourage you to experiment and have fun with everything Pro Tools has to offer.
Download our most popular resource: 6 Steps for Creating Radio Ready songs to learn the fundamentals of what goes into a professional mix from renowned Producer, Songwriter & Mixer Warren Huart, who has worked on several Grammy-nominated albums!
5 Tips for When You’re Mixing Vocals in Pro Tools
1. Add Volume Automation

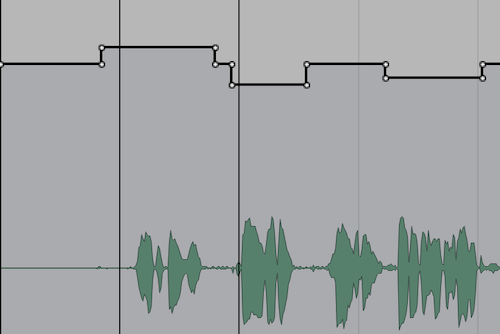
Doing “vocal rides,” or automating levels, is typically one of the first steps pro mixers take when they’re getting a vocal mix started. It involves manually adjusting the volume of certain phrases, words, or even syllables, with the goal being a more consistent level across the performance.
- RELATED: Basic Volume Automation in Pro Tools
From the waveform view of the track, you can make clip selections and use Clip Gain to adjust their volume. From the volume view, you can draw in automation at the output of the fader. For faster and more hands-on results akin to analog mixing, you can also put the track’s automation into Write mode, and ride the fader as the track plays back. Put it back into Read mode to play back your automation.
2. Adjust Your EQ

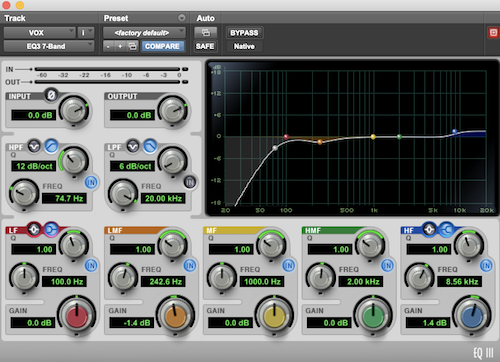
EQ is another important tool we use all the time to help fix problems or sweeten up vocal tracks. Pro Tools provides an easy-to-use plugin called EQ3 7-Band.
When we’re using EQ, we’re typically either boosting or cutting frequencies. Cutting helps us fix problems, like too much low-end, in order for something to sound better. Boosting tends to make things sound “different,” in that you can boost the highs of a vocal to make it brighter and more present.
A good place to start is with a simple high-pass filter. Vocals typically don’t need a ton of low, low-end, because other instruments in the mix handle that. But we also normally don’t want them to sound too thin, so don’t cut too high; pay attention to the 200 to 400 Hz area where both muddiness and body live.
Every voice and every mix is different, so feel free to boost and cut to your heart’s content while you figure out what you like the sound of. Also, don’t be afraid to load up a plugin preset as a reference. It might not work exactly for your material, but it can give you ideas of where to go.
3. Add Compression

The next most common vocal effect is compression. Compression is a dynamics processor that helps even out a recording so there aren’t any wild fluctuations in volume. If we’ve done our due diligence with automation, we’re going to help our compressor out a lot. If you try to push one compressor too hard, it can result in some unwanted sounds like “pumping,” where it’s noticeable that the effect is working hard.
Another consideration is what’s called serial compression. Most engineers will have multiple compressors each doing a little bit of gain reduction versus one compressor doing a lot. Again, this is to help the effect sound as natural as possible.
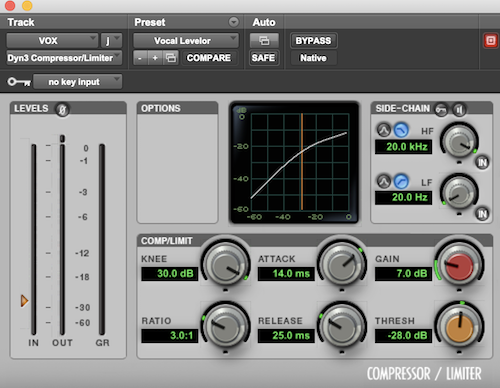
Pro Tools offers a stock compressor called Dyn3 Compressor/Limiter.
4. Organize Your Signal Flow
The basic signal path in Pro Tools goes from the waveform, through the inserts, to the fader, and finally to the pan pot. The waveform’s output directly affects the input of your first insert; the output of the first insert affects the input of the next, and so on, before the signal even reaches the fader.
Good gain staging means managing various input/output levels, but it also means taking into account the order of our inserts (plugins). For example, while there’s no right or wrong way to do it, there are different schools of thought for placing an EQ before or after a compressor. If you EQ before compressing, you can high-pass excess low-end so it doesn’t hit the compressor too hard. If you’ve done any high-end boosting, however, the compressor might emphasize it even more.
Food for thought and hands-on experimentation!
5. Add Effects Sends/Returns for Reverb/Delay
Another critical component of a mixed vocal is the space in which it “lives.” We add this by using time-based effects like reverb and delay to give our vocals dimension and depth. Start by creating an auxiliary return channel in Pro Tools and selecting its input. Load up a stock Pro Tools plugin, such as D-Verb.
From your vocal track, choose the input of your auxiliary return under the Sends area. When you click on the send, a fader will open up allowing you “blend” the right amount of reverb with the dry vocal. Repeat the process for delays, additional reverbs, or any other effects you’d like to run in parallel with your dry vocal.
When Mixing Vocals in Pro Tools, Try to Keep It Simple (But Don’t Be Afraid to Experiment)
Mixing can be a lot of fun, and part of that comes with lots of experimentation. Playing around helps you figure out what works and what doesn’t work, in addition to helping you hone your chops. On the other hand, traditional wisdom tells us to keep it simple. If it sounds good, it is good — you don’t necessarily need a million inserts and effects sends to get there. At the end of the day, start with fundamentals and enjoy the journey of mixing vocals in Pro Tools!
Looking for Pro Tools Tutorials?
Producing great-sounding songs can be difficult if you don’t know how to use your DAW correctly. A Beginners Guide To Music Production in Logic Pro is one of our most popular courses and will teach you the foundational skills that you need to record and mix better songs in Logic Pro. Check it out today!


