Welcome to your one-stop Pro Tools Audio Bridge guide, where we break down everything you need to know. But what is Pro Tools Audio Bridge? In this guide, we’ll explore how this innovative feature simplifies the integration of external audio sources within Pro Tools.
Learn how Audio Bridge can streamline your workflow and open new creative possibilities. We’ll also explain how to access, customize, and troubleshoot Pro Tools Audio Bridge.
What Is Pro Tools Audio Bridge?
Pro Tools Audio Bridge is a feature within Pro Tools that streamlines the integration of external audio sources into your Pro Tools projects.
Audio Bridge uses virtual Input/Output (I/O) to connect Pro Tools with other software and hardware. This enables users to route audio directly between Pro Tools and external devices or applications.
In other words, this functionality is vital for enhancing the flexibility and efficiency of audio production workflows.
Pro Tools Audio Bridge Key Features & Benefits
The main advantage of using Audio Bridge is its capacity to simplify complex routing setups. It allows for direct audio input from virtual instruments, external sound modules, or other digital audio workstations (DAWs) without needing physical cables or additional audio interfaces.
This integration is essential for producers and sound engineers looking to expand their sonic palette and streamline the production process.
Audio Bridge basically enables users to achieve a seamless workflow between Pro Tools and various audio sources. This makes the production process more efficient by reducing setup time and hardware dependency and opens up new creative possibilities.
Whether incorporating live instruments through virtual channels or blending sounds from different applications, Audio Bridge facilitates a more integrated and versatile production environment.
In summary, Pro Tools Audio Bridge is about providing a practical solution to complex routing challenges. It’s designed to enhance the user’s ability to work with diverse audio sources, improving audio production’s creative and technical aspects.
How to Use Pro Tools Audio Bridge
Using Pro Tools Audio Bridge begins with setting up virtual Input/Output (I/O) channels within Pro Tools. This setup is crucial for connecting Pro Tools and external applications or hardware devices.
Therefore, here’s how you can effectively implement Audio Bridge in your audio production workflow:
Step 1: Open Your I/O Settings
- Launch Pro Tools: First, open your Pro Tools session.
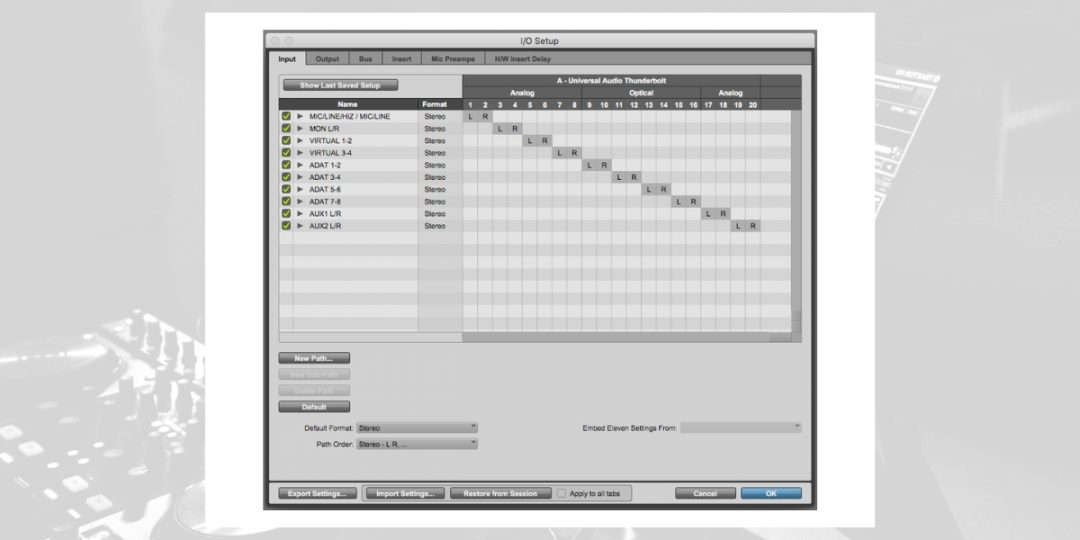
- Access I/O Setup: Next, navigate to the “Setup” menu at the top of the screen and then select “I/O…” from the dropdown menu. This opens the I/O Setup window.
Step 2: Configure Virtual I/O
- Navigate to the I/O Tab: In the I/O Setup window, you’ll see tabs for Input, Output, Bus, etc. Click the “Input” and “Output” tabs to configure virtual channels.
- Create New Paths: Click the “New Path” button (found at the bottom of the window) in both the Input and Output tabs to add virtual channels. Specify the number of channels and their format (mono or stereo).
- Label Virtual Channels: Double-click the name field of each new path to rename it. Use descriptive labels that indicate the channel’s purpose or connected device/application.
Step 3: Assign External Connections
- Assign Output to External Applications: In the Output tab, route the virtual outputs to your external software instrument or hardware processor by selecting it as the destination for the audio signal.
- Assign Input from External Sources: In the Input tab, ensure the virtual inputs are ready to receive audio from your external applications or devices. This creates a return path into Pro Tools.
Step 4: Test Your Setup
- Route Audio in Pro Tools: Assign your Pro Tools session tracks to the newly created virtual outputs and inputs. This might involve setting a track’s output to one of the virtual outputs connected to an external processor.
- Play External Audio: Activate your external source or play audio from the software instrument to send audio through the virtual output.
- Verify Audio Reception: Ensure the corresponding Pro Tools track with the virtual input is receiving the audio. Adjust levels and verify the signal flow.
Step 5: Use in Your Projects
- Record External Instruments: Arm a track for recording that’s set to receive from a virtual input channel. Play the external instrument or output from another application to record directly into Pro Tools.
- Process Tracks with External Effects: Route audio from a Pro Tools track to an external processor via a virtual output and then back into Pro Tools via a virtual input to apply external effects.
- Integrate Audio from Other Software: Use virtual outputs to send Pro Tools tracks to other software for additional processing and route them back via virtual inputs.
Customizing Your Audio Bridge Drivers
Customizing the Audio Bridge drivers may be helpful to ensure your system is optimized for your specific audio production workflow. For instance, Audio Bridge allows you to adjust settings like buffer size, sample rate, and I/O configurations to match the unique requirements of your projects.
Whether you’re dealing with latency issues during recording sessions, require specific sample rates for compatibility with external hardware, or need to configure your inputs and outputs for efficient signal routing, adjusting your Audio Bridge drivers is key.
For this reason, these adjustments help minimize latency and ensure high-quality audio. They help maintain smooth integration between Pro Tools and external applications or devices.
To this end, here’s how to customize your Audio Bridge drivers for optimal performance:
Step 1: Access Driver Settings
- Open Pro Tools: Start your Pro Tools session.
- Navigate to Setup: Go to the “Setup” menu and select “Playback Engine.” This is where you can access and adjust your Audio Bridge driver settings.
Step 2: Adjust Buffer Size
- Find Buffer Size Settings: In the Playback Engine settings, locate the “Hardware Buffer Size” option.
- Select Appropriate Size: Choose a buffer size that balances latency and system performance. Smaller sizes reduce latency but may increase CPU load, while larger sizes do the opposite.
Step 3: Set Sample Rate
- Locate Sample Rate Option: Find the “Sample Rate” setting in the Playback Engine settings.
- Choose Sample Rate: Select a sample rate that matches your project requirements and external gear capabilities.
Step 4: Configure I/O Settings
- Revisit I/O Setup: Go back to the “Setup” menu and select “I/O…” to open the I/O Setup window.
- Adjust I/O Configurations: Customize your Input and Output settings to align with your Audio Bridge connections, ensuring optimal compatibility and performance.
How To Remove Pro Tools Audio Bridge
There may come a time when you need to remove the Pro Tools Audio Bridge from your system. This could be due to troubleshooting issues, system maintenance, or a change in your audio routing setup.
Removing the Audio Bridge is a straightforward process. Still, carefully following the proper steps is crucial to ensure the feature is completely uninstalled without affecting the rest of your Pro Tools installation.
Likewise, this removal process can help resolve conflicts, free up system resources, or prepare your system for a fresh installation of the Audio Bridge.
Here’s how to properly remove Audio Bridge from your computer:
Step 1: Close Pro Tools
- Ensure Pro Tools is completely shut down before uninstalling the Audio Bridge. This generally prevents any issues or conflicts during the uninstallation process.
Step 2: Uninstall Audio Bridge
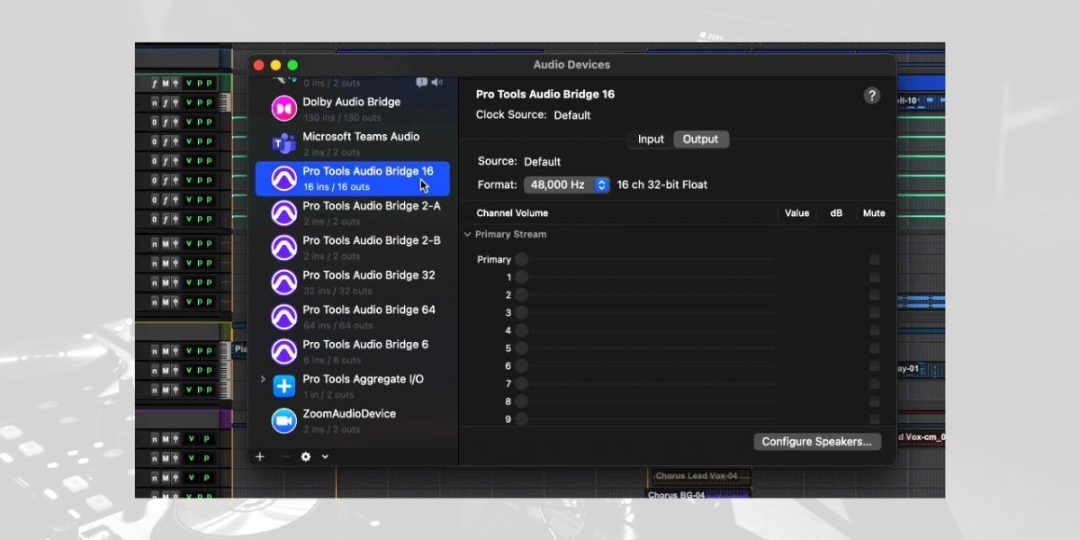
- Access Control Panel (Windows) or System Preferences (Mac): To Begin, navigate to the section where you can uninstall programs (Windows) or the Audio MIDI Setup (Mac). This step is crucial for accessing the system-level settings where the Audio Bridge can be removed.
- Select Pro Tools Audio Bridge: Next, find the Pro Tools Audio Bridge listing in the installed programs or audio devices. This may be listed under Avid products or as Pro Tools Audio Bridge.
- Initiate Uninstall: Finaly, follow the prompts to uninstall or remove the Audio Bridge from your system. This step typically involves confirming that you want to remove the software and may require administrative permissions.
Step 3: Confirm Removal
Later, after uninstallation, restart your computer to ensure the changes take effect and the Audio Bridge is completely removed.
A system restart is equally important in clearing any residual configurations and ensuring that your audio settings in Pro Tools revert to their default state without the Audio Bridge.
You can remove the Pro Tools Audio Bridge from your system by carefully following these steps.
Download our most popular resource: 6 Steps for Creating Radio Ready songs to learn the fundamentals of what goes into a professional mix from renowned Producer, Songwriter & Mixer Warren Huart, who has worked on several Grammy-nominated albums!
Troubleshooting Common Issues with Pro Tools Audio Bridge
When working with Pro Tools Audio Bridge, you may encounter several common issues that affect your workflow sooner or later. Identifying and resolving these issues promptly ensures you maintain a seamless and efficient production environment.
For this reason, here’s how to address some of the most frequent challenges you may face with Audio Bridge:
Issue 1: Routing Errors
Routing errors occur when audio doesn’t travel as expected between Pro Tools and external devices or applications. This can disrupt your workflow and affect your project’s output. For the purpose of avoiding these disruptions, here’s how to resolve these issues.
- Check Virtual I/O Configurations: Revisit your I/O Setup in Pro Tools to ensure all virtual channels are correctly configured and labeled. Proper configuration is essential for clear and correct audio routing.
- Verify External Connections: Ensure external devices or applications are correctly assigned to the corresponding virtual I/O channels. This step is crucial for establishing a reliable audio connection between Pro Tools and external sources.
Issue 2: Compatibility Problems
Compatibility issues can also arise from outdated software or drivers, potentially leading to system instability or incompatibility with external hardware/software.
- Update Drivers and Software: Keep all your drivers, including those for Pro Tools and external hardware/software, up to date. This ensures compatibility and can prevent many issues before they arise.
- Check Compatibility Lists: Avid provides compatibility information crucial for ensuring your external hardware/software works seamlessly with Pro Tools. Certainly, refer to these lists to avoid compatibility problems.
Issue 3: Performance Bottlenecks
From time to time, performance bottlenecks, such as high CPU load or latency, can severely impact the efficiency and responsiveness of your Pro Tools session.
- Adjust Buffer Size: Increase the buffer size in the Playback Engine settings to alleviate CPU load at the expense of increased latency. Finding the right balance is critical to optimizing performance.
- Optimize System Performance: Lastly, close unnecessary applications and background processes to free up system resources. This optimization can significantly improve the performance of Pro Tools and the Audio Bridge.
By addressing these common issues with practical and targeted solutions, you can enhance the stability and efficiency of your Pro Tools Audio Bridge setup.
Closing Thoughts: Crafting Professional Soundscapes with Pro Tools Audio Bridge
In conclusion, Pro Tools Audio Bridge offers a range of capabilities that enhance and are necessary for pushing the boundaries of music production.
From simplifying complex routing to enabling creative explorations, Pro Tools Audio Bridge offers a bridge to uncharted territories of sound design. Therefore, embracing this technology empowers producers and engineers to craft soundscapes with unprecedented depth and clarity, marking a new era in audio excellence.
In essence, with Pro Tools Audio Bridge, the future of sound is at your fingertips. It invites you to explore, innovate, and redefine what’s possible in music and beyond.
To further your journey and mastery of Pro Tools, consider enrolling in The Ultimate Guide to Pro Tools course. This comprehensive and best-selling program is designed to equip you with the knowledge and skills to fully leverage Pro Tools for recording and mixing. To this end, the course is aimed at ensuring you can create professional-grade soundscapes.
Unlock the full potential of Pro Tools and elevate your audio production to new heights today!


