Clip gain in Logic is an important feature for leveling out the volume of an audio region before it goes through any inserts. It’s usually part of the editing process as you prep audio for mixing, though as workflows constantly shift and the lines between recording, editing, and mixing are sometimes blurred, you might find yourself utilizing clip gain at various points throughout a project.
What Is Gain & Why Is It So Important?
Gain is another term we use for volume. It’s quite literally a factor at every stage of the music production process. After you plug in your microphone, you’re adjusting preamp gain to an appropriate recording level in Logic. Once you start editing and mixing, you’re using a combination of clip gain, the input and output gain stages of plugins, and fader levels to balance all the elements of a mix.
- RELATED: Basic Level Mixing in Logic Pro X
- RELATED: Using EQ in Logic Pro X
All of this is to stay below 0dBFS, both on individual tracks and the master, to avoid clipping. When you hear the phrase “gain staging,” it refers to the delicate task of ensuring an appropriate volume level at every point in the signal path — starting, of course, with your microphone/preamp, going into the recorded waveform, through all inserts, to the track fader, to a possible group or bus, and to the master output. Gain is everywhere!
Clip Gain Basics: What Is Clip Gain in Logic Pro?
Once we understand the basics of clip gain in Logic, we can start to realize how useful it is overall. For example, in a fast-paced environment, it’s quite common to see an engineer tracking and adjusting clip gain on the fly so that each recorded section of a performance is roughly equal in volume — incredibly handy for vocal overdubs.
This is a sort of “edit as you go” mentality that drastically speeds up the process, so when an artist leaves the booth, the tracks are just about ready for the next stage — mixing. That’s just one instance of how you can use clip gain to enhance your workflow while recording.
Download our most popular resource: 6 Steps for Creating Radio Ready songs to learn the fundamentals of what goes into a professional mix from renowned Producer, Songwriter & Mixer Warren Huart, who has worked on several Grammy-nominated albums!
What Is Clip Gain Useful For?
We mentioned one example of how clip gain can be super useful in the middle of a recording session. Performances can be very dynamic, even with compression, so you want to try to balance the levels to each other as tracks come in.
Clip gain is also a major part of the editing process. If you have the luxury of time (i.e., your client doesn’t expect you to track and mix an entire song in a short period of time), you can go in and use clip gain to manually balance all of your levels before any plugin processing at all. It’s also very common to use clip gain on vocals to manually reduce plosives and sibilance before going into any EQ or de-essers.
You’ll also find clip gain useful for giving yourself headroom when you receive a multitrack from a client for mixing. You can quickly gain down all of the tracks to a reasonable working level that isn’t clipping the master.
Clip Gain vs. Volume Automation: What’s the Difference?
The main difference between clip gain and automation is where they’re at in the signal path. Clip gain affects the actual recorded waveform level, so it’s the first gain stage in the signal path. Volume automation, on the other hand, adjusts the track’s fader. That’s post-clip gain and post-inserts, on its way to a bus/group, and/or the master.
How to Use Clip Gain in Logic Pro
Clip Gain Info Folder
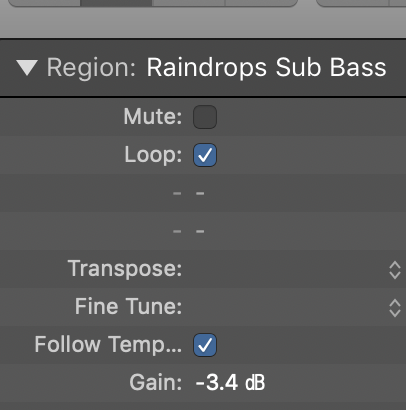
Region-specific clip gain lives in the selected region’s Inspector panel (to open it, simply use “I” on the keyboard with a clip/region/track selected). Here you can navigate down to the Gain setting, pictured above and arbitrarily set to -3.4 dB on an audio clip we have named “Raindrops Sub Bass.”
Decreasing & Editing Clip Gain
After you’ve made a selection that you want to use clip gain on, just keep that Inspector panel open and use your mouse to drag up/down the gain setting to the desired level. That’s that! You should see the waveform change size based on the adjustments you’ve made.
Final Thoughts on Using Clip Gain in Logic Pro
Clip gain is a standard feature of every DAW, including Logic Pro. You should get accustomed to using it frequently; as the first volume stage in the signal path, it plays a huge role in adequate gain staging. Not only that, but it’s a great way to fine-tune your volume without relying too heavily on the track’s final output at the fader stage.
If you found this information useful, we recommend taking a quick look at our Music Production in Logic Pro X with Rob Mayzes if you’d like to learn more about Logic Pro.


