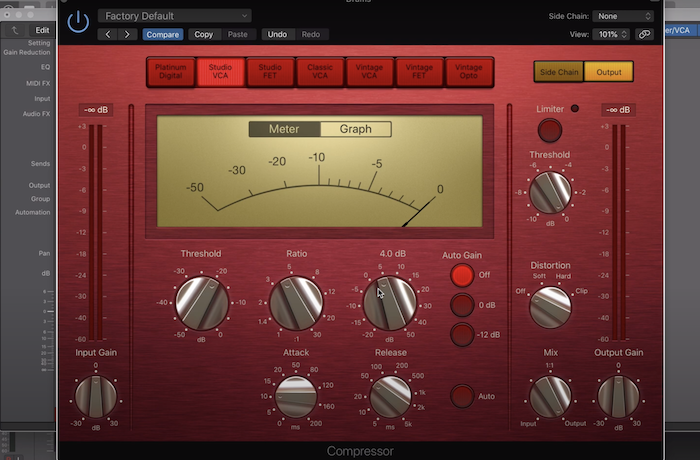
The stock Logic Pro X compressor is one of the DAW’s hallmark features. A bit overwhelming at first glance, this 7-in-1 Swiss army plugin models itself on the best-of-the-best in classic analogue compression.
Learning how to use compression is one of the most important mixing skills you can acquire. Compression is all over mixes. Thankfully, Mark Goslett has leant his expertise, demystifying one of the most misunderstood pieces of studio gear.
Who is Mark Goslett?
Mark Goslett is a London-based music producer and member of the Music Producers Guild. Mark’s pursuit of excellence in the studio, and decades of work as a musician, has brought him to the forefront of the music industry, where his credits include TV commercials; emerging artists; and a ton of live sound experience.
He’s also an expert in Apple’s Logic Pro X software, and here he shows us what Logic Pro’s stock compressor is all about!
Logic Pro X Compressor

Mark dives deep into the feature-rich stock Logic Pro X compressor in this tutorial. For now, we’ll focus on defining some of the most important parameters you’ll find on virtually every compressor.
Ratio
Ratio settings generally range from 2:1 all the way to 10:1. At 10:1, your compressor has become a limiter, which we won’t delve into just yet. A compressor’s ratio setting is exactly that; it represents a relationship between input signal and output signal.
At 2:1, an input signal of 2 dB will output at 1 dB. An input signal of 10 dB will output as 5 dB, and so on. At a 2:1 ratio, your input signal is being reduced by a factor of 2.
The ratio determines how much a sound is being reduced in volume, i.e., compressed. However, a compressor isn’t working 100% of the time. Gain reduction isn’t applied until the input signal surpasses a user-determined threshold.
Threshold
A compressor doesn’t begin compressing until the input signal goes above its threshold. For example, if we set a compressor’s threshold to -18 dB, nothing below -18 dB will trigger the compressor. Any sound louder than -18 dB will then tell the compressor to start applying gain reduction.
Threshold tells the compressor when to turn on, and ratio determines how much gain reduction to apply.
Generally speaking, we use compression to catch the loudest peaks in our dynamic material. So, setting a threshold that catches and reduces those peaks to make our track level more consistent is the best way to begin. Be thoughtful with threshold; if it’s too high, the compressor won’t do anything at all.
Attack
So far we’ve learned that the ratio dictates how much our input signal is reduced after it passes the threshold. But what exactly happens when the signal does surpass the threshold? Does gain reduction immediately kick in? Not necessarily.
The attack setting controls how much time it takes the compressor to apply gain reduction after the input signal passes the threshold. If we set the attack time to 5 ms, it will take 5 ms for gain reduction to apply after the input signal passes our -18 dB threshold.
Setting the attack time will vary from instrument to instrument, and even from song to song based on tempo and a variety of other factors. Most of the time, slower attack times work well; think somewhere between 20 and 40 ms. A slow attack means the entire note will be compressed after it passes the threshold, rather than just the initial transient. If you want to crush fast transients, say on a snare of rapidly-picked guitar, fast attacks do the trick.
Release
Release is another time setting that determines how quickly the compressor turns off after the signal drops below the threshold. Again, this is a very important setting that ultimately determines how the compression will sound.
If the release is too quick, the audio will start to sound unnatural. If it’s too slow, the compressor never shuts off. Typically with the release time, it’s advised to adjust it until it feels right with the pocket of the sound. A good starting point is somewhere around 60 ms. Where you go from there will depend on the overall rhythmic feel and tempo of the song itself.
Makeup Gain
Because compressors actively reduce volume as determined by the ratio/threshold, our overall track level will be lower than before we applied compression. The easy solution to add back some of the gain that’s been reduced by using the compressor’s “makeup gain” or “output” control.
A general rule of thumb is to increase the makeup gain until the level coming out is equal to the level going in. Or, you can push the makeup gain even more to get more overall level out of a track.
Compression Tutorial
If we haven’t stressed it enough, the Logic Pro X compressor is an incredible plugin. You’ll have a blast experimenting with its different emulations, like the iconic 1176 (Studio FET) or the LA-2A (Vintage Opto).
Have a look at Mark’s in-depth tutorial to understand compression, when and how to use it, and how it can change the way you mix for the better!


