Crafting the perfect mix is akin to painting with sound, where each stroke influences the final masterpiece. Learning how to fade in Pro Tools stands out as an essential skill for adding depth and emotion to your tracks. Think of it as the subtle art of making an entrance or exit, not with a bang, but with a graceful arc of sound that can either draw your listeners in or gently let them go. As we navigate through the nuances of fades and prepare your tracks for that polished touch, you’ll find that this technique is not just about volume control but storytelling.
So, let’s gear up to give your music the grand entrance — and exit — it deserves.
Embracing The Power of Fades in Pro Tools
Fades play a pivotal role in music production, enabling seamless transitions between tracks or sections. In Pro Tools, utilizing fades enhances the song and polishes your final mix, making it sound professional.
Fades can soften abrupt starts or ends, blend overlapping tracks, and add a dramatic effect to your music. Mastering fades elevates the emotional impact and clarity of your projects.
This skill is essential for a subtle intro, a smooth transition, or a gentle outro.
- RELATED: Basic Volume Automation in Pro Tools
Preparing Your Tracks for Fading in Pro Tools
Before we explain how to fade in Pro Tools, you should know how to prepare your tracks for fading. This preparation includes organizing your session and ensuring clean, clear audio regions.
Begin by trimming any unnecessary silence or noise from the start and end of your tracks. Label each track and clip clearly for easy navigation. Also, check the alignment of your tracks; proper alignment ensures that fades will occur precisely where you intend.
Lastly, make a backup of your session. This step protects your original recordings, allowing you to experiment with fades without hesitation.
Selecting the Right Segments for Effective Fades
Choosing where to apply fades is as crucial as how you apply them. Here are steps to help you select the right segments:
- Listen Closely: Play through your track and identify any abrupt or harsh transitions. Note these as potential spots for fades.
- Consider the Emotion: Determine what emotional impact you want at each part of your song. A fade-in can build anticipation, while a fade-out can offer a sense of closure.
- Overlap for Crossfades: If blending two tracks, look for segments where they can naturally overlap. This overlap is your crossfade area.
- Mark Your Edits: Use Pro Tools’ marker function to pinpoint exactly where you intend to apply fades.
How to Fade in Pro Tools: A Step-By-Step Guide

Fading in Pro Tools transforms raw recordings into polished pieces of music. Let’s take a look at how to fade in and out in Pro Tools.
#1) Creating a Simple Fade-In for Your Track
Creating a fade-in in Pro Tools is a straightforward process that gently introduces a song or section. Here’s how to do it:
- Select Your Region: Identify the start of the track or section where the fade-in will begin. Click at the beginning of this region.
- Choose the Fade Command: Navigate to the “Edit” menu, select “Fades,” then choose “Create Fade In.”
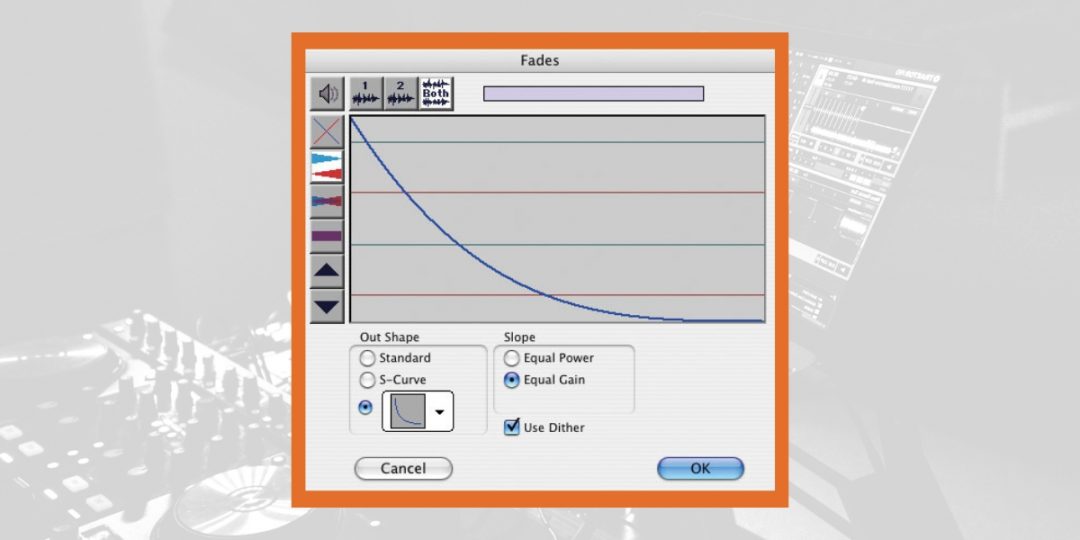
- Customize the Fade: Use the Fade dialog box to adjust the length and curve of your fade-in. A longer fade creates a more gradual introduction, while the curve affects how the sound enters.
- Apply and Listen: Click “OK” to apply the fade after setting your preferences. Play the track to ensure the fade-in meets your expectations.
#2) Executing a Perfect Fade-Out to End Your Mix
A fade-out can gracefully conclude your song or section. Follow these steps to create a flawless fade-out:
- Identify the Endpoint: Decide where you want your track or section to start fading out. This is usually at the end.
- Open the Fade Menu: Similar to creating a fade-in, go to “Edit,” select “Fades,” and then “Create Fade Out.”
- Adjust Fade Settings: In the Fade dialog box, you can adjust the duration and shape of the fade-out. Longer fades offer a more drawn-out conclusion, while the curve shape will dictate the sound’s diminishing pattern.
- Finalize Your Fade: Click “OK” to apply. Review the fade-out by playing back the end of your track to ensure it aligns with your vision.
Advancing Your Skills with Crossfading
Crossfading in Pro Tools is a slightly more advanced technique that allows for smoother transitions between clips. It allows you to blend sounds seamlessly or transition between tracks cleanly.
What Is Crossfading?
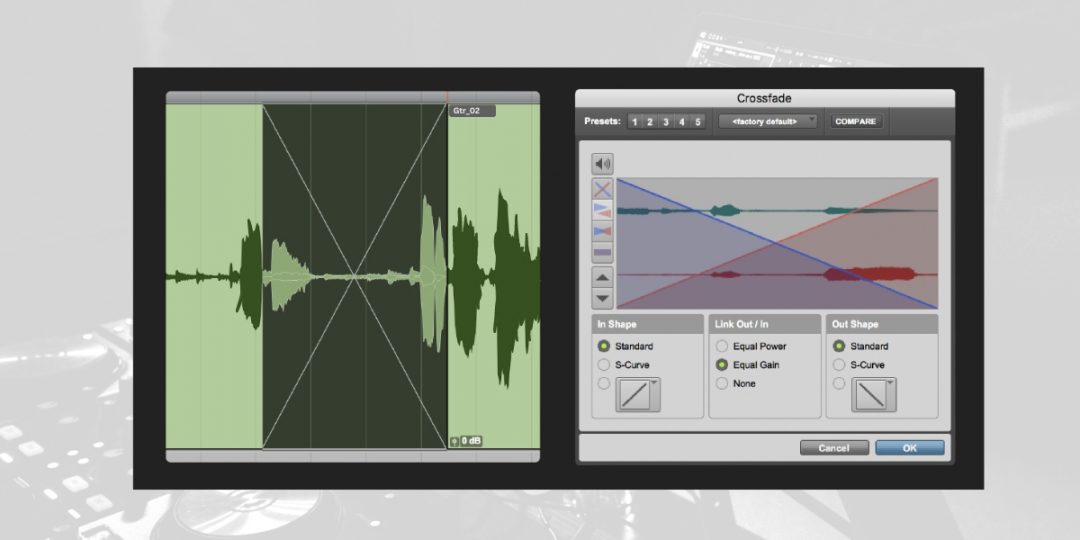
Crossfading refers to the process of gradually decreasing the volume of one track while simultaneously increasing the volume of another, creating a smooth transition between two pieces of audio.
In music production, crossfading is often used to blend songs in a playlist or merge different sections of a track. It’s a fundamental skill for ensuring coherent transitions and enhancing the overall flow of music.
Understanding crossfading’s role is the first step toward utilizing its full potential in your mixes.
How to Crossfade in Pro Tools
 Executing a crossfade in Pro Tools can significantly enhance the fluidity of your music. Follow these steps to create a crossfade between two audio clips:
- Overlap Your Clips: Position two audio clips on the same track so that their ends and beginnings overlap where you want the crossfade to occur.
- Select Both Clips: Click and drag to highlight the area where the clips overlap. Ensure both clips are selected.
- Create the Crossfade: Navigate to the “Edit” menu, select “Fades,” then choose “Create Crossfade.” Alternatively, use the keyboard shortcut (Cmd+Ctrl+F on Mac or Ctrl+Start+F on Windows).
- Customize the Crossfade: A dialog box will appear, allowing you to adjust the crossfade’s length, shape, and symmetry. Each parameter influences the smoothness and audibility of the transition.
- Apply and Review: Click “OK” to apply the crossfade. Play back the section to ensure the transition meets your expectations.
Mastering how to crossfade in Pro Tools smooths out transitions and equips you with a versatile tool for creative expression.
Tips for Smooth Fades and Crossfades
In professional audio production, it is key to ensure that fades and crossfades sound natural and enhance the listening experience. This section offers valuable tips on refining these transitions in Pro Tools, focusing on the importance of fade curves and the efficiency of using fade presets.
Adjusting Fade Curves for Natural Sounding Transitions
The shape of your fade curve can dramatically affect the feel of your transitions. Here’s how to adjust fade curves for the most natural sound:
- Open the Fade Dialog: After creating a fade or crossfade, double-click it to open the Fade dialog box.
- Explore Curve Options: Pro Tools offers several curve shapes, from linear to more exponential curves. Linear fades maintain a constant rate of change, while exponential and logarithmic curves can start or end more abruptly.
- Customize the Curve: Experiment with different curves to match the transition’s feel to the emotion or pace of your track. You can adjust the curve by dragging its handles or selecting a preset shape.
- Listen and Refine: After applying the curve, listen back to the transition. It may take several tries to find the perfect curve that sounds the most natural.
By carefully selecting and adjusting fade curves, you can achieve transitions that feel intuitively right and blend seamlessly into the overall mix.
Utilizing Pro Tools’ Fade Presets for Efficiency
Pro Tools’ fade presets can streamline your workflow and maintain consistency across your project. Here’s how to make the most of them:
- Access Fade Presets: When you open the Fade dialog box, you’ll find preset options for fade-ins, fade-outs, and crossfades. These presets offer commonly used curve shapes and lengths.
- Apply a Preset: Select a preset that closely matches your desired effect. Presets can be a great starting point, especially for standard fades.
- Customize as Needed: Even after selecting a preset, you can still adjust the fade’s parameters. Use this feature to fine-tune the fade’s length and curve to fit your specific needs.
- Save Custom Presets: If you often use a particular fade shape or length, save it as a custom preset. This feature saves time and ensures consistency in your projects.
Leveraging Pro Tools’ fade presets can speed up your editing process while helping easily achieve a polished, professional sound. Combining these presets with customized adjustments can efficiently create smooth and natural-sounding transitions in all your projects.
Download our most popular resource: 6 Steps for Creating Radio Ready songs to learn the fundamentals of what goes into a professional mix from renowned Producer, Songwriter & Mixer Warren Huart, who has worked on several Grammy-nominated albums!
Troubleshooting Common Fading Issues
Even with a solid understanding of fading techniques, you may encounter issues that can affect the quality of your mixes. This section addresses common fading problems and offers solutions to ensure smooth transitions and that your tracks maintain their intended impact.
Overcoming Obstacles with Fade Length and Transition Points
When fades don’t sound right, the length of the fade or the chosen transition points may be the culprits. Here’s how to troubleshoot:
- Reevaluate Fade Length: Adjust the length if a fade feels too abrupt or too drawn out. Shorten the fade for a quicker transition or extend it for a smoother, more gradual change.
- Adjust Transition Points: Sometimes, the issue lies in where the fade begins or ends. Move the start or end point of the fade slightly to find a more natural-sounding transition.
- Experiment with Curves: Changing the fade curve can also resolve issues. If the transition feels unnatural, try a different curve shape to see if it better suits the audio.
- Listen in Context: Always listen to the fade within the context of the entire track or project. This ensures that the fade complements the overall mix, not just in isolation.
Addressing these aspects can significantly improve the effectiveness of your fades, ensuring they contribute positively to your mix’s dynamics and emotional expression.
- RELATED: How To Reverse Audio In Pro Tools
Conclusion: Elevating Your Mixes with Expert Fading Techniques
Learning how to fade in Pro Tools is essential for any audio professional looking to produce polished, engaging mixes. By embracing the power of fades, carefully preparing your tracks, and executing fades and crossfades with precision, you can enhance your projects’ emotional impact and clarity.
Remember, the key to successful fading lies in practice and experimentation. With each project, you’ll gain a deeper understanding of how fades can shape the listening experience, allowing you to make more informed decisions and creative choices.
For those looking to dive deeper into the world of Pro Tools, our Ultimate Guide To Pro Tools is the ultimate masterclass. It covers everything from the basics of the digital audio workstation to advanced recording and mixing techniques.
This comprehensive course is designed to equip you with the knowledge and skills necessary to fully harness the power of Pro Tools. It helps ensure that your mixes sound great and resonate with your audience.
Enroll today to begin your journey toward audio excellence with confidence!


