Nudging tracks is oftentimes a tiny detail that can actually make a significant difference in the overall outcome of a mix. Understanding how to nudge tracks or selected regions in Logic Pro X is a basic and easy-to-learn skill that will take your productions over the top.
What Is Nudging a Track in Logic Pro?
When we nudge a track or region/clip, we’re referring to moving it left or right in time by a small chosen degree. It can help tremendously when we need things to jell or just feel more naturally in the pocket as opposed to completely stuck on the grid.
- RELATED: Basic Level Mixing in Logic Pro X
- RELATED: How to Insert Arrangement Markers Section in Logic Pro X
Especially with quantized MIDI data, where everything lines up perfectly to a beat or subdivision that we’ve selected, we sometimes notice that perfection just isn’t quite right for the groove. Certain data here or there might be right on the grid, just not in the right place for the overall feel. Moving tracks, regions, or even individual MIDI entries or audio segments is a fine way of editing to make things more cohesive.
When Is It a Good Idea to Use Nudge?
Nudging which regions and where is ultimately up to the discretion of the editor. This can be a very subjective edit in many cases, and it can serve as a quick means of adjusting a note here or there. The general idea is that you can use the nudge feature in Logic Pro X to fine-tune the timing of a track, whether that’s to get it more or less aligned to the grid.
Download our most popular resource: 6 Steps for Creating Radio Ready songs to learn the fundamentals of what goes into a professional mix from renowned Producer, Songwriter & Mixer Warren Huart, who has worked on several Grammy-nominated albums!
How To Nudge Tracks in Logic Pro X
Step #1: Select the Tracks You Want to Nudge
First, you’d want to select the track or individual region(s) you’d like to nudge. This is done easily by left-clicking the track from the track list to select all of the audio/MIDI associated with it, or by left-clicking specific regions to highlight them.
In lots of cases when it comes to using the nudge function, we want to pinpoint specific regions, sometimes even splitting them up into even smaller regions to make fine adjustments to a piece of audio or MIDI. Selection is the first key step.
Step #2: Set the Nudge Value

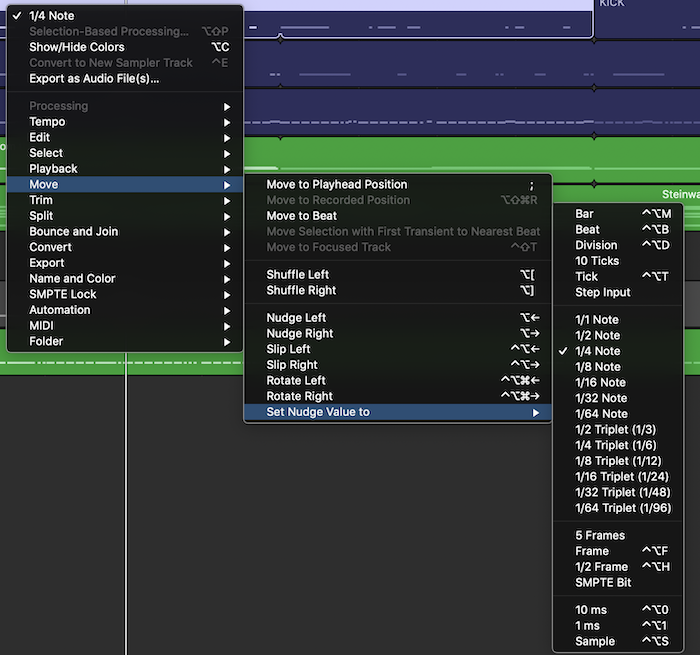
With our selection made, we can now set the nudge value. Simply right-click the selected region to open a large list of tools. Navigate over to the Move menu, and find “Set Nudge Value to” at the bottom of the list. This will open another list where you see all of the available values.
Step #3: Nudge the Tracks Forward or Backward
With the value chosen, you can now move the selected region(s) forward or backward on the timeline. Hold the [Option] key and use the left or right [Arrow] keys to move the region earlier to later respectively.
Can I Nudge Multiple Regions at the Same Time?
Finally, a very common question is whether it’s possible to nudge multiple regions at the same time. You can absolutely nudge multiple regions simultaneously, and you can even make selections of multiple regions across different tracks and nudge them together. Logic Pro X makes this editing task extremely accessible for fine edits on the timeline.
Looking for More Logic Pro Tutorials?
Producing great-sounding songs can be difficult if you don’t know how to use your DAW correctly. A Beginners Guide To Music Production in Logic Pro is one of our most popular courses and will teach you the foundational skills that you need to record and mix better songs in Logic Pro. Check it out today!


