The first step in capturing audio or MIDI in Reaper is to record arm the track. We’ll cover the basics of preparing to record, which is probably why you downloaded Reaper in the first place! Thankfully, this streamlined, efficient, and powerful DAW makes it easy to hit the ground running.
What Is Record Arming in Reaper?
Record arming is essentially just selecting a track on which you want to record audio or MIDI. Without a specific track selection, Reaper doesn’t know which input(s) to pull from your audio interface or MIDI sources to commit to disk. If you simply press record in the transport window without arming a specified track, you won’t be able to record.
This is not only a standard Reaper function, but a DAW standard across the board. Another way to think of recording arming is that it’s a means of choosing the source of the audio or MIDI, as well as its destination once you’ve begun recording.
Download our most popular resource: 6 Steps for Creating Radio Ready songs to learn the fundamentals of what goes into a professional mix from renowned Producer, Songwriter & Mixer Warren Huart, who has worked on several Grammy-nominated albums!
When Do You Need to Record Arm a Track?
You’d need to record arm a track in Reaper whenever you want to capture a take. It’s a preliminary step that lets you know which track, or tracks, are live and ready to go.
- RELATED: Creating a New Project in Reaper
Arming to record is sort of like a safety feature that ensures you don’t record over material on other tracks. Imagine each time you press record and the DAW starts to print audio (or empty audio) over previously recorded tracks. That would be a nightmare! Record arming is there to make sure you know exactly from where, and to where, you’re recording audio/MIDI.
How to Record Arm a Track in Reaper (Step-By-Step Guide)
Step #1: Click the “Record Arm” Button

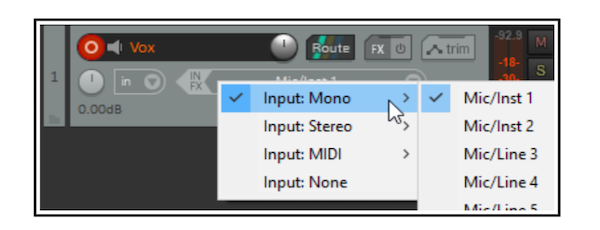
In Reaper, arming a track to record is as simple as clicking the corresponding button on the track you wish to use. Pictured above is the record arm button, displayed as a red circle with a smaller white inner circle. After you’ve clicked the button, it will highlight a brighter red to indicate that it’s now been armed. The image above represents a track that has already been armed.
Step #2: Select Track Input(s)
After you’ve armed the track, you’ll want to select the correct input from which it will receive audio or MIDI. This is dependent on the hardware you have. A basic audio interface with two inputs will let you record on either Mic/Inst 1 or Mic/Inst 2 based on where you’ve connected a microphone or instrument.
Can I Record Arm Multiple Tracks at Once?
Yes! Reaper offers multitrack recording capabilities limited only by your hardware. You could hypothetically arm and record as many tracks simultaneously as needed.
How to Record Arm Multiple Tracks
The easiest way to record arm multiple tracks is to select the first track in the edit window, and [Shift] + Click the last track within the range of tracks you want to arm. This will highlight all of the tracks within the selection. From here, simply press the record arm button on any of the selected tracks to arm them all.
What Does It Mean to Auto Record Arm?
Auto record arm means that any time you select a given track, it will automatically arm itself for recording. This can save a lot of time when you’re bouncing back and forth between different instruments, such as vocals, acoustic guitar, and perhaps a MIDI instrument. Whenever you’re ready to record one or the other, all you have to do is select the track and it will automatically arm itself.
To set up auto record arm, right-click the record arm button of the corresponding track. This will open up a menu from which you can toggle a setting, near the bottom of the list, called “Automatic record arm when track selected.” And that’s it!
Looking for More Reaper Tutorials?
We have a variety of Reaper tutorials on Pro Mix Academy that you can access for free, both in the Reaper tutorials section of our blog, as well as in the Reaper playlist on our YouTube channel. These tutorials can be helpful when you’re getting started, but the quickest way to become a Reaper master is by taking step-by-step training so you don’t have any gaps in your knowledge. If you want to take the fast track to master Reaper and all it’s amazing power, check out our Ultimate Guide to Reaper with Adam Steel.


