Understanding how to time stretch in Logic Pro can significantly enhance your music production capabilities. This powerful feature allows you to manipulate the timing of audio recordings without altering their pitch, offering creative flexibility in editing music tracks.
In this guide, we’ll explain the basics of time-stretching, explore the tools and features available in Logic Pro, and provide practical steps for effectively applying time-stretching to your projects.
By mastering these skills, you’ll be able to achieve more polished and dynamically interesting music.
Introduction to Time Stretching Techniques in Logic Pro
Time stretching is a powerful technique used in digital audio editing. It enables producers to adjust the length of audio clips without affecting their pitch.
This capability is crucial for aligning tracks in different tempos and experimenting with creative effects. In Logic Pro, users have access to several advanced tools that facilitate precise time-stretching adjustments.
Understanding the Basics of Time Stretching
Time stretching refers to the process of changing the playback speed of an audio clip, effectively making it faster or slower while maintaining its original pitch characteristics. This is essential in music production for tasks like synchronizing drum beats or extending melodies without altering their tonal qualities.
Logic Pro uses sophisticated algorithms to ensure these adjustments are smooth and artifact-free, preserving the quality of the original sound. By learning how these tools function, producers can better manage their projects and enhance the overall sound of their music.
Tools and Features for Time Stretching in Logic Pro
Logic Pro offers a suite of tools designed specifically for time stretching. Each tool within this suite is suited for different types of audio editing tasks. These tools enable producers to manipulate the timing of audio with precision, ensuring high-quality results that sound great.
Using the Flex Time Tool
The Flex Time tool in Logic Pro is a versatile feature that allows detailed manipulation of audio signals. It enables users to stretch or compress audio sections independently of the rest of the track.
This is done by adding ‘Flex Markers’ to the waveform, which can then be dragged to the desired position. These automatically adjust the audio between these markers, making it ideal for precise timing corrections and applying creative audio effects.
The Time and Pitch Machine Feature
The Time and Pitch Machine in Logic Pro offers a powerful solution for broader adjustments. This feature allows users to change the duration and pitch of an entire track or any selected part of it.
By inputting the desired tempo or length, the Time and Pitch Machine processes the audio to fit these parameters. This tool is especially useful for matching the tempo of imported tracks with the project’s tempo or for creating harmonic variations without the need for multiple plugins.
Step-by-Step Guide: How to Time Stretch in Logic
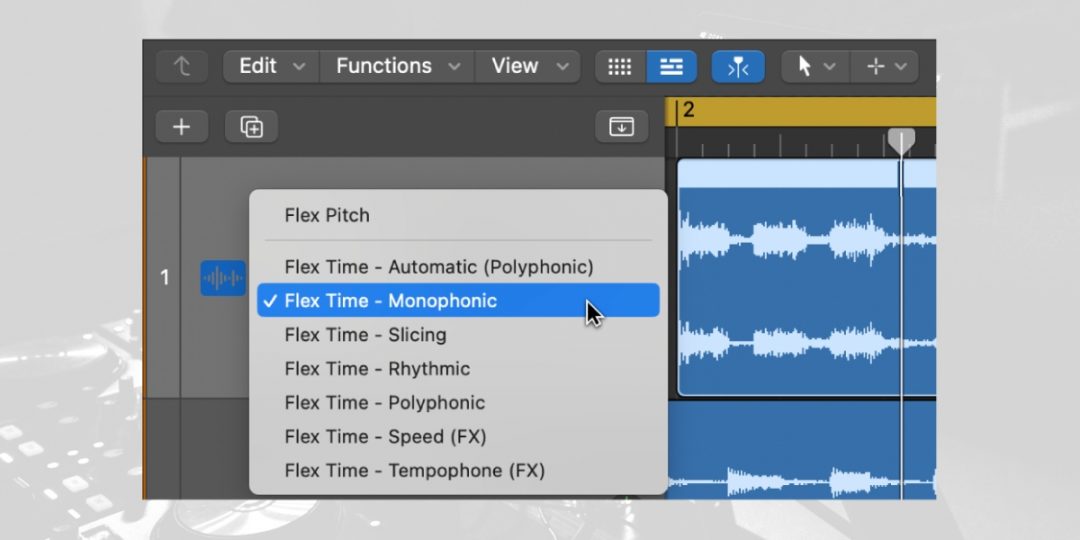 Now, let’s take a look at how to time stretch in Logic Pro, using Logic’s unique features to dial in your sound. From initial setup to fine-tuning parameters, these steps ensure that you achieve the desired audio results with clarity and precision
#1) Setting Up Your Project for Time Stretching
Before you begin time stretching, it’s important to set up your Logic Pro project correctly to ensure optimal workflow and results.
- Create a Backup: Always start by creating a backup of your project to prevent any loss of original material.
- Enable Flex Time: Navigate to the track header, click on the ‘Flex’ button to turn on Flex Time. This activates the time-stretching features.
- Choose the Track Type: Ensure that the track type matches your audio material (e.g., monophonic for single-voice recordings).
- Set the Project Tempo: If you know the target tempo for your stretched audio, adjust the project tempo accordingly.
These initial steps prepare your project, allowing for a smoother and more controlled time-stretching process.
#2) Choosing the Right Time Stretching Mode
Selecting the appropriate Flex Time mode is crucial for achieving great sound quality. Each mode in Logic Pro is designed to handle specific types of audio, which affects how the software processes time stretching.
- Analyze the Material: Begin by assessing your audio to identify its primary characteristics. Is it rhythmic, containing clear beat patterns? Is it monophonic, featuring single vocal or instrumental lines? Or is it polyphonic, with multiple instruments or voices playing simultaneously? This analysis will help which Flex Time mode will best suit your needs.
- Select the Mode: Navigate to the track inspector in Logic Pro and choose a Flex Time mode that aligns with your audio type. Here’s a breakdown of the common modes and their optimal uses:
- Monophonic: Best for audio with single melodic lines without overlap, such as a solo vocal or wind instrument. This mode preserves the quality of solo performances while adjusting timing.
- Polyphonic: Ideal for complex material involving multiple instruments or harmonies. Use this mode when working with full mixes or tracks with many layered elements.
- Slicing: This mode is effective for rhythmic or percussive content. It slices the audio at transient points and allows for time adjustments without affecting the transient sharpness.
- Rhythmic: This mode is similar to Slicing but optimized for audio with a clear rhythmic pattern. It maintains the groove of the original performance while allowing for tempo flexibility.
- Tempophone: Tempophone mode is perfect for dramatic time-stretching effects and textural changes and is suitable for sound design and experimental audio manipulation.
- Test Different Modes: Listen carefully to how each mode impacts your audio. Some modes may introduce artifacts, especially when used on incompatible audio types. For example, using the Monophonic mode on a polyphonic track can create phasing and digital artifacts.
#3) Adjusting Time Stretch Parameters for Optimal Sound
Once you’ve set up your project and chosen the mode, fine-tune the time stretch parameters to perfect the sound.
- Access the Flex Tool: Use the Flex Tool to make manual adjustments directly on the waveform in the main window.
- Adjust Flex Markers: Move the Flex Markers to stretch or compress sections of the audio. Place markers at the start and end of the sections you want to modify to isolate changes.
- Listen and Refine: Continuously play back the audio to assess the impact of your adjustments. Listen for any unnatural sounds or artifacts.
- Use Fade Ins/Outs: To smooth out any harsh transitions, apply fade-ins or fade-outs at the edges of the stretched sections.
Practical Applications of Time Stretching in Music Production
Time stretching is not just a technical tool; it’s a creative asset in music production. It offers a range of possibilities, from enhancing musical expressions to correcting timing inconsistencies in tracks.
This section explores how time stretching can be applied both creatively and as a solution to common recording challenges.
Creative Uses of Time Stretching
Time stretching can transform the texture and mood of a piece, making it an invaluable tool for artists and producers.
- Creating Ambient Textures: Slow down a piece dramatically to use as a lush, ambient background. This technique works well with instrumental sections or isolated vocals.
- Developing New Rhythms: Alter the timing of percussive elements to create unique, syncopated rhythms that give traditional patterns a fresh feel.
- Manipulating Vocal Performances: Stretching vocals can lead to innovative effects, such as elongated, dreamy vocal lines or choppy, rhythmic vocal samples.
- Experimentation: Use extreme stretching to explore sonic landscapes and generate sounds that are entirely new, serving as a basis for electronic music tracks.
Fixing Timing Issues in Recorded Tracks
Correcting timing discrepancies in audio recordings is a critical application of time stretching. It ensures that all elements of a track are rhythmically aligned.
- Identify the Timing Issues: Isolate the track or segment where timing deviations occur.
- Apply Flex Time: Utilize the appropriate Flex Time mode to make precise adjustments to the timing of the track.
- Adjust Individual Notes or Beats: Move the flex markers to correct specific timing errors, aligning them with the desired tempo or rhythm.
- Smooth Transitions: After adjustments, fine-tune the transitions between corrected and uncorrected segments to avoid any noticeable jumps or discontinuities.
By accurately addressing timing issues, time-stretching enhances the overall quality of the music and ensures that all components of the track work harmoniously together.
Advanced Techniques for Time Stretching in Logic Pro
Utilizing advanced techniques involving time stretching and pitch correction can elevate your production to a professional level. Let’s explore how to effectively combine these tools and utilize automation to refine your sound design and mixing process.
Combining Time Stretch with Pitch Correction
Integrating time stretch with pitch correction allows for comprehensive control over audio, making it possible to fine-tune both timing and pitch simultaneously.
- Initial Setup: Use Flex Time to apply time stretching to the desired track. Choose a mode that best suits the audio material.
- Apply Pitch Correction: Add Logic Pro’s Pitch Correction plugin to the track once the timing is adjusted. Set it to the correct key and scale to match the musical context.
- Adjust Pitch Parameters: Fine-tune the response time and strength of the pitch correction to blend naturally with the time-stretched audio.
- Test and Refine: Listen to the track in context with the full mix to ensure that both timing and pitch modifications sound coherent and musical. Make adjustments as needed.
Automation Tips for Time Stretch Effects
Automation in Logic Pro can dramatically enhance the impact and versatility of time stretch effects, especially in dynamic and evolving musical passages.
- Set Up Automation: Open the automation panel in Logic Pro and select the track with the time-stretched audio.
- Choose Parameters: Automate parameters like Flex Time’s speed or the amount of time stretch applied over time. You can also automate pitch if combined with pitch correction.
- Draw Automation Curves: Use the automation curve to gradually change the time-stretching effect throughout the track. This can be used to create build-ups or transitions.
- Refine and Sync: Ensure that the automation is perfectly synced with other elements of the track. Adjust the timing and intensity of automation points for a smooth and integrated sound.
Download our most popular resource: 6 Steps for Creating Radio Ready songs to learn the fundamentals of what goes into a professional mix from renowned Producer, Songwriter & Mixer Warren Huart, who has worked on several Grammy-nominated albums!
Closing Thoughts
Learning how to time stretch in Logic Pro allows the flexibility to creatively manipulate audio and align tracks with precision. These time-stretching techniques are essential for any producer looking to craft sound with meticulous control and inventive flair.
As you continue to explore these tools, you’ll find these skills significantly enhance the dynamics and quality of your projects.
If you’re ready to elevate your music production expertise, we recommend enrolling in our course, Music Production in Logic Pro X with Rob Mayzes. This masterclass covers comprehensive aspects of Logic Pro X, from foundational techniques to advanced mixing strategies, ensuring you develop polished and professional-sounding mixes.
Explore these possibilities today and transform the way you produce music today!

