Welcome to this comprehensive guide on how to create a Reaper split stereo track. Splitting tracks is a key audio editing technique for isolating elements and making precise adjustments. This makes it a vital skill for enhancing your recordings.
This tutorial will explain splitting stereo tracks in Reaper, equipping you with essential audio editing skills. We’ll begin by exploring the basics of track splitting before delving into the step-by-step instructions for splitting Reaper stereo tracks.
Mastering Track Splitting in Reaper
Mastering track splitting in Reaper involves understanding and utilizing multitrack recording. This process puts the audio engineer in control. It allows precise adjustments to individual tracks. This is crucial for achieving the desired sound quality and artistic vision.
By mastering track splitting, you gain the ability to fine-tune each element of your audio, whether it’s reducing the volume of a dominating bass line or adding effects to specific instruments without affecting others.
This skill is not just about technical know-how. It’s also about creative control, enabling you to experiment with different arrangements and effects.
Renowned artists like The Beatles and Pink Floyd have historically utilized multitrack recording to create their iconic sounds, proving its effectiveness in music production.
Understanding Stereo and Mono Tracks in Audio Production
The distinction between stereo and mono tracks is crucial in audio production.
Stereo tracks contain two separate audio channels, providing a sense of spatial dimension and depth. In contrast, mono tracks consist of a single audio channel, offering a more focused and centralized sound.
Understanding this difference is essential when splitting tracks in Reaper, as it affects how the sound is perceived and manipulated. For instance, when working with a stereo track, you might split it into two mono tracks for more precise control over each channel.
This splitting process is critical for both creative and technical reasons. It enhances the overall quality and flexibility of the audio production. The concept of multitracks, which refers to recording each element of the mix individually, further adds to the complexity and creative possibilities in audio engineering.
Understanding these concepts forms the basis for effectively splitting and manipulating tracks in Reaper. It enables you to transform your audio projects with professional finesse.
Reaper Split Stereo Track: Step-by-Step Tutorial
Splitting stereo tracks into dual mono in Reaper allows for more detailed control and processing of each channel. This functionality is vital when you need to apply different effects or processes to each side of a stereo track. It’s also helpful when there’s an imbalance between the left and right channels.
Here’s a step-by-step breakdown of how to create Reaper split stereo tracks.
Step #1) Identifying the Stereo Track You Want to Split in Reaper
- Select the Track: Locate the stereo track you wish to split. This could be a track with imbalanced audio channels or one that requires different processing for each channel.
- Assess the Audio: Listen to the track and decide what you need from each channel after the split. This step is crucial for planning your subsequent editing process.
- Prepare for Splitting: Ensure that the track is not locked or grouped with other tracks, as this could affect the splitting process.
Step #2) Accessing the Track’s Channel Settings in Reaper
There are two methods for accessing the track’s channel settings in Reaper, which both accommodate different editing needs. The first method, ‘Explode Multichannel Audio,’ is best when you need separate files for detailed, individual processing of each channel.
The second method involves duplicating and adjusting the track’s channel mode. This technique is more suited for situations where you want to keep your project streamlined without generating additional files. It allows you the ability to process each channel independently.
Your choice between these methods depends on whether file management or detailed channel control is your priority. Here’s how to go about each method.
Explode Multichannel Audio:
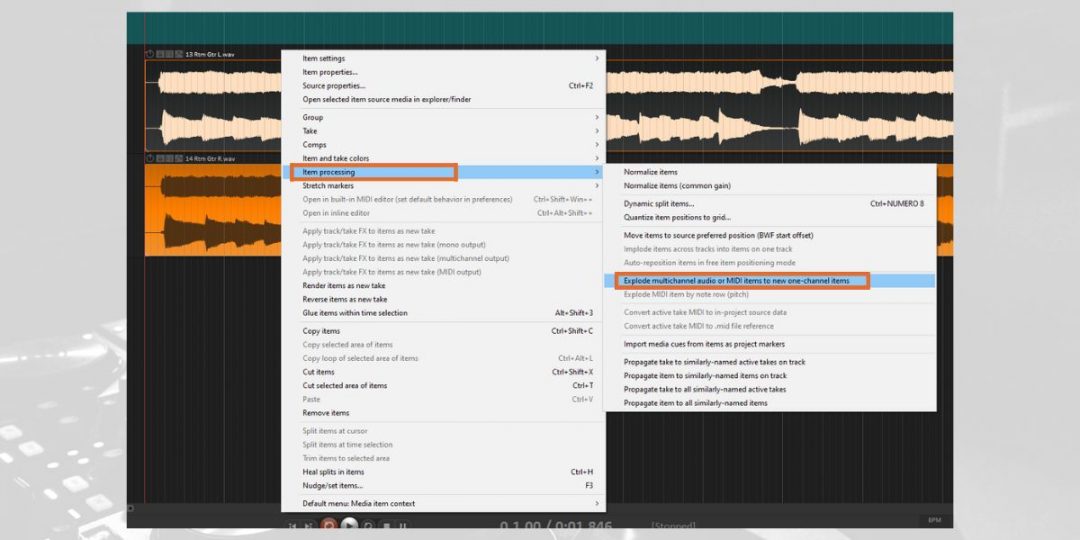
- Right-click on the Track: Access the context menu by right-clicking on the selected stereo track.
- Find the ‘Item Processing’ Option: Look for the ‘Item Processing’ submenu in the context menu.
- Select ‘Explode Multichannel Audio’: Within the ‘Item Processing’ submenu, you will find an option for ‘Explode multichannel audio or MIDI to new one-channel items.’ Selecting this will start splitting the stereo track into two mono tracks.
Alternatively, for a method that doesn’t create new files:
- Duplicate the Track: Right-click the track and select ‘Duplicate tracks.’ This will create a copy of the stereo file on a new track.
- Adjust Channel Mode for Each Track: Right-click on the first duplicated track, go to item settings, and choose ‘Take channel mode: Mono (Left).’ Repeat for the second duplicated track, but choose ‘Take channel mode: Mono (Right)’ instead.
These methods provide two ways to achieve the same goal, giving you flexibility based on your project needs.
The first method creates separate files for each channel. The second method, on the other hand, keeps them on the same track but processes them independently.
Step #3) Using the Item Properties to Split the Track
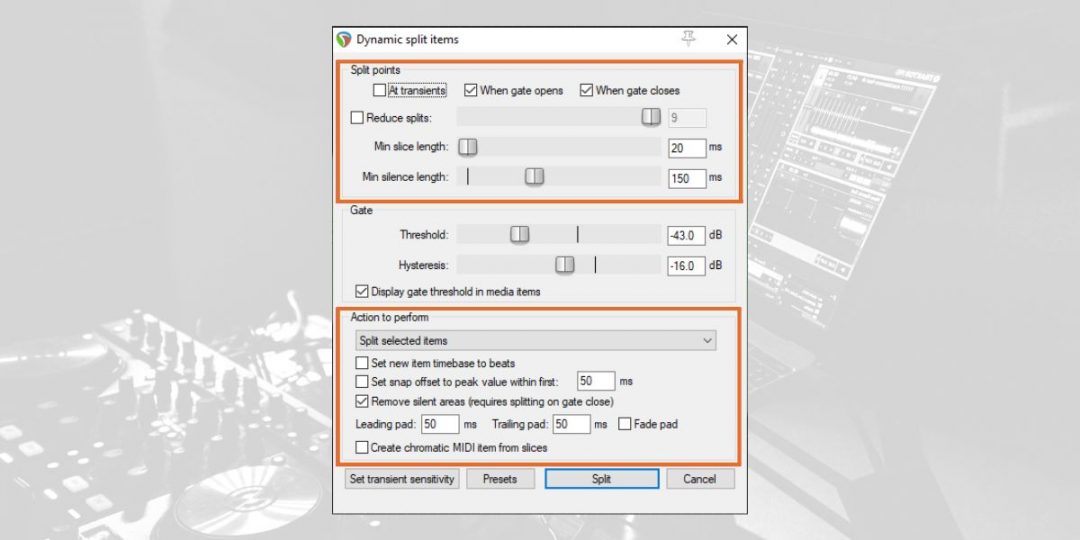
In Reaper, ‘Item Properties’ is a powerful tool for detailed track editing. This process in Reaper is crucial for tasks like isolating a specific part of an audio track. It allows you to create new segments for rearrangement or prepare a track for detailed editing and effect application.
Here’s how it works for splitting tracks:
- Selecting the Track: First, choose the audio track you want to split. This selection is the starting point for any edits you’ll make.
- Accessing Item Properties: Right-click on the selected track and choose ‘Item Properties’. This opens a window where you can make precise edits.
- Dynamic Split Function: A key feature in ‘Item Properties’ is the ‘Dynamic Split’ function. You activate it by selecting the item and pressing ‘D’. This opens a settings window.
- Adjusting Settings for Splitting: You can tweak settings like transient sensitivity and minimum slice length in the dynamic split window. This determines where and how the track will be split.
- Executing the Split: Once you’re happy with the settings, click ‘Split’. This action will split the track at your defined points based on transients or other criteria.
- Additional Options: Dynamic split also offers options like grouping items before splitting. This creates stretch markers for timing adjustments and converts transients (sharp sound changes) into MIDI notes for further digital manipulation.
Reaper’s ‘Dynamic Split’ function is beneficial for complex editing scenarios. Dynamic Splitting allows a level of control that’s both sophisticated and user-friendly. This feature caters to various editing needs, from simple track splits to more advanced audio manipulation.
Step #4) Adjusting the Pan Controls for Each New Mono Track
After splitting the track, the next crucial step is adjusting the pan controls for each new mono track. This step ensures that each track is positioned correctly in the stereo field.
In Reaper, you can pan the media items hard left or right in the properties window. This technique is essential when you’ve separated a stereo file into two mono files and need to maintain their spatial balance.
Proper panning can significantly affect the overall sound of your mix, giving each track its own space and clarity.
Adjusting the pan controls for each new mono track in Reaper is a straightforward process. Here’s how to do it:
- Open Track Properties: After splitting your stereo track into two mono tracks, double-click on one of the new mono tracks to open its properties.
- Locate Pan Controls: In the track properties window, find the pan control. It is typically represented as a knob or slider.
- Adjust Pan Settings: For the first mono track, drag the pan control fully to the left (100% left). This will pan the track entirely to the left channel of the stereo field.
- Repeat for Second Track: Now, do the same for the second mono track, but this time pan it fully to the right (100% right).
- Check Stereo Balance: Play both tracks together to ensure they are balanced correctly in the stereo field. You should hear each track distinctly in each ear if wearing headphones or from the respective left and right speakers.
- Fine-tune if Needed: If necessary, adjust the pan slightly to achieve the desired spatial balance. This might be needed if the tracks are not identical or if a specific stereo image is desired.
- Save Settings: Once you’re satisfied with the panning, close the track properties window to save your settings.
Step #5) Finalizing the Reaper Split Stereo Track: Saving and Naming the Mono Tracks
The final step is to save and name the mono tracks. This involves proper file management and labeling, ensuring that each track is easily identifiable for future editing or mixing in Reaper.
Once you’ve finalized your Reaper split stereo tracks, you can render them to stereo stem tracks if needed. You could also simply save them as individual mono files.
Proper naming and organization streamline the workflow and prevent confusion, especially in complex projects with multiple tracks.
Best Practices for Handling Stereo and Mono Tracks in Reaper
Handling stereo and mono tracks in Reaper involves understanding a few key concepts and practices for efficient workflow.
Here are some best practices to keep in mind when creating split stereo tracks in Reaper:
- Track Types: Reaper treats all tracks as stereo by default, playing mono files through both channels. Understanding this helps in deciding how to handle tracks post-splitting.
- Conversion Practices: Converting mono files to stereo or vice versa is straightforward in Reaper. For mono to stereo, you can render the track as a new stereo file. For stereo to mono, you have two options: downmixing, where the file plays back as mono without changing the original file, or ‘exploding’ the stereo file into two mono tracks.
- Managing and Exploding Stereo Files: When processing each channel of a stereo recording separately, you can either maintain the stereo file or split it into mono tracks. The ‘Explode multichannel audio or MIDI to new one-channel items’ feature in Reaper is useful for this.
- Multichannel Files: Reaper can handle up to 64 channels in a WAV file, allowing for the creation and management of complex multichannel files. This feature is especially useful for large recordings, like a drum kit setup.
- Routing and Comp Management: Proper routing is crucial, especially when recording multi-input sources. Comp management helps keep the different channels in sync, which is essential for cohesive track management.
- Session Management: Using the Track Manager to hide unnecessary tracks helps keep the session interface clean. Creating templates for frequently used setups can save time.
These practices ensure efficient workflow when handling stereo and mono tracks in Reaper. They cater to various editing needs, from simple track adjustments to complex audio manipulations.
Honing Your Music Production Skills in Pro Tools
Mastering the art of splitting stereo tracks in Reaper allows for more nuanced control and creativity in your projects.
Creating a Reaper split stereo track enhances audio quality, whether fine-tuning mixes or balancing channels. This technique can significantly improve the precision of your audio production efforts.
Remember, the key to proficiency lies in practice and experimentation. Don’t be afraid to apply these insights to your own audio endeavors in Reaper!
To further enhance your skills, consider exploring our best-selling Ultimate Guide to Reaper course. In it, Reaper expert Adam Steel breaks down how to get the most out of Reaper’s key capabilities and tools.
This includes everything from basic recording to intricate mixing techniques. This course will streamline your workflow and expand your creative toolkit in Reaper. This course is aimed at helping you ensure that your projects sound professional and reflect your true artistic vision.
Join us today to unlock the full potential of Reaper in your music production journey!
Download our most popular resource: 6 Steps for Creating Radio Ready songs to learn the fundamentals of what goes into a professional mix from renowned Producer, Songwriter & Mixer Warren Huart, who has worked on several Grammy-nominated albums!

