Pro Tools bounce vs export options are two ways of saving audio files from a session to the desired destination. We’ll delve into the specific differences between the two, as well as how to perform these functions.
Getting Familiar with Pro Tools Export Options
Pro Tools’s two primary export options are Bounce to Disk and Export Selected. Bouncing is an offline (non-real-time) function that replaces what real-time “printing” used to be — you’re able to quickly export tracks complete with effects and all processing without regard to actual session duration.
On the other hand, simple exporting is a pre-effects function, which is helpful for exporting raw audio files for later mixing, delivery to another engineer, or just to have as a dry multitrack session.
Pro Tools Bounce vs. Export: What’s the Difference?
What Does It Mean to “Bounce” a Track?
The Bounce to Disk function lets you choose an output source, such as a bus, and will create an audio file of everything routed to the output of that source. Any inserts/effects prior to the output of the selected source are included, making it the most efficient way to bounce a finished mix from the main output of your session. The length of the bounced file follows your timeline selection.
- RELATED: How To Bounce Stems In Pro Tools
What Does It Mean to Export a Track in Pro Tools?
Exporting a clip(s) in Pro Tools is the fastest way to save a raw recording. You can export individual audio clips or complete consolidated tracks, such as in preparing multitrack files. The important thing to remember is that it bypasses effects and is based on clip selection as opposed to output and timeline selection.
Download our most popular resource: 6 Steps for Creating Radio Ready songs to learn the fundamentals of what goes into a professional mix from renowned Producer, Songwriter & Mixer Warren Huart, who has worked on several Grammy-nominated albums!
How to Bounce Selected Tracks in Pro Tools

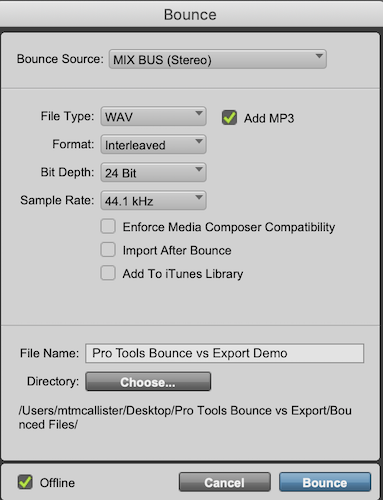
The first thing you’ll want to do is make a timeline selection to determine the length of the bounce. After that, use the keyboard command [Option] + [Command] + “B” to bring up the Bounce to Disk window. At the very top you’ll locate Bounce Source, which is the output from which you’re be bouncing audio.
- RELATED: How to Loop in Pro Tools (3 Tricks & Shortcuts You Can Use)
- RELATED: Pro Tools Beat Detective Explained (5 Steps to Tighten Up Your Tracks)
To bounce out a stereo file from the chosen source, keep Format set to Interleaved (default). You’ll see other options, like the ability to add an MP3, the ability to change lossless file types, and more. Bounce to Disk also lets you name the file and choose its save location.
Using the bounce function lets you quickly save full mixes as stereo audio files or create stems of individual instruments or groups with all of their associated plugin processing.
How to Export Selected in Pro Tools?

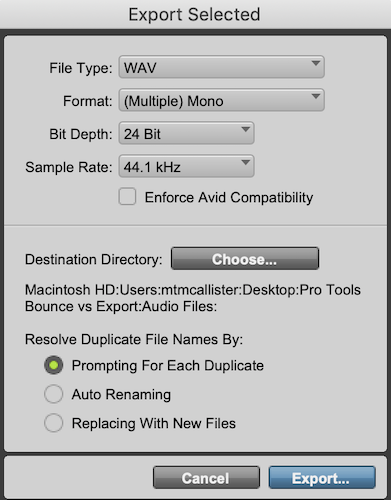
The Export Selected function starts with selecting a clip(s). Using [Shift] + [Command] + “K” brings up the Export Selected dialogue box. Selecting (Multiple) Mono as the format preserves mono recordings and also lets you export multiple clips individually. Choosing Interleaved will preserve a stereo recording/file.
Let’s say you have a single vocal track comprised of various clips. You can select all of the clips for export, but Pro Tools will save them as separate files. In order to export a complete track as a single audio file, first consolidate it by selecting all clips on the track and using the command [Shift] + [Option] + “3.”
Using the Export Selected function is a fast way to save raw audio tracks — for example, when planning to import into a separate mixing session at a later time.
Closing Thoughts: How Do I Know Whether to Bounce or Export My Track?
Just remember that bouncing “prints” audio from a chosen output, so it preserves all plugin processing. It’s most often used to bounce a mix or create stems.
Exporting selected files bypasses processing and saves raw clips/audio files. You’d generally use the basic export function when creating a multitrack; that is, raw recordings to be imported into a session for mixing.
Looking for Pro Tools Tutorials?
Learning the fundamentals of how to use your DAW is crucial to creating consistent & great sounding mixes. If you are looking to learn recording & mixing with Pro Tools, you should consider enrolling in our popular Ultimate Guide To Pro Tools course to get started with everything you need to know.


