Pro Tools grid mode is extremely useful, as is its keyboard shortcut and the others that cycle through the different editing modes. We’ll briefly cover each of the four edit modes in Pro Tools with a primary focus on the grid and how it’s the go-to editing mode for some engineers.
What Are the Pro Tools Editing Modes?
The four editing modes in Pro Tools are Shuffle, Spot, Slip, and Grid. In the sections below, we’ll give context to these functions in terms of how they operate and when a good time to use them would be.
Why Are There Different Editing Modes?
Audio is a complex thing, and while a lot of us focus on music production, there are many other reasons you’d be working in Pro Tools apart from music. Post-production for TV/film, podcasts, audiobooks, and voiceover are just a few examples. Each of these requires use of a DAW like Pro Tools to record, edit, and mix audio for a specific purpose.
- RELATED: The Edit and Mix Windows in Pro Tools Explained
- RELATED: Pro Tools Beat Detective Explained
Pro Tools edit modes take common tasks into account and help us speed up our workflow. Edit modes specifically affect how the movement of audio and MIDI clips works, as well as how many of the editing tools operate.
Download our most popular resource: 6 Steps for Creating Radio Ready songs to learn the fundamentals of what goes into a professional mix from renowned Producer, Songwriter & Mixer Warren Huart, who has worked on several Grammy-nominated albums!
What Are the 4 Editing Modes in Pro Tools?
- Shuffle: In this mode, clips automatically snap to the beginning or end of each other to eliminate any gaps. It’s not the most musical or natural form of editing, but it’s great when working with podcast or voiceover audio where you can edit out noises and remove the space all at once. (F1 or [Option] + “1”)
- Spot: When you try to drag a clip in Spot mode, a dialogue box appears asking you where you’d like to place it exactly on the time scale. This works well for extremely precise editing jobs, like post-production. (F3 or [Option] + “3”)
- Slip: Slip is the most elastic editing mode in Pro Tools. It lets you freely drag clips to any position. And when you’re using tools like the Smart Tool, you can essentially click or click and drag anywhere to make an edit without restriction. There’s no automatic movement or snapping to the grid. (F2 or [Option] + “2”)
- Grid: Grid mode is most commonly used for music production. When you set the grid value, such as 1/4 notes, clip movements and certain tool functions like the Selector all snap to the nearest value. This is helpful for aligning clips in time and making edits that adhere to the chosen time scale and value. (F4 or [Option] + “4”)
What Is Pro Tools Grid Mode Shortcut & Editing Mode?
How Does Grid Mode Work?
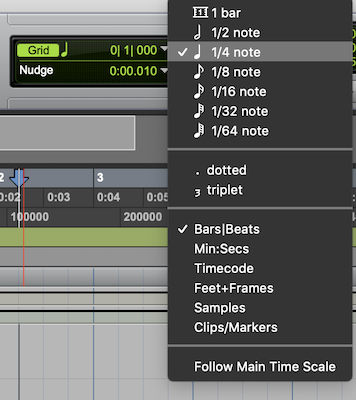
To enter Grid mode, hit F4 or [Option] + “4.” Specifically for MacOS, in which certain OS functions are sometimes tied to the Function keys, you might prefer to use the latter. In any case, this quick command will put you in Grid mode.
Let’s say you’ve set the grid value to a quarter note, and you’re working in Grid mode. With the Smart Tool, the Grabber will move and snap clips to the nearest quarter note. The Selector will snap to the nearest quarter note, whether it’s a one-click or a dragged selection. And finally, the Trim tool will snap and cut the beginning or end of a clip to the nearest quarter note.
What Are the Benefits of Editing in Grid Mode?
The biggest benefit of using Grid mode is that it keeps your clip movements and edits in time with the song. Particularly when you’re working with electronic music, or music composed of loops and samples, using Grid lets you easily chop, duplicate, or otherwise edit clips precisely in time.
You can also see which recorded audio is in or out of time based on how the transient aligns to the grid value. It’s certainly the most musical editing mode that gives you a clear-cut, definitive measurement of time for editing and movement.
- PRO TIP: Hold down the [Command] key to temporarily disable the grid, for total freedom of movement just as in Slip mode.
Absolute vs. Relative Grid Mode: What’s the Difference?
Sometimes a clip of audio doesn’t begin exactly on a beat — especially when you’re punching in and out for recording. So our grid value is a quarter note, and we’ve just punched in a vocal overdub where the recording begins in between beats. The start of the audio clip is in between beats, and the actual vocal comes in mostly on beat, perhaps 20 milliseconds early. In Relative Grid mode, when we go to move that clip, the offset is maintained.
In other words, with a region that begins several milliseconds before the grid increment, we can move it by the chosen grid value in Relative Grid mode, while still keeping the clip’s relation to the absolute grid. Press F4/[Option] + “4” twice to enter Relative Grid; press it again to go back to Absolute Grid, and vice versa.
Our Take: When Should I Edit in Grid Mode & Why?
Between Grid and Slip modes, you have about 90% of your bases covered. The precision of Grid mode and how it allows you keep things in time is why it’s one of the most frequently used edit modes in Pro Tools. Hopefully, this Pro Tools grid mode shortcut will help save you time and effort in the long run!
Looking for Pro Tools Tutorials?
Learning the fundamentals of how to use your DAW is crucial to creating consistent & great sounding mixes. If you are looking to learn recording & mixing with Pro Tools, you should consider enrolling in our popular Ultimate Guide To Pro Tools course to get started with everything you need to know.

