Changing output settings in Reaper is a crucial skill for both new and experienced audio engineers working with the DAW. This guide will provide a detailed walkthrough on how to change output in Reaper, ensuring your projects sound precise. In it, we’ll cover everything from configuring your audio device settings to fine-tuning inputs and outputs. These lessons are crucial to achieving optimal sound quality and performance in your recordings and mixes.
Understanding the Basics of Audio Output in Reaper
Understanding Reaper’s audio output basics is vital to adequate sound mixing and mastering. Managing output channels is certainly essential regardless of which DAW you work in.
Output channels are the paths through which your audio travels from the software to your speakers, headphones, or other external devices. Learning how to route audio within Reaper involves assigning tracks to specific output channels. In addition, this is crucial for controlling where each element of your mix is sent.
Familiarizing yourself with Reaper’s interface elements, like the track I/O button and the routing matrix, will allow you to send your audio to the right place.
This foundational knowledge is the first step towards mastering audio output in Reaper, ensuring your final mix translates well across different playback systems.
Navigating Reaper’s Interface for Output Settings
Navigating Reaper’s interface for output settings is straightforward. The central hub for audio configuration is found under the ‘Preferences’ dialog. Here, you can access various settings that affect your audio output.
This section leads into detailed settings for audio devices and track I/O, which is essential for customizing your sound output.
Accessing and Configuring the Audio Device Settings
To effectively utilize Reaper for your audio projects, it’s essential to properly configure your audio device settings. This initial setup ensures Reaper communicates correctly with your audio hardware, producing optimal sound quality and performance.
Here’s a step-by-step guide to help you navigate and configure these crucial settings:
-
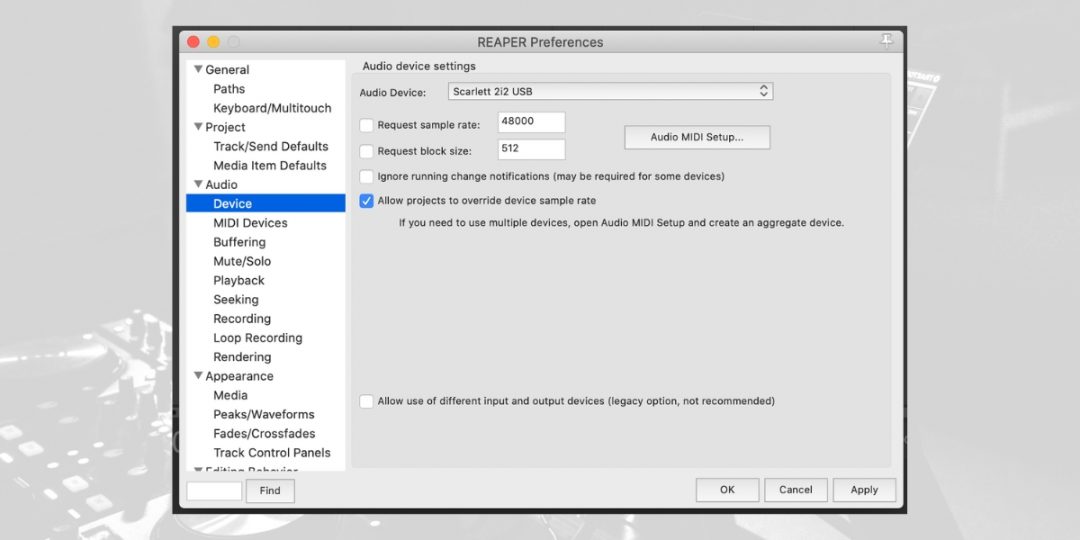
- Open Preferences: Start Reaper and access the ‘Options’ menu. Here, select ‘Preferences’ to open the settings dialog.
- Select Audio Device: Then, within Preferences, go to ‘Audio’ and then ‘Device.’ This section is dedicated to audio hardware settings.
- Choose Audio System and ASIO Drivers
- For Windows users: Opt for ‘ASIO’ in the Audio System and select an appropriate ASIO driver for your audio interface.
- For Mac users: The default Core Audio drivers are typically suitable.
- Configure Inputs and Outputs: Enable and select the inputs and outputs you need in the same area. This step is vital for managing how audio is routed in and out of Reaper.
These steps will set a solid foundation for your audio output in Reaper. They also pave the way for a seamless audio production experience.
Adjusting Track I/O Settings for Custom Output
Adjusting Track I/O settings in Reaper is vital for achieving precise control over where and how your audio is routed within your project. This capability is critical when dealing with complex recording scenarios or creating specific mixes for different outputs.
Here’s a step-by-step guide to help you navigate this process:
- Locate Track Routing: Open your Reaper project and select the track to adjust. Find the ‘Routing’ button or section on the track.
- Default Output Routing: Tracks default to outputs 1-2, suitable for basic projects.
- Select Alternative Outputs: In the ‘Routing’ section, pick different outputs for specialized needs, like outputs 5-6 for distinct artist mixes.
- Manage Master Send and Parent Channels: Uncheck ‘Master Send’ to bypass default output. Adjust ‘Parent Channels’ to your chosen outputs, ensuring the ‘Track Channels’ setting aligns, typically at 2 for stereo.
These steps empower you to tailor your project’s audio output, catering to the specific needs of each track. This level of customization is also a game-changer in achieving the exact sound landscape you envision for your recordings.
Step-by-Step Guide: How to Change Output in Reaper

This section will guide you through how to change output settings in Reaper. Each step is equally important for optimal audio output, from selecting the correct audio device to managing individual track outputs and assigning them to hardware interfaces.
#1) Selecting the Appropriate Audio Device
Selecting the correct audio device in Reaper is a critical first step in setting up your audio output. This ensures that Reaper communicates effectively with your hardware, impacting the overall sound quality and performance.
-
- Access Preferences: In Reaper, click ‘Options’ and select ‘Preferences.’ Alternatively, use the keyboard shortcut Ctrl+P (Cmd+P on a Mac).
- Navigate to Device Settings: Within Preferences, locate and click on ‘Audio,’ then select ‘Device.’ This is where all the audio hardware configurations are managed.
- Choose Audio System:
- For Windows: Set the Audio System to ‘ASIO.’ Select an ASIO driver that is compatible with your audio interface. ASIO drivers reduce latency and enhance sound fidelity in professional audio production.
- For Mac: Choose the built-in Core Audio drivers accordingly, which are generally efficient for high-quality audio processing.
- Configure Audio Interface: Ensure your audio interface is correctly identified and activated within this section. This could involve selecting it from a list of available devices and adjusting any specific settings it might have.
#2) Configuring Individual Track Outputs
Configuring individual track outputs in Reaper allows intricate control over your audio project’s routing, a crucial aspect for detailed sound mixing and distribution. Therefore, here’s an expanded step-by-step guide:
- Access Track I/O Settings: Right-click on the track you wish to configure and select ‘Track I/O’ to open its settings.
- Understand Default Settings: Initially, every track routes audio to Outputs 1-2, the standard stereo output used for most projects.
- Choose Custom Outputs: Select alternative outputs in the ‘Routing’ section to diversify your mix. For instance, route a track to Outputs 5-6 for a distinct mix for a specific part of your setup.
- Adjust Master Send and Channels: If you opt for custom outputs, manage the ‘Master Send’ option. Uncheck it if you don’t want the track to route to the default output. Additionally, set ‘Parent Channels’ to align with your chosen output. For instance, select 5-6 for a track intended only for those outputs.
By carefully adjusting these settings, you can ensure each mix element is sent to the right place, offering flexibility and precision in your audio production.
#3) Assigning Outputs to Hardware Interfaces
Assigning outputs to specific hardware interfaces in Reaper is vital for creating a tailored audio experience, especially in complex recording setups.
Therefore, here’s an expanded guide on how to accomplish this:
- Access Track I/O-Routing Panel: Click on the track you want to modify, then access its I/O settings.
- Add New Hardware Output: In the I/O panel, add a new output destination, such as ‘Output 3,’ to direct your audio to a specific hardware interface.
- Uncheck Master Send: Ensure that ‘Master Send’ is unchecked. This step is specifically crucial to prevent the audio from routing to the master output, allowing it to go only to your selected output.
- Dedicated Routing: This configuration is beneficial for sending a click track exclusively to a drummer’s monitor through ‘Output 3.’ It offers precise control over where each track’s audio is sent, enhancing the mixing and recording process.
This approach enables precise and customized routing of each track to specific hardware outputs. Likewise, this is crucial for detailed audio production and live setups.
Advanced Tips for Output Configuration in Reaper
In Reaper, managing complex setups and handling multiple outputs in large projects requires a blend of advanced techniques for efficient output configuration.
This section explores these sophisticated strategies, focusing on the nuanced aspects of routing and track management essential for mastering advanced audio output in extensive projects.
Utilizing Routing Matrix for Complex Setups
The Routing Matrix in Reaper is an essential feature for complex audio projects, offering a streamlined approach to managing intricate routing setups. Here’s how you can effectively utilize it:
- Access the Routing Matrix: From the main menu, navigate to ‘View’ and select ‘Routing Matrix.’ This opens up a comprehensive view of your project’s routing.
- Understand the Matrix Layout: The matrix displays all tracks, sends, and hardware outputs, showing interconnectedness. Each cell represents a potential connection point.
- Configure Routing: Click on a cell to create or remove a connection. This allows you to direct audio from any track to output or send.
- Use for Complex Projects: The matrix is particularly beneficial in large projects with many tracks and buses. It lets you visualize and modify routing connections easily, which is crucial for keeping track of complex routing schemes.
- Ensure Correct Audio Pathways: Lastly, regularly check the matrix as you work on your project to ensure all tracks and buses are routed to the appropriate destinations.
In summary, you can easily handle complex routing requirements using the Routing Matrix. It also ensures that each component of your audio project is perfectly aligned and connected for optimal output.
Download our most popular resource: 6 Steps for Creating Radio Ready songs to learn the fundamentals of what goes into a professional mix from renowned Producer, Songwriter & Mixer Warren Huart, who has worked on several Grammy-nominated albums!
Managing Multiple Outputs for Large Projects
When tackling large-scale projects in Reaper, managing multiple outputs is key to maintaining organization and clarity. Here’s how to approach this:
- Create Sub-Projects: Divide your large project into sub-projects, each focusing on specific track groups. This division helps in managing complex mixes more efficiently.
- Set Up Multiple Outputs: In each sub-project, configure multiple outputs next. Ensure these align with the main mixer in your primary project, facilitating cohesive sound blending.
- Develop a Custom Template: At this point, create a template featuring labeled summing buses for various instrument types, like drums, guitars, or synths. Assigning tracks to these buses automates routing, directing them to predetermined outputs.
- Optimize Mixdown Strategy: For a streamlined mixdown, route tracks initially to a standard stereo bus (Outputs 1-2). After that, you can utilize additional outputs for creating stems or submixes, which helps segregate different elements of your mix, making the final mixdown more manageable and organized.
Implementing these strategies in Reaper for large projects helps break down the complexity. It helps ensure each track is routed correctly for an effective and organized final mix.
Troubleshooting Common Output Issues in Reaper
You may encounter common output issues in Reaper, particularly latency problems and compatibility issues with external devices. In any event, these require a systematic approach to troubleshooting and configuration.
Addressing Audio Latency Problems
Addressing audio latency problems in Reaper involves a multi-faceted approach:
- Identify the Issue: Digital audio latency manifests as a delay during recording or playback, leading to misalignment and timing issues in your tracks. Recognizing this problem is crucial for effective troubleshooting.
- Install Correct Audio Drivers: Start by ensuring you have the correct audio driver for your system. This fundamental step can significantly reduce latency.
- Manually Offset Latency: If the problem persists, go to Reaper’s ‘Preferences’ under ‘Recording.’ Here, manually adjust input and output offset settings. These settings, in milliseconds, help sync the timing of your audio with your activities.
- Understand Contributing Factors: Latency can also stem from your audio interface’s A/D and D/A converters, digital audio signal chain buffers, and buffer settings. Lower buffer settings can minimize latency, but they require more computing power.
- Recording Challenges: Be aware that latency affects real-time recording, causing a noticeable delay in audio playback through headphones or speakers. In particular, this can lead to frustration and impede the recording process.
In any case, systematically addressing these areas can mitigate latency issues in Reaper and ensure smoother recording sessions.
Solving Compatibility Issues with External Devices
If you have compatibility issues with external devices in Reaper, consider these steps to address and resolve them.
- Identify Common Causes: Compatibility problems usually arise from audio driver issues or OS incompatibilities. Regularly updating your audio interface’s drivers can often resolve these issues.
- Troubleshoot Audio Interface: Confirm your audio drivers are up-to-date. Windows users should opt for ASIO or WASAPI protocols, while Mac users must ensure correct driver installation and select their audio interface in Reaper’s preferences.
- Check Reaper Installation: Occasionally, a problematic Reaper installation might cause recognition issues with audio interfaces. Resetting Reaper’s settings by renaming the ‘REAPER.ini’ file in its resource folder can often fix this.
- Disable Exclusive Mode: In Windows, disabling exclusive mode in sound settings can also resolve conflicts where one application monopolizes the audio interface, leading to issues with other software.
Addressing these aspects methodically can significantly improve device compatibility in Reaper, enhancing overall audio production workflow.
Mastering how to change output in Reaper is essential for precise audio control. This guide equips you with the knowledge needed to excel in audio projects.
Whether customizing devices, routing tracks, or troubleshooting, you can navigate Reaper’s complexities. Experiment, tailor your audio output, and achieve top-notch sound quality.
Looking To Maximize Your Creative Potential Reaper?
If you’re looking to enhance your audio engineering capabilities beyond how to change output in Reaper, check out Pro Mix Academy’s The Ultimate Guide To Reaper. Guided by the expertise of Adam Steel, this course fundamentally transforms your approach to digital audio work. It delves into efficient setup, recording, and mixing, ideal for all skill levels.
Moreover, the course includes over 12 hours of comprehensive tutorials across 69 chapters. Significantly, it’s been updated for Reaper 7, highlighting classic and new features. By enrolling, you’ll quickly move beyond the basics and confidently start creating exceptional audio projects.
Avoid the trial and error phase and jump into producing exceptional audio projects with this ultimate guide today!


