Mastering a few basic techniques in audio production can open up a universe of possibilities to sculpt your sound. Sidechain compression is one critical technique that stands out for its ability to bring clarity and punch to your mixes. If you’ve ever wondered how to sidechain in Logic, you’ve come to the right place.
In this guide, you’ll discover a straightforward yet impactful way to make your tracks breathe and pulse with energy. Sidechain compression isn’t just a tool; it’s your secret ingredient for creating dynamic contrasts that make listeners want to move.
Firstly, we’ll explain how to set up your tracks to fine-tune your groove. Then, we will also explain everything you need to know about sidechaining in Logic.
What is Sidechain Compression?
Sidechain compression is a pivotal audio processing technique used in music production. It involves using the signal from one track to control the Logic compression on another.
This means when the sidechain source (usually a rhythmic element like a kick drum) hits, it triggers a compressor on another track (such as a bass line), momentarily reducing its volume.
This technique is essential for creating space in a mix. It allows certain elements to stand out by momentarily ducking others.
The Role of Sidechain in Modern Music Production
In modern music production, sidechain compression is critical in shaping the dynamic relationship between instruments.
It’s most famously used in electronic dance music to create a pumping effect that synchronizes the bass and kick drum. It is used to enhance the rhythmic drive of a track.
However, its application extends beyond EDM.
Ultimately, sidechain compression is a solid tool for managing frequency overlap and ensuring clarity in the mix across various genres. By judiciously applying sidechain compression, producers can craft mixes where elements breathe together in harmony, contributing to a polished and professional sound.
How to Sidechain in Logic Pro X
Learning how to sidechain in Logic Pro X allows you to dynamically alter the volume of one track based on another track’s audio signal. This technique is fundamental for achieving a balanced mix where certain elements stand out at the right moments.
Let’s explore how to sidechain in Logic, beginning with basic track set-up.
Selecting Your Source and Target Tracks
The first step in creating a sidechain effect involves choosing your source and target tracks.
The source track is the signal that will trigger the compression, commonly a kick drum in dance music. The target track is where the compression will be applied, such as a bass line or pad.
- Identify the Source Track: Choose the track that will act as the trigger. This could be a kick drum or any rhythmic element you want to use to drive the compression.
- Choose the Target Track: Select the track on which you want to apply the compression. This track typically occupies a frequency range similar to the source. One that can benefit from dynamic volume reduction to make room for the source signal.
Setting Up Compressor for Sidechain Input
After selecting your source and target tracks, you must configure the compressor on your target track to respond to the source.
- Insert Compressor: On your target track, open the plugin chain and insert Logic Pro X’s Compressor.
- Choose Sidechain Source: In the Compressor plugin, locate the side-chain input selector at the top right corner. Use this dropdown menu to select the source track you identified earlier.
By following these steps, you set the foundation for sidechain compression in Logic Pro X. This allows you to create dynamic relationships between tracks that enhance the overall mix’s clarity and rhythmic feel.
Step-by-Step Guide to Sidechain Compression
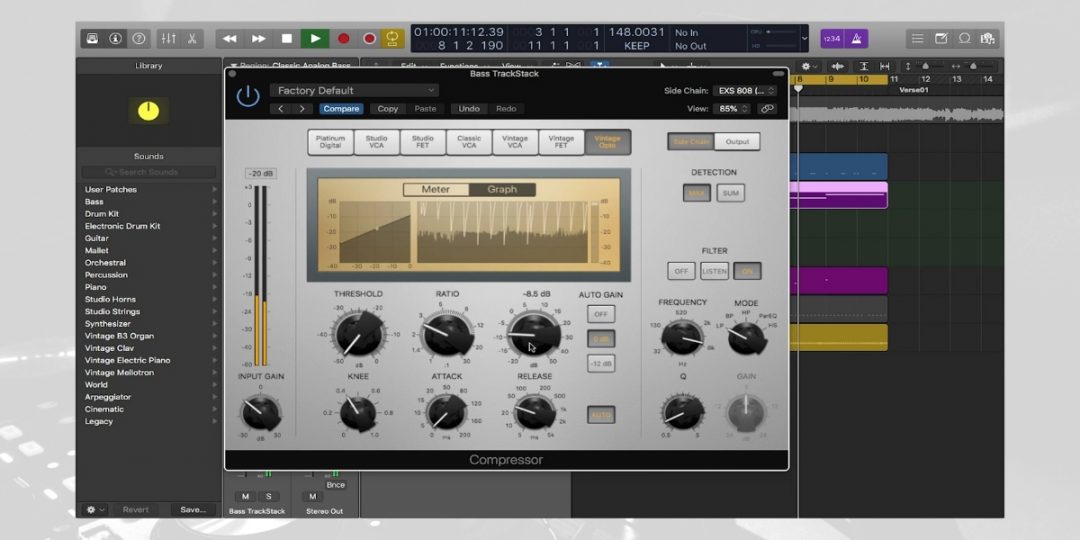
After setting up your source & target tracks and configuring your compressor inputs, you will want to dial in your compression. This involves a more detailed understanding of the compressor’s settings, which we will explore below.
#1) Choosing the Right Compressor Settings
Selecting the appropriate compressor within Logic Pro X is crucial for sidechain application. Logic offers various compressor models, each emulating different hardware units with unique characteristics.
For sidechain compression, you want a model that reacts well to the dynamic range of your music. Experiment with the “Platinum Digital” for clean compression or “Vintage VCA” for a more colored sound, depending on your track’s needs.
- Open Compressor: On your target track, launch the compressor.
- Select Model: Browse through the models and choose one. Consider the genre and the vibe you’re aiming for.
- Preview: Listen to how each model affects your sound, paying attention to the naturalness and impact of the compression.
#2) Adjusting Threshold and Ratio for Optimal Impact
The threshold and ratio settings determine how much and when the compression occurs.
The threshold sets the level at which compression begins. On the other hand, the ratio dictates the compression intensity once the threshold is exceeded.
- Set Threshold: Lower the threshold until the compressor engages with the audio signal from your source track. Aim for it to trigger primarily on the beats you want to emphasize.
- Adjust Ratio: Increase the ratio to intensify the compression effect. A higher ratio means more compression, but be mindful not to over-compress and lose dynamics.
#3) Fine-Tuning Attack and Release for Musical Groove
The attack and release controls shape how quickly the compressor reacts to the incoming signal and returns to its initial state.
These settings are pivotal for ensuring the sidechain compression breathes with the rhythm of your track.
- Attack Setting: To begin with, adjust the attack to control how quickly the compression starts after the signal exceeds the threshold. A faster attack squashes the signal quicker, while a slower attack allows more initial transient through.
- Release Setting: Set the release to manage how quickly the signal returns to its uncompressed state. With this in mind, a shorter release creates a more pronounced pumping effect. Correspondingly, a more extended release smooths out the compression over time.
By methodically adjusting these settings, you can sculpt the sidechain effect to enhance the groove and energy of your mix. This ensures the sidechain compression serves the overall musicality of your production in Logic Pro.
#4) Automating Sidechain Parameters for Dynamic Effects
Automation in Logic Pro X brings life to sidechain compression, creating evolving textures and rhythms. You can introduce dynamic changes over time by automating parameters like the compressor’s threshold, ratio, or sidechain filter settings.
- Open the Track with Sidechain Compression: To begin, navigate to the channel strip where you’ve applied sidechain compression.
- Enable Automation View: Press ‘A’ to toggle the automation view in your project.
- Select the Compressor: Click on the compressor plugin to view its parameters in the automation lane.
- Choose a Parameter to Automate: In the automation lane, find and click on the drop-down menu to select the parameter you wish to automate (e.g., Threshold, Ratio).
- Draw Automation Curves: Click in the automation lane to create points and then drag these points to shape your automation curve. Specifically, adjust the curve to increase or decrease the parameter value over time.
- Fine-tune the Automation: Playback your track and listen to the effect of the automation. Adjust as needed by adding more points or modifying the curve for the perfect dynamic effect.
- Repeat for Additional Parameters: If desired, select and automate other parameters following the same steps to further sculpt the sidechain effect.
Advanced Sidechaining Techniques in Logic Pro X
To further enhance your mix, advanced sidechaining techniques can open up new creative possibilities. These techniques go beyond traditional applications, allowing for more nuanced control and creative effects.
Let’s take a look at a few examples of advanced sidechain techniques in Logic.
Using Ghost Trigger for Creative Sidechaining
Ghost triggering, or using a silent trigger for sidechain compression, allows for precise control over the compression effect without the trigger sound being heard in the mix.
This method is especially useful for sculpting the dynamics of a track without the influence of a competing audio signal.
- Create a Ghost Track: First, set up a new track in your project that will trigger the sidechain compression. This could be a copy of your kick drum track or any other rhythmic element that you want to use as a trigger.
- Silence the Track: Ensure this ghost track is not audible in the mix by muting it or routing its output to no output. The goal is for this track to trigger the compressor without being heard.
- Configure the Compressor: On the target track, select the ghost track as the sidechain input source in the compressor settings where you want the sidechain compression to occur. This will make the compressor respond to the ghost track.
- Adjust Compressor Settings: Lastly, tailor the compressor’s threshold, ratio, attack, and release settings to achieve the desired dynamic effect, guided by the silent signal from the ghost track.
By utilizing a ghost trigger, you can achieve a more controlled sidechain effect, perfect for when you need the compression to be rhythmically tight but don’t want the triggering sound itself to influence the mix’s balance.
Sidechain Filtering for Frequency-Specific Dynamics
Filtering the sidechain signal allows for frequency-specific compression, enabling more targeted dynamic control that can clean up mixes or create interesting effects.
- Set Up Sidechain Compression: Follow the initial steps to set up sidechain compression on your target track, choosing your source track accordingly.
- Enable Sidechain Filter: Enact the sidechain filter (SC Filter) option in the compressor plugin. This might be found in an advanced or sidechain section of the plugin.
- Configure the Filter: Select the type of filter (high-pass, low-pass, band-pass) and adjust the frequency to target specific parts of the audio spectrum. For example, using a high-pass filter on the sidechain signal lets through higher frequencies. This focuses the compression effect on the lower frequencies of the target track.
- Fine-tune the Effect: Adjust the compressor’s settings to respond to the filtered sidechain signal, crafting the dynamic response to fit the mix perfectly.
Sidechain filtering opens up possibilities for managing mix elements more discriminately. It allows producers to apply compression where most needed without unnecessary pumping effects across the full frequency spectrum.
This technique is invaluable for cleaning up the low end or preventing frequency masking in dense mixes.
Creative Applications of Sidechain Compression
Exploring the creative applications of sidechain compression in Logic Pro X reveals its versatility beyond traditional ducking techniques. It offers innovative ways to enhance the pulse of your tracks and control dynamics creatively during the mixing and mastering.
Enhancing the Pulse of Your Tracks
Sidechain compression can be artfully used to add rhythm and movement to various elements within a mix, making your tracks breathe with a dynamic pulse.
- Identify the Pulse Source: Select a rhythmic element, like a kick drum, to act as the sidechain trigger. This will be the heartbeat of your track.
- Apply to Sustained Sounds: Use sidechain compression on sustained sounds such as pads, basslines, or synth leads. Route the compressor to be triggered by the pulse source.
- Adjust for Musicality: Set the compressor’s attack and release times to match the tempo and feel of your track. Remember to approach this with attention to the overall feel of the track. A quicker release can create a more pronounced rhythmic effect, enhancing the track’s pulse.
Through these steps, sidechain compression becomes a powerful tool for injecting life into your tracks, making them more engaging and rhythmically cohesive.
Download our most popular resource: 6 Steps for Creating Radio Ready songs to learn the fundamentals of what goes into a professional mix from renowned Producer, Songwriter & Mixer Warren Huart, who has worked on several Grammy-nominated albums!
Creative Dynamics Control for Mixing and Mastering
Sidechain compression also serves as a dynamic equalizer in mixing and mastering, allowing for innovative control over the track’s energy and space.
- Selective Frequency Ducking: Implement sidechain compression to duck specific frequency ranges. This technique allows the kick to cut through a dense mix by applying sidechain compression only to the low frequencies of competing instruments.
- Vocal Presence: Apply sidechain compression to background elements using the vocal track as the sidechain source. This subtly reduces the background levels when the vocals are present, ensuring clarity and focus on the lead vocal without drastically lowering the mix’s overall energy.
- Mastering for Cohesion: Light sidechain compression on the master track, triggered by the kick or bass, can glue the track together. This gentle pumping effect adds a cohesive rhythmic quality to the entire mix, enhancing the overall groove.
To summarize, these advanced techniques demonstrate sidechain compression’s role as a creative force in music production.
Producers can achieve professional-sounding mixes that stand out in clarity, depth, and rhythmic excitement by mastering these applications.
Mixing Tips: Balancing Sidechain Compression for Clarity and Impact
Achieving the perfect balance with sidechain compression ensures clarity and rhythmic impact in your mix. Without a doubt, the key is to adjust settings thoughtfully.
Start by setting a threshold that activates compression without diminishing the target track. Opt for a moderate ratio to maintain natural dynamics. With this in mind, adjust the attack and release to complement the track’s tempo, avoiding artifacts.
Lastly, use your ears: listen for a balance where the sidechain effect enhances rather than overwhelms.
This approach ensures that sidechain compression contributes to your mix’s overall sound quality.
Closing Thoughts: Mastering Sidechain Compression To Get That Pro Sound
To conclude, learning how to sidechain Logic can be your key to crafting polished, professional mixes. Whether enhancing the pulse of your tracks or fine-tuning the energy and space in your mix, sidechain compression is your ally for achieving clarity, depth, and rhythmic excitement.
With this in mind, don’t be afraid to experiment with this one!
If you’re ready to take your music production skills to the next level to start creating genuinely great music, then we’ve got a secret weapon for you. Music Production In Logic Pro X with Rob Mayzes is a Logic Pro X masterclass that will take you through everything you need to know about developing professional-sounding mixes without delay.

