Melodyne is a tool that’s renowned for its precision in pitch correction and audio manipulation capabilities. This powerful tool reshapes music production, offering nuanced control over audio tracks within Pro Tools and other DAWs. This guide details how to use Melodyne in Pro Tools, from setup to advanced features. We’ll cover everything from importing audio to intricate editing techniques.
Each section is designed to enhance your skills, making Melodyne an integral part of your production arsenal.
Exploring the Basics of Melodyne in Pro Tools
Melodyne by Celemony is a staple in music production, valued for its pitch correction and audio manipulation capabilities. As a Pro Tools plug-in, it integrates seamlessly into your workflow, enhancing audio tracks by adjusting pitch and timing with precision.
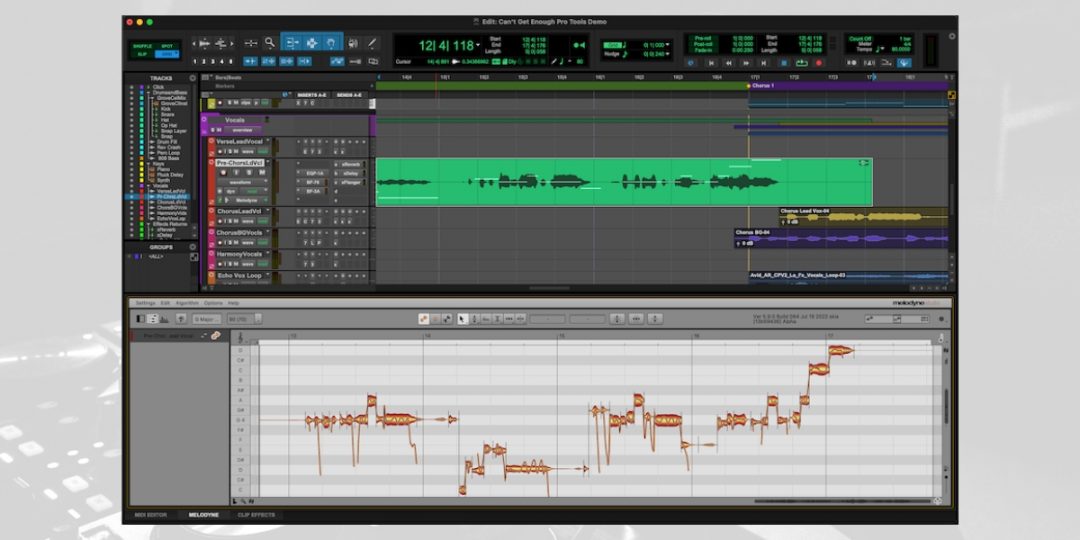
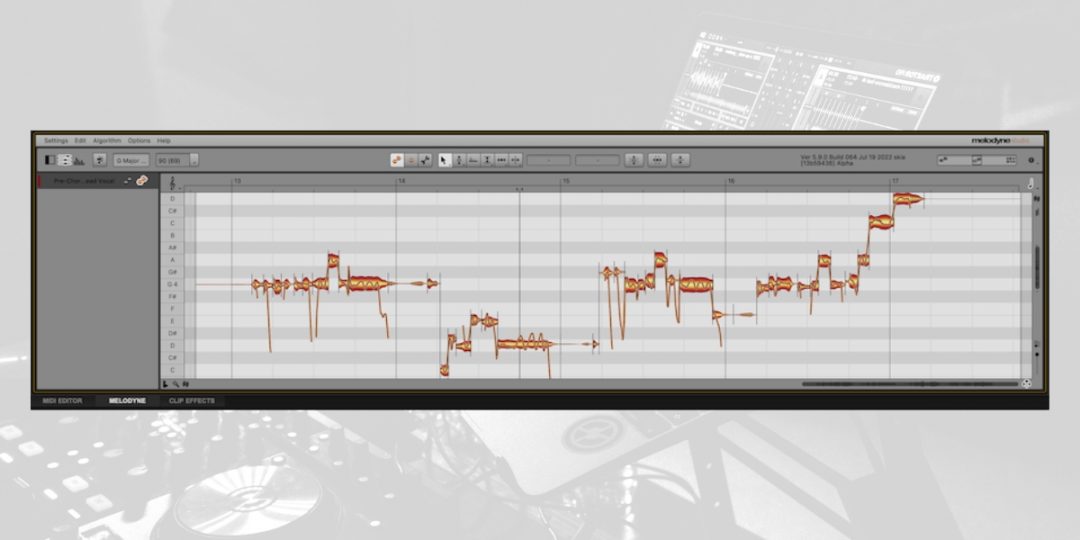
Melodyne’s interface, presenting audio as flexible ‘blobs,’ allows for intuitive and accurate note adjustments. This visualization is also key to Melodyne’s ability to offer subtle and significant audio changes, maintaining natural sound quality.
Melodyne altogether excels at working with complex audio material, offering detailed control over each element in a mix. Its strength lies in identifying and modifying individual notes, even in dense audio mixes.
Leveraging Melodyne for Creative Music Production in Pro Tools
Melodyne in Pro Tools extends beyond pitch correction, unlocking creative possibilities in music production. It enables detailed pitch and timing edits, allowing users to manipulate audio creatively.
In other words, Melodyne is adept at changing the character of audio elements by varying pitch and format and easily adjusting volume.
Its visual representation of ‘blobs’ and ‘pitch curves’ simplifies the process of identifying and correcting pitch inaccuracies. Melodyne provides both automatic pitch-correction modes and manual editing tools for more precise results.
These features integrate well with Pro Tools, making Melodyne an essential tool for both corrective and creative audio editing. With Melodyne, you can fine-tune performances or creatively alter sounds, offering a wide spectrum of editing possibilities in Pro Tools.
Preparing Your Pro Tools Session for Melodyne Integration
Setting up your Pro Tools session correctly is essential for using Melodyne effectively. Proper setup ensures a smooth and efficient audio editing experience.
Setting Up Tracks for Melodyne Processing
Properly setting up your tracks in Pro Tools for Melodyne processing is vital for effective audio editing. This preparation ensures that Melodyne can accurately analyze and process the audio, which is crucial for precise pitch correction and timing adjustments.
Therefore, here’s how to set up your tracks:
- Select Track or Clips: First, choose the track or specific audio clips you plan to edit. Depending on your editing needs, this can be an individual clip or an entire track.
- Apply Melodyne: Then, right-click on the selected clip or track in Pro Tools. From the dropdown menu, select ‘Melodyne’ to apply it.
- Audio Analysis by Melodyne: Finally, once applied, Melodyne analyzes the audio and displays it as editable ‘blobs.’ This visual representation is key for the detailed editing process.
With the integration of Melodyne using ARA technology in Pro Tools, especially from version 2022.9 onwards, accessing the Melodyne edit window has become more convenient. When you work with Melodyne in Pro Tools, you can now directly access and use the Melodyne edit window from within the Pro Tools interface.
This means that you no longer need to go through complex processes to open the Melodyne editor separately. Instead, it seamlessly appears within the Pro Tools environment, simplifying the navigation and editing of your audio.
Understanding Melodyne’s Algorithm Selection
When working with Melodyne in Pro Tools, one of the key considerations is choosing the right algorithm for your audio material. Melodyne offers a range of algorithms, each tailored to specific types of audio, including vocals, instruments, and percussion. These algorithms are crucial in determining how Melodyne analyzes and manipulates your audio.
Let’s break down the significance of algorithm selection:
- Audio Character: Different audio sources have unique characteristics. Vocals, for instance, require a different approach than percussive instruments. To this end, Melodyne’s algorithms are designed to recognize these differences and provide specialized processing.
- Pitch and Timing Precision: The choice of algorithm can impact the precision of pitch correction and timing adjustments. Some algorithms are better suited for fine-tuning pitch, while others excel in preserving natural timing.
- Tonal Quality: Each algorithm has its tonal quality. Some may produce a warmer, more natural sound, while others may result in cleaner, more transparent audio.
- Polyphonic vs. Monophonic: Melodyne algorithms cater to both polyphonic (multiple notes or voices at once) and monophonic (single-note) audio. Selecting the appropriate algorithm ensures accurate processing of your audio material.
Melodyne’s Algorithms and their Characteristics:
- Universal Algorithm: This versatile algorithm is suitable for a wide range of audio materials. It balances pitch correction and timing adjustments well and is an excellent starting point for many editing tasks.
- Melodic Algorithm: Ideal for monophonic audio, such as vocals and solo instruments, the Melodic algorithm excels in pitch correction. It provides precise control over individual notes.
- Percussive Algorithm: This algorithm focuses on timing accuracy for percussive sounds. It’s perfect for aligning drum tracks and other rhythmic elements.
- Percussive Pitched Algorithm: Combining pitch and timing features, this algorithm is well-suited for audio with both pitched and percussive elements.
By understanding the characteristics of these algorithms, you can make informed choices to enhance your audio editing experience with Melodyne in Pro Tools.
How to Use Melodyne in Pro Tools
Integrated with Pro Tools, Melodyne offers a wide array of audio manipulation and enhancement capabilities. This section will explain how to use Melodyne in Pro Tools.
Step #1 Importing Audio Files into Melodyne
First you’ll need to import your audio files into the Melodyne interface to get started with Melodyne in Pro Tools. This is a critical step for making precise adjustments to pitch, timing, and more. Let’s go through the essential steps:
- Launch Melodyne: Open Melodyne within your Pro Tools session. You can find Melodyne among your plugins or access it from the Effects menu.
- Select the Track or Audio Clip: Identify the specific track or audio clip you intend to edit using Melodyne. Simply click on it to select.
- Access Melodyne: In most instances, right-click on the selected track or clip. Choose “Open in Melodyne” or a similar option from the context menu that appears. Melodyne will then open and load the selected audio.
- Wait for Analysis: Melodyne will analyze the imported audio. The duration of this process may vary depending on the length and complexity of the audio.
- View in Melodyne Interface: After the analysis is complete, the audio will be displayed within the Melodyne interface as editable “blobs.” Each blob corresponds to a distinct note or sound within the audio. You can now make precise adjustments to pitch, timing, and other parameters.
Download our most popular resource: 6 Steps for Creating Radio Ready songs to learn the fundamentals of what goes into a professional mix from renowned Producer, Songwriter & Mixer Warren Huart, who has worked on several Grammy-nominated albums!
Step #2 Essential Editing Techniques in Melodyne for Pro Tools Users
Once you’ve successfully imported your audio files into Melodyne within your Pro Tools session, the next crucial step is mastering essential editing techniques. Let’s break down the core tools and methods that Pro Tools users can harness within Melodyne.
- Pitch Correction: Melodyne’s pitch correction capabilities are renowned in the industry. Within the Melodyne interface, you can easily correct any pitch irregularities present in your audio tracks. Whether you’re fine-tuning vocal performances or ensuring that instruments are perfectly in tune, Melodyne provides the tools you need for pitch-perfect results.
- Timing Adjustments: Perfect timing is essential in music production, and Melodyne equips you with the means to achieve it. You’ll discover how to manipulate the timing of audio clips, ensuring that every beat and note aligns seamlessly. This is particularly valuable when synchronizing various tracks or tightening up a performance for a polished outcome.
- Note-Level Editing: Melodyne’s unique ‘blobs’ interface further allows you to edit audio at the note level. In fact, you can easily identify and manipulate individual notes within your audio clips, granting you unparalleled control over your sound.
- Creating Harmonies: On the other hand, one of the creative advantages of using Melodyne in Pro Tools is the ability to create harmonies effortlessly. By adjusting the pitch and timing of individual notes within an audio track, Melodyne allows users to craft rich and intricate harmonized vocal or instrumental arrangements with precision.
- Dynamic Editing: Maintaining the natural dynamics of your audio is also crucial. Melodyne offers dynamic editing tools that enable you to preserve the subtle nuances of performance while making necessary corrections.
By mastering these essential editing techniques within Melodyne, Pro Tools users can achieve pristine audio results, correct imperfections, and exercise creative control over their music productions.
Honing Your Music Production Skills in Pro Tools
In conclusion, this comprehensive guide has walked you through how to use Melodyne in Pro Tools, covering everything from setup to advanced editing techniques. Pro Tools users can achieve precise audio results and creative control by mastering these skills. Without doubt, knowing how to use Melodyne in Pro Tools will greatly enhance your audio projects as you continue honing your music production skills.
To take your skills even further, we recommend enrolling in our best-selling Ultimate Guide to Pro Tools course. It offers in-depth training by Jon Connolly, a seasoned professional, covering system setup, recording, mixing, editing, and workflow optimization in Pro Tools.
This course, suitable for both beginners and experienced users, complements your editing skills by providing a holistic understanding of Pro Tools and broadening your music production proficiency. Sign up today!


