One fundamental skill that considerably enhances workspace navigation is understanding how to zoom out in Pro Tools. Zooming out provides a broader view of your project, helping you see the bigger picture—literally. As we venture further, we’ll uncover the underlying importance of zooming in the Pro Tools workflow, how it facilitates better composition visualization, and the steps to zoom out effectively.
Additionally, we’ll touch on saving custom zoom views and using zoom shortcuts for a more fluid navigation experience. Let’s jump in.
Navigating Your Audio Workspace in Pro Tools
Pro Tools is a versatile & intuitive DAW where your musical ideas can take flight. Central to navigating this space efficiently is mastering the zoom function. This is where our focus will lie, diving into zooming’s role in workflow and composition.
- RELATED: How To Reverse Audio In Pro Tools
The Importance of Zooming in Pro Tools Workflow
Zooming is more than just a visual aid. It’s a way to make your workflow comfortable & easy to navigate in Pro Tools. It allows swift navigation through your project, making editing and arrangement tasks smoother.
When you zoom out, a broader project view is unveiled, aiding in quick section transitions. Conversely, zooming in offers a detailed view, which is essential for precise edits. Balancing these zoom levels is vital to a streamlined workflow, saving valuable time during your creative process.
Arrangement Visualization: Zooming for Better Composition
Maintaining a clear view of your arrangement is crucial for effective composition. Zooming out in Pro Tools provides a macro view, helping identify the structure and flow of your piece. It allows for easy rearrangement and spotting areas needing variation.
On the flip side, zooming in facilitates micro-level edits, ensuring each note or beat is precisely where it should be. With adept zoom control, you’re not just navigating; you’re orchestrating your composition with a clear vision, making informed decisions that contribute to a compelling musical narrative.
How To Zoom Out In Pro Tools
Mastering the zoom functionality in Pro Tools is crucial for an efficient workflow. It allows for quick transitions between a macro and micro view of your project, making the editing process more intuitive.
Let’s take a step-by-step look at how to manipulate the zoom to navigate your workspace better.
Zooming In and Out: Adjusting Your View
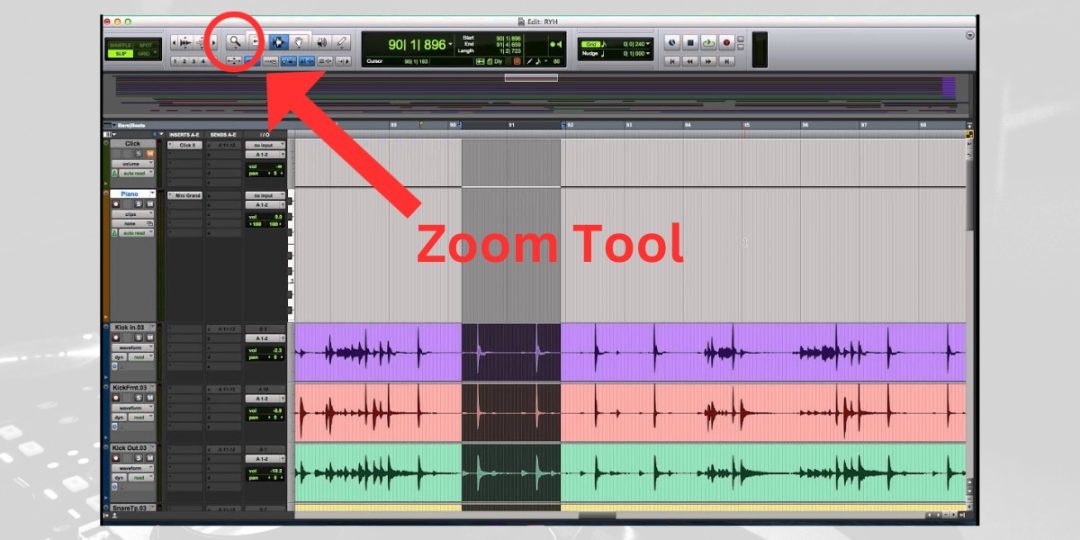
- Select Zoom Tool: Click on the “Zoom” tool icon on the toolbar or press “F5” on your keyboard.
- Zoom In: Click on the area you want to enlarge. Each click zooms in a step further. Alternatively, press and hold the “T” key to zoom in.
- Zoom Out: Right-click on the area you want to shrink. Each right-click zooms out a step further. Alternatively, press and hold the “R” key to zoom out.
- Controlled Zoom: Click and drag to select an area to zoom into or out of that specific selection. Use the left mouse button to zoom in and the right mouse button to zoom out.
Utilizing zoom effectively helps in fine-tuning your tracks and gaining the proper perspective, whether you are working on intricate edits or reviewing the entire arrangement.
Zoom Presets: Saving and Using Custom Zoom Views
- Setting a Zoom Preset: Adjust the zoom level to your preference, then go to “Window” > “Zoom” and choose “Save Zoom Preset” from the menu.
- Naming Your Preset: Enter a name for your zoom preset and click “OK.”
- Accessing Saved Zoom Presets: To use a preset, go to “Window” > “Zoom” and select your preset from the list.
- Quick Toggle: Assign keyboard shortcuts to your zoom presets for quicker access.
Having custom zoom presets at your fingertips streamlines your process, enabling a swift transition between different project views, which is invaluable in a fast-paced editing scenario.
Download our most popular resource: 6 Steps for Creating Radio Ready songs to learn the fundamentals of what goes into a professional mix from renowned Producer, Songwriter & Mixer Warren Huart, who has worked on several Grammy-nominated albums!
Navigating with Pro Tools Zoom Shortcuts
While knowing how to zoom out in Pro Tools can help make your workflow easier, learning to use zoom shortcuts will take you even further. These shortcuts provide quick navigation through your project, facilitating a seamless creative process.
- Horizontal Zoom In/Out: Press “T” to zoom in and “R” to zoom out horizontally. This is crucial for viewing different sections of your project swiftly.
- Vertical Zoom In/Out: Use “Control + Option + Command + [” to zoom out and “Control + Option + Command + ]” to zoom in vertically. This zoom alters the height of the tracks.
- Zoom Toggle: Press “E” to quickly toggle between your current zoom level and a predefined zoom setting. This is handy for rapidly switching perspectives.
- Zoom to Fit: Press “Option + A” to zoom to fit. This command adjusts the zoom level, so your entire project is visible.
- Zoom Preset Recall: If you have saved zoom presets, you can assign them to specific number keys for instant recall.
These shortcuts are your allies in maintaining a smooth workflow. Incorporating them into your routine minimizes disruptions, allowing you to focus on the creative aspect of your project.
By mastering these shortcuts, you unlock a fluid interaction with your Pro Tools workspace, enhancing your overall project navigation and editing efficiency.
How To Get The Most Out Of Using Pro Tools
Integrating the zoom tool in Pro Tools is a small skill that can significantly improve your overall workflow. Balancing the use of zooming in for detailed edits and zooming out for a broader project view will give you better control over composition and arrangement.
But learning how to zoom out in Pro Tools is just one of many valuable skills that can significantly elevate your music production quality. Our Pro Tools masterclass with Jon Connelly covers everything from the essential system setup and optimization, revealing hidden treasures within Pro Tools, to mastering recording, maintaining a creative flow, and ensuring your mixes sound polished and professional. You’ll also learn to tackle common Pro Tools errors swiftly, keeping the creative process smooth.
We encourage you to continue expanding your Pro Tools production skills by enrolling in our popular Ultimate Guide To Pro Tools course and learning how to unlock the realm of possibilities in recording and mixing in Pro Tools!


