Mixing vocals in Logic Pro X using stock plugins can transform your tracks, making them sound professional and polished. This guide will teach you how to mix vocals in Logic Pro X effectively, focusing on using the powerful built-in tools available. We’ll start by preparing your vocal tracks and setting proper gain staging. Then, you’ll learn how to use EQ, compression, reverb, and delay to enhance your vocals. Finally, we’ll cover fine-tuning techniques to ensure your vocals stand out in the mix.
You can achieve clear, balanced, and dynamic vocal mixes with Logic Pro X by mastering these steps. Let’s get started!
The Importance of Well-Mixed Vocals
A well-mixed vocal track is crucial for creating a professional and engaging song. Vocals are often the focal point of a track, carrying the melody and conveying the song’s emotional depth.
Clear and balanced vocals ensure that the listener can connect with the lyrics and the overall message of the song. Poorly mixed vocals can result in a muddy or harsh sound, detracting from the song’s impact and professionalism.
By achieving a balanced mix, the vocals can sit well within the track, complementing other elements like instruments and effects. Ultimately, well-mixed vocals can significantly enhance the overall listening experience, making the track more enjoyable and memorable.
Does Logic Have Good Stock Plugins For Mixing Vocals?
Logic Pro X is renowned for its high-quality stock plugins that are more than capable of producing professional-grade vocal mixes.
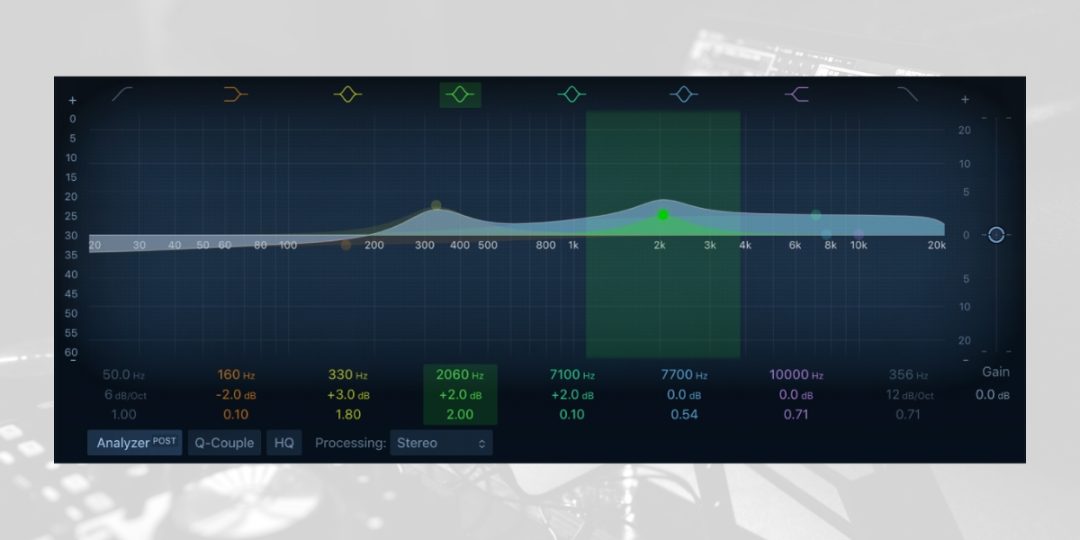
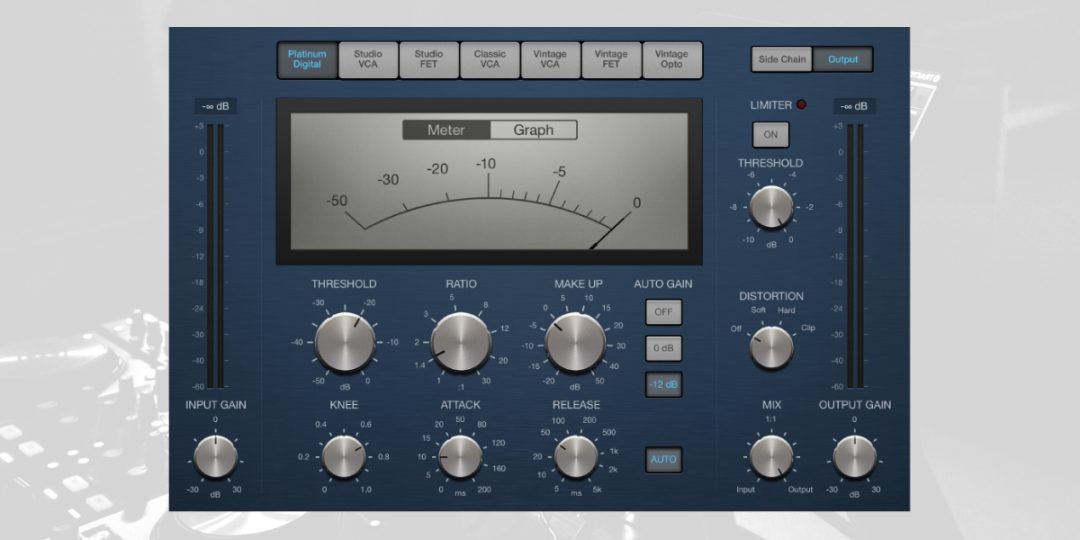
The Channel EQ, for instance, provides precise control over the frequency spectrum, allowing for effective tonal shaping. The Logic Pro X Compressor offers various models, mimicking classic hardware units, and is highly versatile for dynamic control.
Space Designer, Logic’s convolution reverb, adds depth and ambiance to vocals, making them sound more polished. Additionally, plugins like the De-Esser and Exciter are excellent for controlling sibilance and adding brightness, respectively.
These tools ensure that users can achieve a professional and polished vocal mix, even with just stock plugins.
Preparing Your Vocals for Mixing
Preparing your vocal tracks properly before mixing is essential. This preparation ensures that you start with clean and optimally leveled recordings, setting a solid foundation for the mixing process.
Cleaning Up Your Tracks
Cleaning up your tracks involves removing unwanted noise and artifacts, as well as ensuring your vocals are crisp and clear. This initial step is crucial for achieving a polished mix.
- Remove Background Noise: Use Logic Pro X’s Noise Gate plugin to eliminate low-level background noise.
- Edit Breaths and Clicks: Manually cut out loud breaths, clicks, and pops in the vocal track.
- Apply a Low-Cut Filter: Use the Channel EQ to apply a low-cut filter, removing frequencies below 80 Hz to reduce rumble.
- Tidy-Up Timing: Use Flex Time to correct any timing issues, ensuring the vocals are perfectly in sync with the track.
Setting Up Proper Gain Staging
Proper gain staging is critical for maintaining optimal audio levels throughout the mixing process, preventing distortion, and preserving dynamic range.
- Set Initial Levels: Adjust the gain on your audio interface or preamp to achieve a healthy recording level, typically peaking around -6 dB.
- Normalize Your Tracks: Use the Normalize function in Logic Pro X to set a consistent peak level for all vocal recordings.
- Use Gain Plugins: Apply the Gain plugin to fine-tune levels without affecting the overall mix balance.
- Check Meter Levels: Monitor the levels on Logic’s Meters to ensure your vocal tracks are not clipping. Aim for peaks around -6 dB to -3 dB.
- Balance with Other Elements: Adjust the fader to balance the vocal track with other elements of the mix, ensuring it sits well within the overall soundscape.
How to Mix Vocals Logic Pro X Using Stock Plugins
Learning how to mix vocals in Logic Pro X with stock plugins is useful for achieving professional-quality results with ease. Logic’s native tools offer everything needed to create a professional-sounding vocal mix, from EQ and compression to reverb and delay. Here’s how to make it happen!
Step #1) Applying EQ
EQ is a crucial first step in vocal mixing. It helps shape the tonal balance, remove unwanted frequencies, and enhance the vocal’s clarity and presence.
How to Use Channel EQ
Channel EQ is a versatile tool in Logic Pro X that allows precise control over the frequency spectrum.
- Insert the Channel EQ: Open the mixer and add the Channel EQ to your vocal track.
- Analyze the Frequency Spectrum: Use the analyzer to visualize the frequencies present in your vocal recording.
- Apply High-Pass Filter: Roll off low frequencies below 80 Hz to remove rumble and unwanted noise.
- Cut Problem Frequencies: Identify and reduce harsh frequencies, usually between 200-500 Hz and 2-4 kHz.
- Boost Desirable Frequencies: Enhance clarity by slightly boosting frequencies around 1-3 kHz and add airiness by boosting above 10 kHz.

Identifying and Reducing Problem Frequencies
Identifying and reducing problem frequencies ensures a clean and balanced vocal sound.
- Sweep for Problem Frequencies: Use a narrow Q setting and sweep across the frequency spectrum to identify unpleasant sounds.
- Cut Harsh Frequencies: Once identified, reduce these frequencies by cutting them with a moderate Q setting.
- Manage Resonances: Address any resonant peaks that cause the vocal to sound boxy or nasal.
Enhancing Vocal Presence with EQ
Enhancing vocal presence with EQ helps the vocals stand out in the mix.
- Boost Presence Frequencies: Increase frequencies between 1-3 kHz to make the vocals more present in the mix.
- Add Airiness: Boost high frequencies above 10 kHz to add brightness and openness.
- Maintain Balance: Ensure that boosting does not make the vocals sound harsh by making small, controlled adjustments.
- Check The Sound in Context: Always listen to the EQ adjustments in the context of the entire mix to ensure the vocals sit well with other elements.
Step #2) Adding Compression to Vocals in Logic Pro X
Compression is a key step in vocal mixing, ensuring that the vocals have a consistent volume and dynamic range. Logic Pro X provides a diverse set of stock compressors that can help achieve this effect.
Using the Logic Pro X Compressor
Logic Pro X features several compressor models that emulate different classic hardware units.
- Insert the Compressor: Open the mixer and add the Logic Pro X Compressor to your vocal track.
- Choose a Compressor Type: Select from various types, such as Platinum Digital, Studio VCA, Vintage VCA, Vintage FET, and Opto. Each type offers a distinct sound.
- Platinum Digital: Transparent and versatile, suitable for most vocal types.
- Studio VCA: Clean and precise, great for modern vocal sounds.
- Vintage VCA: Warm and smooth, emulating classic analog compressors.
- Vintage FET: Fast and aggressive, ideal for adding punch to vocals.
- Opto: Smooth and musical, known for gentle and natural compression.
- Input Level Adjustment: Ensure the input level is appropriate to avoid distortion and achieve clean compression.
Adjusting Attack and Release Settings
Properly adjusting the attack and release settings is crucial for maintaining the natural sound of the vocals.
- Set the Attack: A fast attack time (1-10 ms) can catch transients and control peaks. A slower attack (10-50 ms) allows more of the initial transients to pass through, adding punch.
- Set the Release: A fast release time (20-50 ms) quickly reduces gain reduction after the signal drops. A slower release (50-500 ms) smooths out the compression effect, preventing pumping.
- Test Different Settings: Experiment with different settings to find the balance that best suits the vocal performance.
Setting the Right Threshold and Ratio
The threshold and ratio settings determine how much compression is applied and at what point.
- Set the Threshold: Lower the threshold until the compressor starts to reduce the gain of the loudest parts of the vocal. Aim for 2-6 dB of gain reduction.
- Choose the Ratio: Common ratios for vocals are between 3:1 and 6:1. A higher ratio applies more compression, while a lower ratio is more subtle.
- Monitor Gain Reduction: Ensure that the gain reduction meter shows consistent reduction without excessive compression, maintaining the vocal’s natural dynamics.

Step #3) Using Reverb and Delay for Vocal Mixing
Reverb and delay are essential effects for adding depth and space to your vocals. Logic Pro X’s stock plugins, like Space Designer and Delay Designer, offer useful tools for achieving professional results.
Applying Reverb with Space Designer
Space Designer is Logic Pro X’s convolution reverb, allowing you to simulate various acoustic environments.
- Insert Space Designer: Open the mixer and add Space Designer to your vocal track.
- Select a Preset: Choose a suitable reverb preset that matches the vibe of your track. For vocals, consider using small to medium-room presets for a natural sound.
- Adjust Reverb Time: Set the reverb time to fit the song’s tempo and style. A longer reverb time can create a more spacious feel, while a shorter time keeps the vocals tight.
- Mix Wet and Dry Signals: Balance the wet and dry signals by adjusting the wet/dry mix to ensure the reverb complements the vocals without overpowering them.
- Tailor the Reverb EQ: Use the built-in EQ in Space Designer to shape the reverb sound, cutting low frequencies to avoid muddiness and boosting highs for clarity.
Creative Uses of Delay
Delay can add interest and depth to your vocals, creating a sense of space and rhythm.
- Insert Delay Designer: Add Delay Designer to your vocal track from the mixer.
- Choose Delay Settings: Set the delay time to match the song’s tempo. Common settings are quarter-note or eighth-note delays for rhythmic effects.
- Adjust Feedback: Increase the feedback to create more repetitions of the delay, adding depth and complexity. Be cautious not to overdo it, as too much feedback can clutter the mix.
- Pan the Delays: Use stereo panning to place the delays in the left and right channels, creating a wider vocal sound.
- Blend with the Dry Signal: To ensure clarity, balance the delay effect with the dry vocal signal. Adjust the wet/dry mix to achieve the desired effect.
Step #4) Fine-Tuning Vocals with Additional Stock Plugins
Fine-tuning your vocals involves using specific plugins to enhance the clarity and quality of the vocal track. Logic Pro X provides powerful tools like the Exciter and De-Esser to achieve this.
Using the Exciter for Added Brightness
The Exciter plugin in Logic Pro X adds harmonic content to your vocals, making them sound brighter and more vibrant.
- Insert the Exciter: Open the mixer and add the Exciter plugin to your vocal track.
- Select Frequency Range: For adding brightness to vocals, choose the frequency range you want to enhance, typically between 3 kHz and 10 kHz.
- Adjust Harmonics: Increase the harmonics to add more presence and clarity to the vocal sound. Start with a subtle amount and increase gradually.
- Blend with Dry Signal: Balance the effect by mixing the processed signal with the original dry signal to maintain naturalness.
- Fine-tune the Effect: Adjust the effect settings to ensure the added brightness enhances the vocal without causing harshness or distortion.
Applying De-Esser to Control Sibilance
The De-Esser plugin helps manage harsh ‘s’ sounds, ensuring a smoother and more pleasant vocal track.
- Insert the De-Esser: Add the De-Esser plugin to your vocal track from the mixer.
- Set the Frequency Range: Identify the sibilance’s frequency range, usually between 4 kHz and 8 kHz, and set the De-Esser to target this range.
- Adjust the Threshold: Lower the threshold until the De-Esser starts reducing the sibilant peaks. Aim for subtle reduction to avoid affecting the overall vocal tone.
- Fine-tune the Reduction: Adjust the reduction amount to smooth out the sibilance while preserving the vocal’s clarity.
- Monitor in Context: Listen to the De-Esser in the context of the full mix to ensure the sibilance is controlled without overly dulling the vocal sound.
Step #5 ) Finalizing Your Vocal Mix
Finalizing your vocal mix involves making the final adjustments to ensure that the vocals sit well within the overall track. This includes balancing the vocal levels and using automation for dynamic control.
Balancing Vocals in the Mix
Balancing the vocal levels within the mix is crucial for ensuring the vocals are neither too loud nor too quiet.
- Set Initial Vocal Level: Adjust the fader so the vocals are clearly audible but do not overpower the other elements.
- Reference the Mix: Compare your mix with professional tracks in a similar genre to ensure appropriate vocal levels.
- Listen in Context: Listen to the vocals in the context of the full mix to ensure they complement the other instruments.
- Adjust for Consistency: Make small adjustments to the fader to maintain a consistent vocal level throughout the song.
- Use EQ to Fit Vocals: Apply minor EQ adjustments if needed to ensure the vocals blend well with the mix without clashing with other frequencies.
Using Automation for Dynamic Control
Automation helps maintain a consistent vocal performance and ensures dynamic control throughout the track.
- Enable Automation Mode: Switch to automation mode in Logic Pro X.
- Automate Vocal Volume: Create volume automation curves to adjust the vocal levels during different sections of the song. This helps maintain clarity and impact.
- Automate Effects Parameters: Automate reverb and delay sends to enhance certain parts of the vocals, such as choruses or specific phrases.
- Automate Panning: Use panning automation to create movement and interest in the vocal track, especially for background vocals or ad-libs.
- Fine-Tune Automation: Listen to the track and make precise adjustments to ensure the automation enhances the vocal performance without being noticeable.
Download our most popular resource: 6 Steps for Creating Radio Ready songs to learn the fundamentals of what goes into a professional mix from renowned Producer, Songwriter & Mixer Warren Huart, who has worked on several Grammy-nominated albums!
Closing Thoughts
Mastering how to mix vocals in Logic Pro X using stock plugins is a valuable skill for any music producer. You can achieve a professional-quality vocal mix by utilizing Logic Pro X’s powerful tools, such as Channel EQ, Compressor, Space Designer, and Delay Designer. Each plugin serves a specific purpose, from shaping the vocal tone and controlling dynamics to adding depth and spatial effects.
The process involves several key steps: preparing your vocals, applying EQ to enhance clarity, using compression to maintain consistent levels, and adding reverb and delay for depth. Fine-tuning with additional plugins like the Exciter and De-Esser ensures your vocals are bright and free from unwanted sibilance.
Finally, balancing the vocals within the mix and using automation for dynamic control helps maintain a polished and engaging vocal performance.
By following these steps and understanding the tools available to you, you can create mixes that stand out and capture the listener’s attention. Consistent practice and experimentation will further enhance your ability to produce high-quality vocal tracks using Logic Pro X.
Are You Ready To Take Your Logic Mixing Skills To The Next Level?
If you’re ready to elevate your music production skills, consider enrolling in our Music Production in Logic Pro X with Rob Mayzes masterclass. This comprehensive course covers everything from fundamental mixing techniques to advanced production strategies, ensuring you develop professional-sounding mixes.
Gain in-depth knowledge of Logic Pro X’s tools and features and learn how to apply them effectively to create high-quality music. Sign up today to get started!


