Getting your music out there for the world to hear is an exciting part of being a producer. Having the right tools can make this process smooth and enjoyable. One crucial skill to have in your arsenal is knowing how to export a Logic project as an MP3 file.
This guide will walk you through everything you need to know, from preparing your project to ensuring your final export sounds professional and polished. Let’s make sure your tracks are ready to impress, whether you’re sharing them with friends, streaming online, or distributing them to a wider audience.
Effortlessly Exporting Your Logic Project as an MP3
Knowing how to export your Logic Pro X project as an MP3 is essential for producers who work within Logic. This format balances audio quality and file size, making it perfect for sharing and streaming. Following a systematic approach ensures that your export process is smooth and efficient.
Below, we will explain in detail how to export a Logic project as an MP3 file.
Preparing Your Project for Export
Preparation is key to ensuring that your exported MP3 file sounds professional and polished. Proper project settings and a clean workspace are essential to avoid issues during the export process.
Ensuring Proper Project Settings and Audio Quality
- Sample Rate and Bit Depth: Verify that your project is set to the correct sample rate (44.1 kHz or 48 kHz) and bit depth (16-bit or 24-bit). These settings directly impact the audio quality of your final export.
- Track Levels: Adjust the volume levels of all tracks to avoid clipping, which can cause distortion. Ensure that the overall mix is balanced and clear.
- Effects and Processing: Double-check that all applied effects, such as EQ, compression, and reverb, are set correctly. Properly configured effects enhance the sound quality of your project.
- Bounce Range: Use the cycle range or the yellow range on the timeline to select the exact portion of your project that you wish to export. This step ensures you are exporting the correct segment of your audio.
Cleaning Up Your Project for a Smooth Export
- Remove Unnecessary Tracks: Delete any tracks that do not contribute to the final mix. This helps streamline the project and reduces the chances of errors during export.
- Clear Track Names: Ensure all tracks are clearly named. This will make managing your project easier and prevent confusion during the export process.
- Eliminate Silent Sections: Check for and remove any unnecessary silent parts at the beginning or end of your project. This helps maintain a professional and polished final output.
- Consolidate Regions: Merge fragmented audio regions into continuous tracks. This step minimizes potential issues during export and simplifies the process.
How to Export Logic Project as MP3
In this section, we’ll explain how to export a Logic project as an MP3 file. You will learn about setting export parameters, choosing the correct file format and bitrate, and completing the export process.
#1) Setting the Export Parameters in Logic Pro
To export your Logic Pro project as an MP3, start by setting the correct export parameters. These settings determine the portion of your project to be exported and the overall quality of the final file.
- Open the Bounce Dialog: Navigate to File > Bounce > Project or Section. This opens the bounce dialog where you can set your export parameters.
- Select the Output Range: Use the cycle range in the timeline or manually input the start and end points to define the segment of your project you want to export. This ensures you only export the desired section of your audio.
- Choose the Output Format: In the bounce dialog, select the PCM option. This step is necessary before converting the file to MP3.

#2) Selecting the Correct File Format and Bitrate
Choosing the correct file format and bitrate is crucial for ensuring the best balance between audio quality and file size.
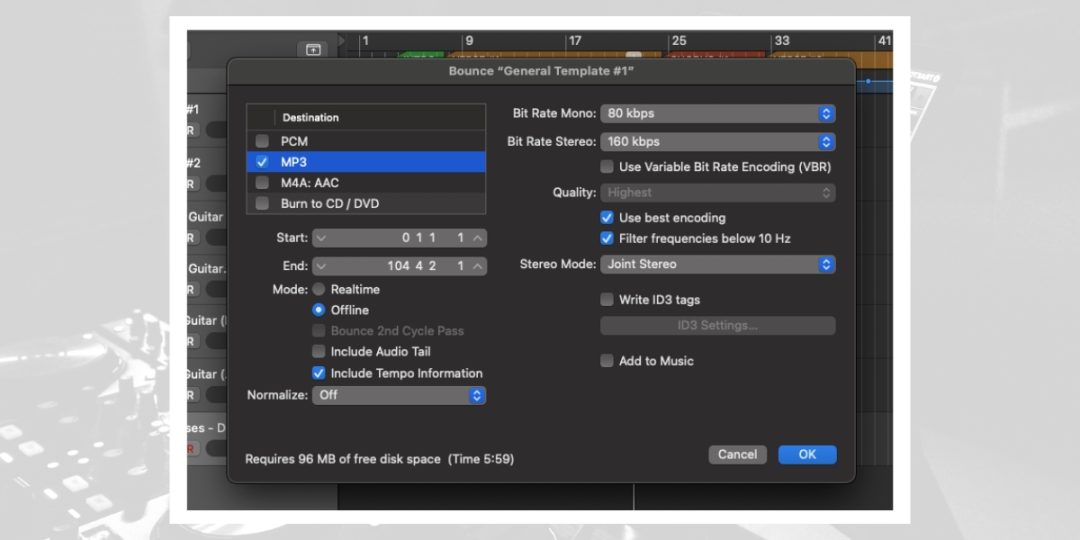
- Select MP3 Format: After setting the export parameters, switch to the MP3 tab within the bounce dialog.
- Set the Bitrate: Choose a bitrate that matches your needs. A higher bitrate, such as 320 kbps, offers better audio quality, while lower bitrates, like 128 kbps, result in smaller file sizes. If you need professional audio quality, choose 320 kbps. If you need smaller files for faster uploads, 128 kbps is better. Consider the purpose of your MP3 to find the right balance between quality and size.
- Adjust Additional Settings: You can enable options like Normalize to ensure the output level is consistent. Normalizing adjusts the audio to a standard level, preventing volume discrepancies. Depending on your project requirements, you may also adjust stereo mode settings. For instance, you can choose between stereo and joint stereo modes. Stereo mode keeps the left and right channels separate, which is ideal for preserving spatial effects. Joint stereo combines channels for a smaller file size without significant quality loss. Choose the settings that best fit your project’s audio and size needs.
#3) Completing the Export Process and Saving Your MP3 File
Once you have set the export parameters and selected the correct file format and bitrate, you can complete the export process and save your MP3 file. Follow these steps to ensure a smooth and successful export:
- Review Your Settings: Double-check all the settings in the bounce dialog before finalizing the export. Ensure that the output range, format, and bitrate are correct. This step helps prevent any errors or missed settings that could affect the final file.
- Initiate the Bounce: Click the Bounce button in the bounce dialog to start the export process. Logic Pro will begin processing your project according to the parameters you have set. Depending on its length and complexity, this may take some time.
- Choose the Destination Folder: After the bounce process is complete, a save dialog will appear. Select the folder where you want to save the MP3 file. Choosing a location that is easy to access and well-organized is a good practice.
- Name Your File: Enter a descriptive name for your MP3 file. This helps you identify the file easily later. Avoid using generic names like “track1” or “song” and instead use a name that reflects the content of the project.
- Save the File: Click Save to finalize the export. Your MP3 file will be saved to the selected destination folder.
- Verify the Export: Once the file is saved, locate the MP3 file in the destination folder and play it back to ensure it has been exported correctly. Check for any issues, such as missing audio, distortion, or incorrect metadata.
Following these steps ensures that your Logic Pro project is exported correctly and saved as a high-quality MP3 file. This process ensures that your final audio file is ready for sharing, distribution, or further use.
- RELATED: Importing Audio Files in Logic Pro X
Tips for Optimizing Your MP3 Export from Logic Pro
Optimizing your MP3 export from Logic Pro is a crucial step to consider. These tips will help you achieve the best audio quality and enhance your MP3 file with valuable metadata.
Achieving the Best Audio Quality in MP3 Format
Consider using a dithering process to achieve the best audio quality in your MP3 export. Dithering helps to reduce quantization errors and enhances overall audio quality.
Additionally, use a dedicated mastering plugin designed for MP3 exports. These plugins offer specific tools to fine-tune your final output, ensuring it sounds polished and professional.
Regularly reference your export against high-quality tracks in a similar genre. This comparison helps maintain a consistent audio quality across different playback systems.
Using Metadata to Enhance Your MP3 File
Metadata adds important information to your MP3 file, making it easier to organize and identify. Follow these steps to include metadata in your export:
- Open the Metadata Settings: In the bounce dialog, go to the MP3 tab and locate the metadata fields.
- Add Basic Information: Enter the artist name, track title, album name, and year. This information helps categorize and identify your MP3 file.
- Include Genre and Comments: Specify the genre of your track and add any relevant comments. This provides additional context for listeners.
- Embed Artwork: If applicable, add cover artwork to your MP3 file. This enhances the visual appeal and can be displayed in media players.
- Verify Metadata: After exporting, use a media player or metadata editor to check the accuracy of the embedded information.
Troubleshooting Common Issues When Exporting MP3s from Logic
Exporting MP3s from Logic Pro X can sometimes present challenges. This section will help you troubleshoot common issues to ensure a smooth export process.
Fixing Export Errors and Audio Glitches
If you encounter errors or audio glitches during the export process, follow these steps to resolve them:
- Check Project Settings: Ensure your project settings match the desired output format. Verify the sample rate and bit depth are set correctly.
- Update Plugins: Outdated Logic plugins can cause export issues. Make sure all your plugins are up-to-date and compatible with Logic Pro X.
- Render Tracks: Bounce all tracks to audio files before exporting. This reduces the processing load and can help eliminate glitches.
- Clear Cache: Sometimes, clearing Logic Pro X’s cache can resolve unexpected errors. Go to Preferences > Advanced Tools and reset the cache.
- Reboot Logic Pro X: Restarting the application can often resolve temporary glitches. Save your project, close Logic Pro X, and then reopen it.
Addressing Compatibility Problems with Different Devices
MP3 files sometimes have compatibility issues when played on different devices.
To ensure your exported files work seamlessly across all platforms, follow these guidelines:
- Standard Bitrate: Export your MP3 at a standard bitrate, such as 192 kbps or 320 kbps. These bitrates are widely supported and offer a good balance between quality and file size.
- File Naming: Use simple and clear file names without special characters. Some devices may have trouble reading files with complex names.
- ID3 Tags: Ensure your MP3 files include proper ID3 tags. Add metadata such as the artist’s name, album, and track title. This information helps devices recognize and organize your files correctly.
- Test on Multiple Devices: Before distributing your MP3 files, test them on various devices. Check playback on smartphones, computers, and other media players to ensure compatibility.
- Convert if Necessary: If a device does not support MP3, consider converting the file to a different format, such as AAC or WAV, using a reliable audio converter.
Download our most popular resource: 6 Steps for Creating Radio Ready songs to learn the fundamentals of what goes into a professional mix from renowned Producer, Songwriter & Mixer Warren Huart, who has worked on several Grammy-nominated albums!
Wrapping Up Your MP3 Export: Final Checks and Considerations
Learning how to export a Logic project as an MP3 is essential for producers aiming for professional quality and efficient distribution. This process ensures your audio files are optimized for various platforms, maintaining high fidelity and usability.
By following the steps outlined, you streamline your workflow, minimize errors, and achieve consistent results. This not only enhances the listening experience but also elevates your production standards, making your work stand out in the competitive music industry.
To further enhance your music production skills, we recommend enrolling in our best-selling course, Music Production In Logic Pro X with Rob Mayzes. This masterclass covers everything from the basics to advanced techniques, helping you create professional-sounding mixes.
You’ll learn to use Logic Pro X’s powerful features, including its extensive library of sounds and plugins. The course also offers practical tips on arranging, recording, and mixing to create professional-sounding tracks.
With in-depth tutorials and hands-on exercises, this course is designed to transform your production capabilities and help you produce high-quality music. Sign up today and take your music production skills to the next level.


