Understanding how to freeze a track in Logic Pro X is fundamental for efficient music production. This process is more than a technical necessity; it’s a strategic tool in your production arsenal. You can effectively manage your project’s CPU load by freezing tracks, ensuring smoother workflow and better overall performance.
In this guide, we’ll break down the mechanics of the ‘Freeze’ function in Logic Pro X. We will guide you through each step and share best practices to optimize your experience in Logic Pro X.
Understanding the ‘Freeze’ Function in Logic Pro X
The ‘Freeze’ function in Logic Pro X is a strategic tool designed to optimize music production by managing system resources.
It allows for the temporary conversion of active tracks into a less CPU-intensive format. This feature particularly benefits projects with high plugin usage or complex arrangements. It ultimately helps to reduce processor load and prevent issues like audio glitches or software crashes.
While a track is frozen, you can still make basic adjustments like muting, soloing, adjusting pan position, and modifying volume. However, changes to the software instruments or plugins on the track require unfreezing.
Why Would You Freeze A Track In Logic (& When)?
Freezing a track is primarily employed to manage CPU-heavy projects, enhancing stability and seamlessness in music production.
It’s a tactical move, especially when working with CPU-intensive software instruments and plugins or as your project scales up.
This approach ensures that your system’s capacity is not overstretched, allowing you to maintain the complexity and quality of your production without hindering creativity.
How to Freeze a Track in Logic Pro X: A Step-by-Step Guide

In this section, we’ll guide you through how to freeze a track in Logic Pro X. Freezing tracks is simple and offers significant benefits, especially in complex projects.
Step #1: Selecting the Track for Freezing
Freezing a track in Logic Pro X begins with selecting the track you want to freeze. This choice determines which part of your project will be rendered into an audio file to save CPU resources.
- Identify the Track: Start by choosing the track you want to freeze. It could be an instrument track, a vocal track, or any other type that is causing high CPU usage.
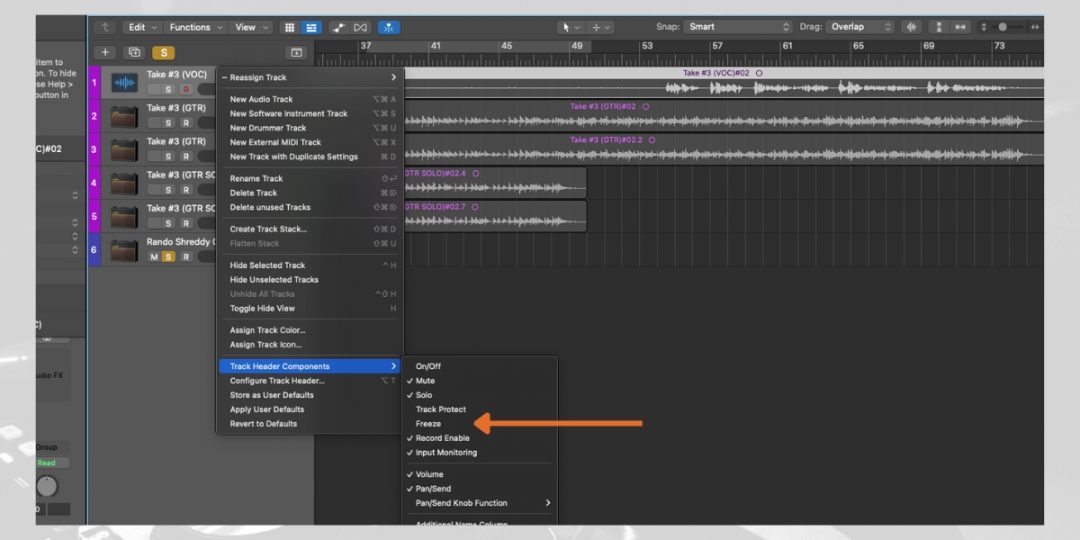
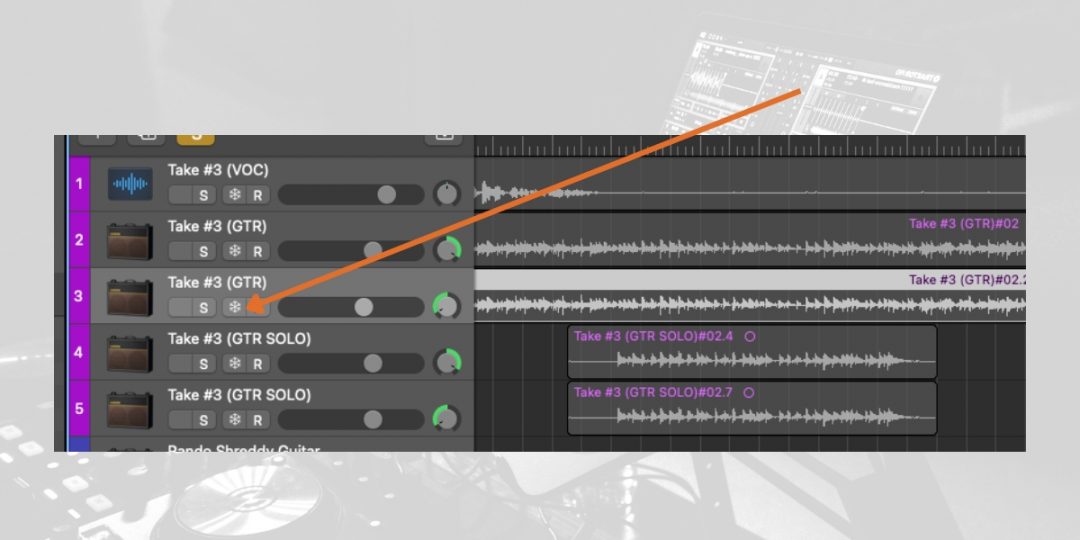
- Enable Freeze Option: If the ‘Freeze’ button is not already visible in your track header, you need to enable it. To do this, right-click on the channel strip, select ‘Track Header Components’, and then choose ‘Freeze’. This adds the ‘Freeze’ icon to your track headers, making it ready for freezing.
Step #2: Applying the Freeze Function in Logic Pro X
You will apply the freeze function after selecting the track(s) you wish to freeze. This step is where the actual process of reducing CPU load takes place. This is when Logic renders the track’s real-time processing, including virtual instruments and effects, into a static audio file.
- Activate Freeze: To initiate the freezing process, click the ‘Freeze’ button in the track header. This button will turn green to confirm that the freeze process has been started.
- Rendering the Track: Once the freeze is activated, the next time you play your project, the playhead will skim across the session, indicating the freezing process. Logic Pro X is now rendering the track into an audio file, which will alleviate the CPU load once completed.
This action effectively ‘locks’ the current state of the track, including all its settings and effects.
As we previously stated, you cannot change its plugins or virtual instruments while a track is frozen. If such changes are needed, you would have to unfreeze the track, make the changes, and then freeze it again if necessary.
Step #3: Freezing Multiple Tracks
If you wish to freeze more than one track, you can select multiple tracks in your project. You can apply the freezing process to all selected tracks simultaneously, reducing the CPU load for each one.
Best Practices for Freezing Tracks in Logic Pro X
Now, let’s take a look at some of the nuances of freezing tracks in Logic Pro X. We’ll focus on effective strategies for unfreezing and editing tracks, as well as managing system resources in Logic Pro X.
How to Unfreeze and Edit Tracks in Logic Pro X
If you need to edit the software instrument of plugins within your track, you must unfreeze it first. Here’s how to unfreeze a track in Logic Pro X.
- Reactivating the Track: Click the snowflake icon in the track header to unfreeze a track. This will make all of a track’s elements active again. It’s important to note that during the freezing process, the track was rendered into an audio file, which temporarily disabled real-time processing to save CPU resources. By unfreezing, you revert the track back to its editable state.
- Making Edits: Once the track is unfrozen, you can proceed to make any required changes. This could involve altering the MIDI data, tweaking plugin settings, or modifying the track’s automation. During this stage, you can apply creative changes or correct any issues that were not apparent or accessible during the track’s frozen state.
- Refreezing: After making your edits and ensuring the track is as you want it, you can refreeze it. Refreezing the track will render these new changes into a new audio file, thus conserving CPU resources once again.
Utilizing Different Freezing Modes
Logic Pro offers two different freezing modes to enhance CPU management & worklfow greatly. These modes cater to different needs based on the nature of your track:
- Source Only Mode: This mode freezes your track without including any applied effects. It’s particularly useful when you’re working with CPU-intensive software instruments and want to freeze their raw, unprocessed sound. This mode is ideal for situations where you are content with the instrument’s sound but might want to tweak the effects later on.
- Pre-fader Mode: Unlike the ‘Source only’ mode, the ‘Pre-fader’ mode freezes the track along with all its effects. It captures the complete sound of the track, including both the instrument and the effects chain. This mode is beneficial when both the instrument and the applied effects contribute to a high CPU load and you need to lock in the entire sound of the track for efficient processing.
Each mode has its specific use cases, and selecting the right one depends on what elements of the track you wish to freeze.
Managing System Resources Through Track Freezing
Managing system resources effectively through track freezing in Logic Pro X involves a few key considerations and tips:
- Track Analysis: Analyze your project to identify which tracks consume the most CPU resources. Typically, tracks with multiple plugins, especially CPU-intensive tracks like reverb or complex synths, should be prioritized for freezing.
- Selective Freezing: Instead of freezing every track, be selective. Focus on freezing tracks that are finished or won’t require immediate editing. Freezing tracks in the early stages of your project can help manage CPU load as the project grows.
- Monitoring CPU Load: Regularly monitor your CPU load, especially after adding new tracks or plugins. Logic Pro X provides a CPU/HD meter that can help you monitor system performance. This helps in making informed decisions about when to freeze or unfreeze tracks.
- Regular Saves: When freezing and unfreezing tracks, saving your project is a good practice to avoid any potential data loss.
Download our most popular resource: 6 Steps for Creating Radio Ready songs to learn the fundamentals of what goes into a professional mix from renowned Producer, Songwriter & Mixer Warren Huart, who has worked on several Grammy-nominated albums!
Tips For Integrating Freezing Into Your Workflow
Integrating the freezing function into various stages of music production in Logic Pro X can greatly enhance your workflow. Here’s how you can apply this feature effectively across different stages:
- During Arrangement: In the initial phases of arranging your track, you might experiment with various instruments and effects. As the project grows, so does the CPU load. Here, freezing tracks that are less likely to change (like a finalized drum pattern or rhythm section) can save CPU, helping you focus on composing and arranging other elements without lag.
- In the Mixing Phase: Mixing often involves adding multiple effects and processing to tracks, which can be CPU-intensive. Freezing tracks that have reached a near-completion stage in the mix can free up resources. This allows you to apply more demanding processing to other tracks without overwhelming your system.
- Before Mastering: As you prepare your project for the final mastering stage, it’s beneficial to freeze most tracks. This can ensure minimal CPU usage, allowing for a smoother mastering process, especially if you’re using additional mastering plugins within the same project.
- Revisiting Projects: When reopening an older project for further editing or remixing, start by unfreezing tracks as needed. This allows you to modify elements with fresh insights while keeping the project manageable.
By thoughtfully integrating track freezing into these different stages, you can maintain a smooth and efficient workflow, ensuring your creative process is uninterrupted by technical limitations. This approach optimizes CPU usage and helps you focus on the creative aspects of music production in Logic Pro X.
Closing Thoughts: Streamlining Your Music Production in Logic Pro X
Familiarizing yourself with how to freeze a track in Logic Pro X is a handy skill to have in your back pocket. Utilizing track freezing can significantly enhance your project’s efficiency, maintaining smooth operation even in complex sessions.
Balancing technical resource management with creative flexibility is key to ensuring your musical vision is realized without compromise. As you continue to explore and apply these techniques, you’ll find that freezing tracks is not just a workaround for CPU limitations but a strategic component of your creative process in Logic Pro X.
To further develop your music production capabilities, we recommend enrolling in our best-selling Logic Pro course: Music Production in Logic Pro X with Rob Mayzes.
This course offers a detailed exploration of various music production techniques, from the fundamentals to advanced strategies. Its goal is to help enhance both your technical proficiency and creative expression. With Rob Mayzes’ guidance, you’ll delve deeper into the intricacies of music production while honing your skills to new levels!


