Logic Pro is an intuitive DAW with a vast selection of tools for music production and songwriting. While Logic Pro is undoubtedly a one-stop shop for every phase of production (recording, mixing, and mastering), the overall workflow lends itself to the initial creative phase of writing a song. One of the most important things to producers and songwriters during this stage is the ability to quickly audition different arrangements. In Logic Pro, you can learn how to insert an arrangement markers section to help you navigate and experiment with ease.
What Are Arrangement Markers?
There are two main types of markers in Logic Pro. The first are classic markers allowing you to label sections of a song and navigate between them using keyboard shortcuts. The second, and most useful, are arrangement markers. Arrangement markers similarly let you label sections of a song, but they also let you drag and drop all of the associated tracks and clips within the marked section. How is this useful?
Examples of How to Use Arrangement Markers
Arrangement markers serve the dual purpose of labeling and organizing your session, while also giving you the opportunity to experiment with different arrangements on the fly. By simply dragging the desired arrangement marker to a new position on the timeline, you can readily move entire sections of a song. It’s incredibly easy to audition what the chorus might sound like after the intro and before the verse, for example. Taking advantage of Logic Pro’s arrangement markers feature is a tremendously helpful tool for nailing the flow of a song with little fuss.
- RELATED: Basic Panning in Logic Pro X
Download our most popular resource: 6 Steps for Creating Radio Ready songs to learn the fundamentals of what goes into a professional mix from renowned Producer, Songwriter & Mixer Warren Huart, who has worked on several Grammy-nominated albums!
Logic Pro: How to Insert an Arrangement Markers Section (Step-by-Step-Guide)
Arrangement markers are powerful, flexible, and also easy to set up. Here’s how:
Step #1: Show Global Tracks
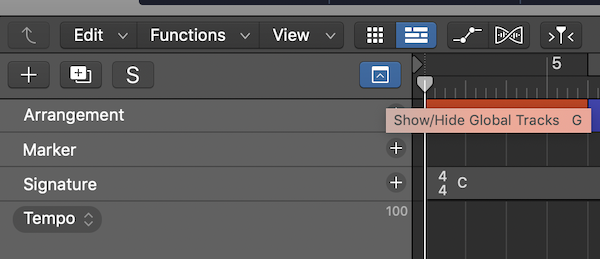
You’ll have to enable global tracks first to see where arrangement markers live. You can do this one of two ways. First, note the dropdown menu to the far right of the new tracks section of the edit window. Click it to show global tracks (highlighted blue when open). Alternatively, you can toggle global tracks on/off by simply hitting the “G” key.
Step #2: Right-Click to Enable Track Arrangement
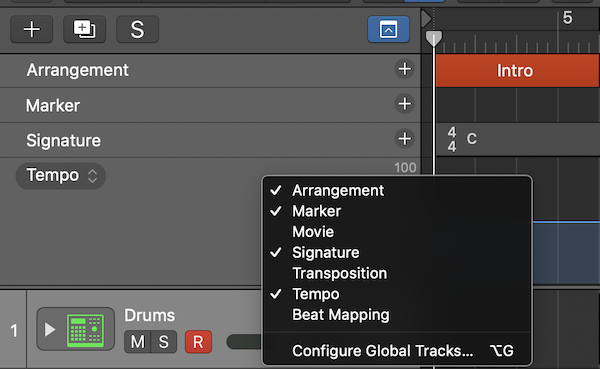
If you don’t see it listed in your global tracks menu by default, you’ll need to enable the arrangement track. Right-click somewhere in the global tracks box and select Arrangement. You can also customize the other global elements you may or may not want to see.
The keyboard shortcut for enabling the arrangement markers track is [Command] + [Shift] + “A.” It’s also possible to configure global track settings using the [Option] + “G” shortcut.
Step #3: Click “+” to Insert a New Marker

Now we’re ready to insert an arrangement marker. Do so by clicking the “+” on the arrangement track. Logic Pro will automatically name each marker according to the order you add them. The first marker will come out as Intro, the second Verse, etc. We can rename and customize these at the end.
Step #4: Resize the Length of Your Marker
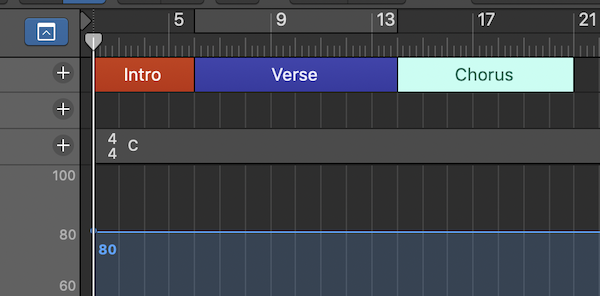
We can easily resize the length of a marker by clicking and dragging on either end of it in the arrangement track. Adjust the bounds of each marker according to the layout of your project.
Step #5 – Label & Color Your Marker

Finally, we can rename as well as color code our arrangement markers. To rename a marker, simply click its current title. A dropdown menu will open up with a list of suggested names and an option to rename it whatever you’d like. Repeat the process as needed for each marker.
To color code each marker, hit [Option] + “C” to open up Logic Pro’s color picker. Select the marker you want to change, and choose a color from the palette to give it a makeover. That’s it!
Conclusion: Using Arrangement Markers in Logic Pro Helps Keep Your Project Organized
Arrangement markers provide a useful overview of the whole project at a glance from the global tracks menu. They also offer the unique ability to shift and move complete sections of the song in a single click — no more having to select groups of clips across multiple tracks and trying to copy/paste them manually. Just move the arrangement marker, and all of the audio contained under the marker will follow!
Looking for More Logic Pro Tutorials?
Producing great-sounding songs can be difficult if you don’t know how to use your DAW correctly. A Beginners Guide To Music Production in Logic Pro is one of our most popular courses and will teach you the foundational skills that you need to record and mix better songs in Logic Pro. Check it out today!

