In the world of music production, any engineer worth their salt will attest that safeguarding your projects is absolutely essential. This means keeping consistent, organized backups of your projects every step of the way. If you are recording in Reaper, it’s crucial to understand how its backup system works. Fortunately, Reaper offers a robust backup system that is easy to use and build into your process. Welcome to Reaper Backup 101, where we break down everything you need to know to keep your project safe!
Why It Is Essential To Develop Good Backup Habits
It’s important to develop good backup habits from the start, regardless of what type of projects you work on or how often. Regularly backing up your project ensures you always have a digital safety net to protect your progress.
This includes ensuring they are covered in the case of unforeseen circumstances that can lead to data loss. Hardware failures, software crashes, accidental deletions, or even unexpected power outages are all potential risks that can lead to irreparable damage if not backed up.
You should get into the habit of backing up your project at least once a day. Though we will take a closer look at Reaper backups, it’s always a good idea to create and store backups in multiple locations (just in case).
Having a separate drive that you can back your files up to is a little extra effort that can go a long way in case of an emergency!
- RELATED: Exporting a Session in Reaper
Where Does Reaper Save Audio Files?
Our first stop on the Reaper Backups 101 journey begins with the basics. Before you can utilize Reaper’s backup system, you first need to know where Reaper stores these files.
Reaper stores audio files within a project folder that is created when you start a new project. This actually keeps things pretty simple to keep track of and ensures that all of the files related to your project are stored in one place.
This also makes sharing, collaborating, or archiving your projects and folders easy without having to worry about wrangling a bunch of files.
Download our most popular resource: 6 Steps for Creating Radio Ready songs to learn the fundamentals of what goes into a professional mix from renowned Producer, Songwriter & Mixer Warren Huart, who has worked on several Grammy-nominated albums!
Reaper Backup 101: How To Create & Access Reaper Backup Files
Below are the basic steps to create and access backups in Reaper. Remember, it’s best to make a habit out of these backup techniques early on to save yourself a potential headache later!
 Setting Up Auto Backup In Reaper
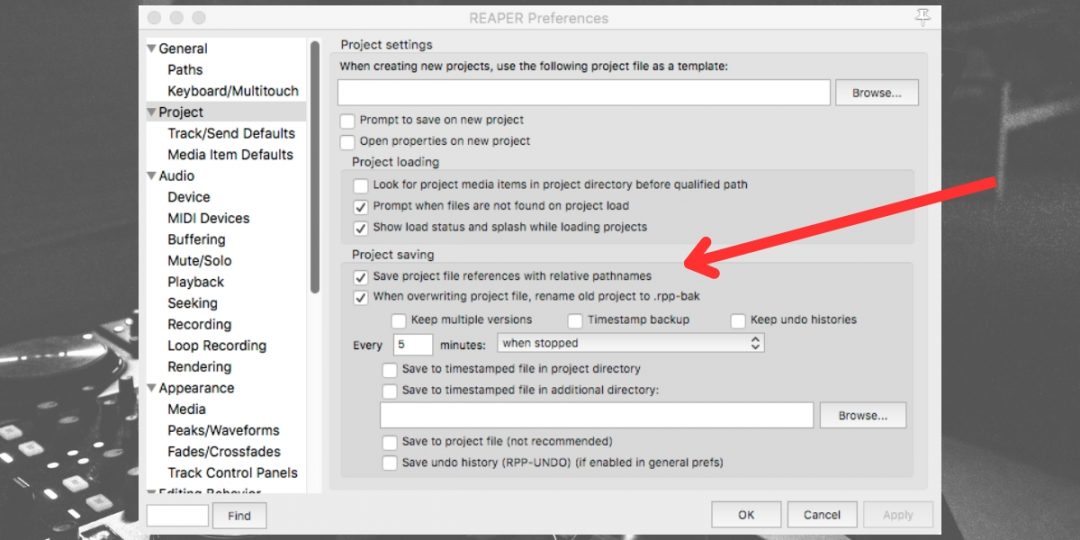
- You can set up an automated backup system in Reaper to establish a safety net for your projects. Launch Reaper and navigate to the “Options” menu at the top. From there, select “Preferences.“
- Within the “Preferences” window, find and click on the “Project” tab. Here, you’ll see a section of settings labeled “Project Saving.” Here, you can decide how often you want Reaper to save your files and under what conditions. This is where you can also opt for Reaper to auto-save time time-stamps and edit histories, along with the current version of your project.
- Even though Reaper will automatically save your changes to the project folder, you can choose to backup your files to additional or different locations by inputting your destination to the “Save to timestamped file in additional directory” field.
How To Make A Reaper Preset Backup
- Making a preset backup is a strategic move that helps you retain your customized settings, plugins, and configurations. Open your project and make any necessary adjustments or tweaks to achieve the desired sound or setup.
- Navigate to the “File” menu and select “Project Bay.” The Project Bay visualizes your project’s elements, making it easier to manage and organize different aspects of your work.
- To create a preset backup, simply drag the customized project settings you’ve established into the “User Presets” section of Project Bay. This action saves your settings as a preset, allowing you to recall them effortlessly in the future.
Backup To Dropbox
- Embracing cloud storage solutions like Dropbox enhances your backup strategy by providing an off-site location for your project files. If you haven’t already, install Dropbox on your machine.
- Locate your local Reaper project folder on your computer. This folder contains all your project-related files, including audio, project files, settings, etc.
- Once located, initiate a drag-and-drop action by selecting your project folder and placing it within your Dropbox directory. This process establishes a link between your local storage and the cloud-based storage provided by Dropbox.
How To Import Reaper Backup Files
- The ability to import backup files is crucial for recovering lost or previous project versions. Launch Reaper and navigate to the “File” menu. From the dropdown menu, select “Open Project.”
- A dialog box will appear, prompting you to browse your computer’s files and select the backup file you wish to import. Locate the appropriate backup file and click “Open.“
- After importing the backup file, review and adjust any project settings that may require attention. While the backup serves as a snapshot of your project at a specific point, adjustments may be necessary to ensure compatibility with your current setup.
How To Find Overwritten Reaper Backups
- Accidental overwriting of backups is a concern for any artist. To locate overwritten backups, navigate to your Reaper project folder on your computer.
- Once inside the project folder, search for files with names containing “.RPP-BAK,” “Backup,” or “Project Name – Old.” These files should hold previously saved versions of your project that were overwritten or replaced during your creative process.
By incorporating these meticulously detailed backup practices into your workflow, you’ll establish a robust safeguard for your creative ventures. This strategy ensures data protection and empowers you to explore your musical creativity without fear of losing your valuable work.
If you want to learn more about the best practices for creating backups in Reaper, we recommend checking out this in-depth video with Reaper master mixer Adam Steel:
Looking For More Reaper Tutorials?
Are you tired of having to interrupt your creative flow to look up how to do simple routine tasks in Reaper? We recommend checking out our Ultimate Guide To Reaper course to learn everything you need to know about recording and mixing songs in Reaper.


 Setting Up Auto Backup In Reaper


