When it comes to music production, having an efficient workflow can save you a lot of time and effort. It also ensures you maintain the bandwidth to focus your attention where it’s really needed. If you’re working in Reaper, Snapshots offers the ability to save & recall your go-to mix settings as needed effortlessly. The beauty of Snapshots is how it allows you to capture & switch between different mix states with a simple click. In this guide, we will take a look at how to use Reaper Snapshots & how they can improve your workflow!
What Are Reaper Snapshots & How Do They Work?
Snapshots are an extension for Reaper offered by Standing Water Sound (SWS). We highly recommend downloading the donationware SWS extensions for Reaper if you haven’t already. You will quickly find that they add impressive features and functionality to Reaper that can significantly improve your mixes.
But what are Reaper Snapshots?
Imagine you have a mix of a song in progress and are really happy with the current levels and effects. But in the name of creative exploration, you push further and continue to tinker with your mix.
Let’s say you aren’t happy with these new changes and want to return to the settings you previously dialed in. This is where Snapshots come in handy.
Snapshots allow you to save and recall specific mix elements with a simple button click. Snapshots allow you the option to choose between saving a complete mix or saving specific elements of a mix to recall.
Ultimately, SWS Snapshots expand your creative possibilities by letting you explore your options without fear of losing what works. It also saves you time by sidestepping the need to manually reset your settings whenever you want to try something new.
What Does Snapshot Save (& What Does It Not Save)?
Reaper Snapshots provide a good amount of flexibility when it comes to deciding what mix elements you want to save. It allows you to save settings related to the track mix, effects, and plugin settings.
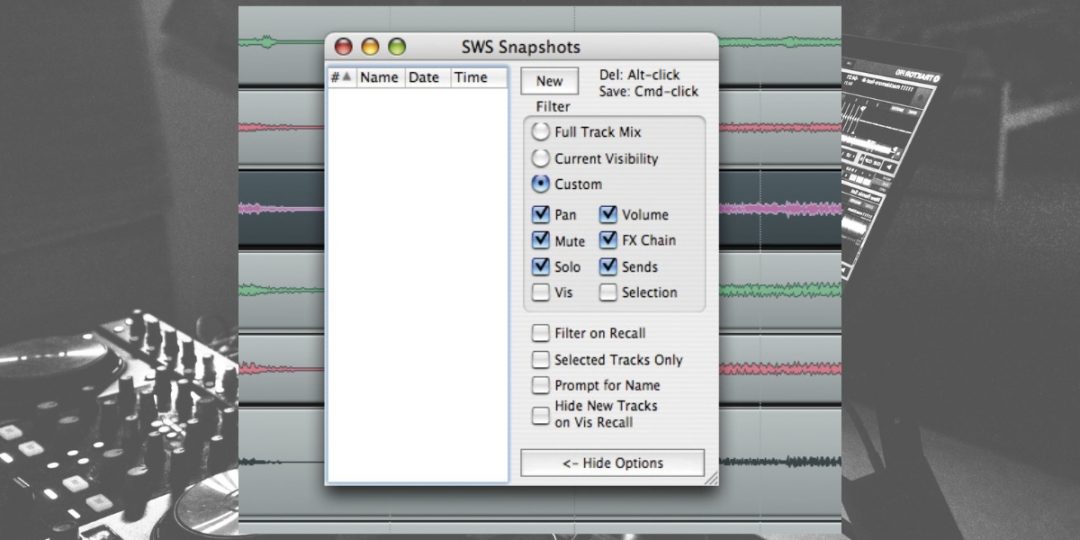
SWS Snapshots allow you to choose between three options for how to save your Snapshot. These are labeled “Full Track Mix,” “Current Visibility,” and “Custom.”
Enabling the Full Track Mix option dims all tick boxes below it (Pan, Volume, Mute, Solo, FX Chain, Sends). This means that all of these options will be selected and saved in your Snapshot.
When you choose the Custom option, the tick boxes become available, enabling you to select specific mix elements for snapshots. Depending on your needs, this allows you to choose what combination of elements to save.
The Selected Tracks Only option is an important selection to be aware of. When it’s off, selecting ‘New‘ creates a snapshot for all tracks. When on, it applies only to your currently selected tracks in Reaper’s Track Control Panel.
Snapshots do not allow you to save audio files or MIDI data.

How To Use Reaper Snapshots:
Below are the steps you would follow to access, create, and toggle between Reaper Snapshots.
#1) Pull Up The Snapshots Window
- Open Reaper and load your project.
- Navigate to the “Extensions” menu at the top.
- Click “SWS/S&M: Show/hide snapshot window” and scroll down.
- A new “Snapshot” window will appear, displaying your snapshot options.
#2) Snapshots Filters
- In the “Snapshot” window, you’ll see a filter section at the top.
- Use the checkboxes to select which elements you want to include in your snapshots.
- You can choose to capture track settings, FX chains, and plugin parameters.
- Adjust the filters according to your needs for each snapshot.
#3) Right Click Menu Options In Snapshots
- You can right-click on any snapshot in the “Snapshot” window to access the menu.
- Choose “Rename” to give your snapshot a descriptive name for easy identification.
- Select “Delete” to remove a snapshot you no longer need.
- Use “Copy” to duplicate a snapshot and make variations without starting from scratch.
- “Save snapshot to file” allows you to save and share snapshots externally.
Remember, the snapshots you create won’t alter your original project but provide alternate settings to switch between.
Download our most popular resource: 6 Steps for Creating Radio Ready songs to learn the fundamentals of what goes into a professional mix from renowned Producer, Songwriter & Mixer Warren Huart, who has worked on several Grammy-nominated albums!
When Would It Be Useful To Use Reaper Snapshots?
There are many applications one could use Reaper Snapshots for. In our experience, this tool really opens the door for experimentation for several reasons. These include:
- A/B Testing Tracks: Snapshots allow you to easily test and compare different mixing approaches. You can quickly create different processing chains and then toggle between them to compare which ones you like best.
- Improved Collaboration: Working with Snapshots makes it easier than ever to share your project with your collaborators or clients and easily reference different mix versions
- Greater Creative Exploration: SWS Snapshots allow you to get as wild with your experimentation as you want without fearing losing what works along the way. Knowing you can quickly and easily return to previous settings as needed offers peace of mind.
To learn more about using Reaper Snapshots, we recommend checking out this in-depth YouTube video on our channel that explores using this extension in greater detail.
Conclusion: SWS Snapshots In Reaper Are An Amazingly Useful Tool
Reaper’s SWS Snapshots feature fundamentally changes how you approach mixing. Its ability to save, recall, and manage various mix settings empowers both beginners and professionals to work smarter and more creatively.
We guarantee that once you begin incorporating this tool into your workflow, you’ll wonder how you ever mixed without it!
Looking for More Reaper Tutorials?
Are you tired of having to interrupt your creative flow to look up how to do simple routine tasks in Reaper? We recommend checking out our Ultimate Guide To Reaper course to learn everything you need to know about recording and mixing songs in Reaper.


