When working in Logic Pro X, Adaptive Limiter offers a tried and true tool for achieving professional-sounding tracks. The Adaptive Limiter is a dynamic processor designed to maintain a consistent audio level, ensuring your music remains clear and distortion-free. This is a crucial step in mastering your music that beginners can easily overlook. In this guide, we will look in-depth at Adaptive Limiter in Logic Pro X, how it functions, and how to get the most out of it.
Understanding Adaptive Limiter in Logic Pro X
Adaptive Limiter in Logic Pro X offers a simple solution for songs with unevenly loud parts that can create a jarring listening experience. It controls the perceived loudness of your audio at any point, working to prevent sudden unpleasant spikes in volume.
Imagine you’re watching a mellow movie, and suddenly, the volume unexpectedly skyrockets during an explosion scene. It would likely send you quickly scrambling for the remote to reduce the volume, taking you completely out of the movie magic.
Adaptive Limiter stops that from happening in your music, ensuring your song plays consistently loud. Adaptive Limiter is usually applied during the mastering process, as it ensures that the final mix or track meets industry standards for loudness and clarity.
How Does Adaptive Limiter Work?
When Adaptive Limiter detects a part of your audio that’s about to get too loud, it intervenes by slightly reducing the volume of that specific section, ensuring it stays within safe limits.
However, it does this in a way that aims to be transparent. This means that it doesn’t drastically change the overall volume balance or the character of your audio.
Its primary goal is to maintain a consistent and distortion-free volume level, making it an essential tool for mastering your music. Therefore, while it controls volume to some extent, its primary function is to protect the audio from going too loud rather than shaping its dynamics or tone like Logic’s compressor would.
Critical Components of the Adaptive Limiter Interface
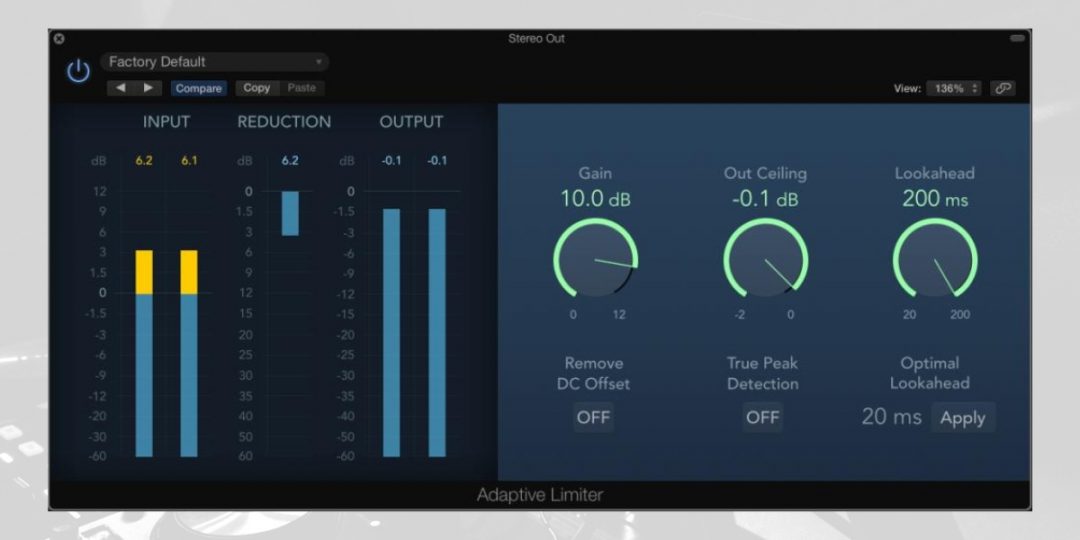
To effectively wield the Adaptive Limiter, it’s essential to grasp the core elements of its interface:
- Input Level: The Input Level slider is your entry point, allowing you to adjust the incoming audio signal.
- Threshold: The Threshold setting acts as the trigger point for the limiter. When the audio level surpasses this threshold, the limiter starts reducing peaks.
- Out Ceiling: This parameter defines the absolute maximum output level. It ensures that your audio never exceeds this point, preventing potential clipping issues.
- Release: The Release parameter is a critical control for shaping the limiter’s response. It dictates how quickly the limiter recovers after limiting occurs, impacting the dynamics and overall sound.
Setting Up Adaptive Limiter for Your Projects
Getting Started with Adaptive Limiter
To begin, insert the Adaptive Limiter as the final plugin in your signal chain, typically placed on the master track. This position allows it to process the entire mix and apply the desired limiting level.
- Insert Adaptive Limiter: Open your project and navigate to the track where you want to apply the limiter. Typically, you’d place it on your master track, which affects the entire mix. To do this, go to the “Mixer” or “Channel Strip” view (accessible from the “View” menu), find the master track, and insert the Adaptive Limiter as an effect.
You can do this by clicking on the “+” button in the effects section of the master track and selecting “Adaptive Limiter.” - Basic Settings: Once inserted, the Adaptive Limiter interface will appear. You’ll see controls like “Input Level,” “Threshold,” “Out Ceiling,” “Release,” “Look-Ahead,” and “Attack.“
Adjusting Threshold and Release Parameters
First, let’s look at how to dial in two critical parameters: Threshold and Release.
- Threshold: The Threshold setting is your first line of defense against audio peaks. Adjust it carefully by dragging the slider or entering a value. In other words, higher values mean more aggressive limiting.
Start conservatively, and as you listen to your track, increase the threshold until you notice that the limiter is actively controlling peaks without making your music sound too compressed. - Release: Release governs how quickly the limiter recovers after limiting occurs. Faster release times maintain dynamics but may result in noticeable limiting.
Therefore, slower release times offer a smoother, more controlled sound. Fine-tune this parameter according to your track’s character and the desired level of peak control.
Using Look-Ahead and Attack Controls
Now, let’s explore the advanced controls: Look-Ahead and Attack.
- Look-Ahead: The Look-Ahead feature is like the limiter’s crystal ball, predicting incoming peaks. It allows the limiter to react proactively, ensuring it catches any peak before it becomes an issue.
Adjust this setting based on the nature of your audio. For highly dynamic tracks, increasing Look-Ahead can be beneficial, while for more predictable sounds, a shorter Look-Ahead may suffice. - Attack: Attack defines how quickly the Adaptive Limiter responds to transients (sudden, short bursts of sound, like a snare hit or a guitar strum). A shorter attack time makes the limiter respond faster, potentially preserving more transient detail, but might lead to more noticeable limiting. Similarly, a longer attack time results in a smoother limiting process but may soften the transients. Experiment with this control to find the sweet spot for your music.
Download our most popular resource: 6 Steps for Creating Radio Ready songs to learn the fundamentals of what goes into a professional mix from renowned Producer, Songwriter & Mixer Warren Huart, who has worked on several Grammy-nominated albums!
Applying Adaptive Limiter to Individual Tracks
You will often use Adaptive Limited in Logic Pro X as a mastering tool applied to your entire song. Its primary function is to ensure your combined audio doesn’t exceed your set output threshold to stay within industry standards.
However, there are instances where it may be a good idea to use Adaptive Limiter on individual tracks as well. For example, when dealing with a particularly dynamic recording, such as a vocal track with sporadic loud peaks, applying a gentle Adaptive Limiter to that specific track can help ensure a more consistent level before it enters the mix.
This can save time during mixing, as you won’t need to address extreme variations later.
Optimizing Drum Tracks with Adaptive Limiting
Applying an Adaptive Limiter to specific drum tracks can also be helpful in balancing out your sound. Drums are often one of the most dynamic elements, with kicks, snares, and cymbals ranging from soft to thunderous hits.
Imagine the kick drum has occasional peaks that can be pretty pronounced. These peaks may cause issues during mixing, potentially leading to individual track clipping or interfering with other instruments.
Applying the Adaptive Limiter directly to the kick drum track can be highly useful in this scenario. In addition, by setting a moderate threshold on the Adaptive Limiter for the kick drum, you can gently control its extreme peaks without sacrificing its impact, ensuring it remains punchy while preventing it from exceeding safe levels.
This targeted use of the Adaptive Limiter helps maintain a balanced drum sound, therefore saving valuable time during mixing and allowing you to focus on refining the overall drum mix.
While the Adaptive Limiter in Logic Pro X is primarily used for mastering, there are scenarios where applying it to individual tracks makes sense. Therefore, we suggest using Adaptive Limiter only as needed for individual tracks, considering whether alternatives like compression or automation better match your specific track requirements.
Looking for More Logic Pro Tutorials?
Ready to harness the full potential of tools like the Adaptive Limiter in Logic Pro X? Our ‘Music Production In Logic Pro X‘ class, led by Rob Mayzes, is your gateway to unlocking these powerful techniques and taking your music production skills to the next level.
Check it out today!

