When it comes to audio recording and engineering, it’s important to understand the impact and importance of sample rate. Sample rate plays a unique role in determining an audio track’s overall quality and playback fidelity. But what is sample rate & how can you use it to achieve high-quality audio recordings? In this guide, we explore the concept of sample rate and explain how to change sample rate in Pro Tools.
What Is Sample Rate & How Does It Work?
Sample rate is easy to overlook, but it plays an important role in audio quality. Simply put, sample rate is the number of digital samples taken from a sound source each second.
These samples help recreate the original sound as accurately as possible, based on the available number of samples.
A way I like to simplify when explaining to students is to pretend that you have a magic microphone that can take pictures of the sound it’s recording. The more pictures it takes, the more clearly and accurately it can reproduce its original source material.
While having more pictures sounds ideal, in theory, they also require more space and processing power to reproduce the source material.
using a higher sample rate allows you to capture more sound details, resulting in better overall audio quality and reproduction. But the trade-off is that higher sample rates also equal larger file sizes, which are not always ideal.
Ultimately, choosing the right sample rate is a matter of balancing sound quality and file size as efficiently as possible.
Common sample rates include:
- 44.1 kHz: This rate is commonly used for music CDs and audio distribution
- 48 kHz: This sample rate is often used for video production and digital broadcasting.
- 96 kHz: This rate is often used in professional audio recording for higher audio quality and precision.
- 192 kHz: Typically, this rate is reserved for specialized high-resolution audio projects. It provides the highest level of playback fidelity.
When Would You Change Your Sample Rate & Why?
Setting and sticking with a sample rate when recording is like making sure that you are speaking the same language as everyone else involved with the production. This is important when you are working with other musicians or using a combination of different types of recording equipment.
It’s important that everyone is on the same page so that all of the sounds can be recorded and played back seamlessly.
For example, matching the sample rate is important when collaborating with other musicians or studios to ensure seamless audio file integration.
Additionally, some audio interfaces or hardware might have limitations on supported sample rates, requiring adjustments to meet compatibility requirements.
How To Change Sample Rate In Pro Tools (Step-By-Step Guide)
When recording in Pro Tools, you may need to adjust your sample rate. Below is a step-by-step guide to help you set and modify the sample rate in Pro Tools.
#1) Set It When You Start Your Project (If You Can)
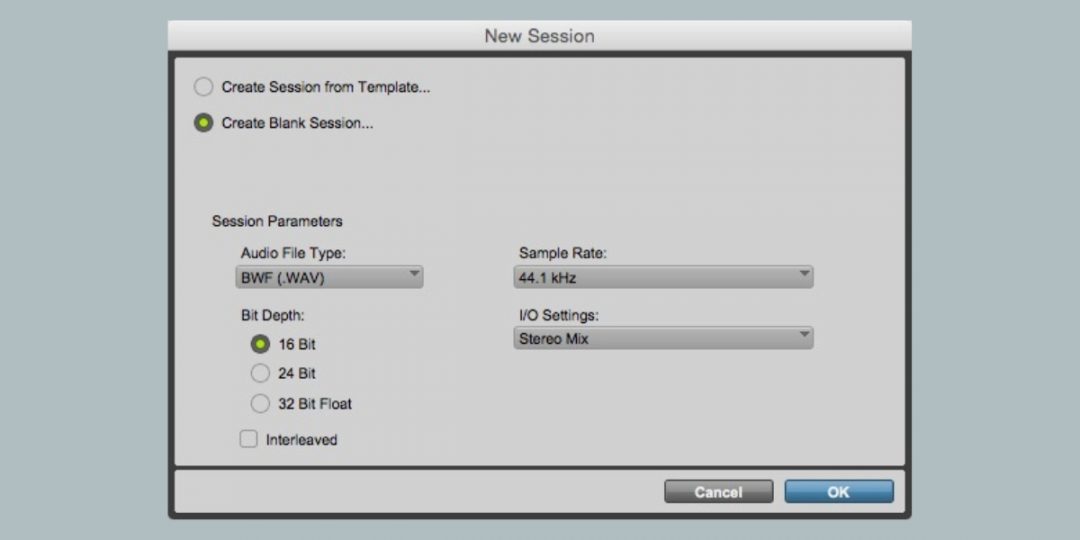
- Create a new session in Pro Tools by selecting “File” from the menu and then “New Session.”
- You will find the “Sample Rate” setting in the New Session dialog box.
- Choose your desired sample rate from the available options, such as 44.1 kHz, 48 kHz, 96 kHz, or 192 kHz.
- Click “Create” to start your project with the selected sample rate.
#2) Locate Sample Rate Drop-Down In The New Session Box

If you forget to set the sample rate when creating your project (or need to change it for a session), you can easily do so within Pro Tools:
- Open your Pro Tools project.
- Go to the “File” menu and select “New Session…” to access the New Session dialog box.
- You’ll find the “Sample Rate” drop-down menu in the New Session dialog box.
- Choose the desired sample rate from the available options.
#3) How To Choose The Correct Sample Rate (A Few Tips)
When deciding on the right sample rate for your audio project, consider the specific needs and goals of your recording.
If you’re working on a professional music production and quality is a top priority, opting for higher sample rates like 96 kHz or 192 kHz can capture every detail of your sound.
On the other hand, if you’re recording a simple voiceover or podcast, lower sample rates of 44.1 kHz or 48 kHz should be plenty without sacrificing much quality.
Before deciding on a sample rate, you should think about the amount of available storage space and the processing power of your recording setup. You want to achieve the best possible balance between audio quality and resource efficiency.
Download our most popular resource: 6 Steps for Creating Radio Ready songs to learn the fundamentals of what goes into a professional mix from renowned Producer, Songwriter & Mixer Warren Huart, who has worked on several Grammy-nominated albums!
#4) Save Your Settings
After dialing in the sample rate you need, we recommend immediately saving your session with the updated configuration. This will help make sure that all of your future recordings, edits, and playback within that project use the chosen sample rate.
Looking For More Pro Tools Tutorials?
Hopefully, this article has given you a clear understanding of how sample rate works and how to change sample rate in Pro Tools.
Are you ready to stop scrambling to search for answers every time you need to take care of a simple task in Pro Tools? Our Ultimate Guide To Pro Tools is one of our best-selling courses & will teach you the foundational skills you need to learn how to work with Pro Tools.
Sign up today & learn to master the art of recording and mixing in Pro Tools in no time!


