Navigating the nuances of recording guitar tracks within Pro Tools doesn’t have to feel like deciphering a complex code. This comprehensive guide will detail how to record guitar in Pro Tools. We will cover everything you need to know for recording electric and acoustic guitars, including micing amps for recording.
You’ll also learn the intricacies of connecting your guitar and adjusting input levels for pristine sound quality. We aim to help you leverage Pro Tools’ unique interface & features to help record clear, dynamic, and compelling guitar tracks. Let’s jump in!
Getting Started with Pro Tools for Guitar Recording
Before diving into the technicalities of recording guitar in Pro Tools, laying the groundwork for a seamless recording session is essential. This involves selecting an appropriate audio interface and correctly setting up your Pro Tools session to begin with.
Choosing the Right Interface for Your Guitar Setup
When choosing an interface to use while learning how to record guitar in Pro Tools, there are a few factors to consider. Those include:
- Understand Your Needs: Consider the number of inputs you need. A simple setup requires only one or two, but more complex arrangements may need more.
- Compatibility: Ensure the interface is compatible with Pro Tools. Most modern interfaces are, but it’s crucial to check.
- Latency: Look for interfaces with low latency to avoid delays between playing your guitar and hearing the output.
- Quality: Don’t compromise on audio quality. A higher bit depth and sample rate can provide clearer, more detailed recordings.
Choosing the right interface is the first step towards achieving professional-quality recordings. It’s not just about connectivity; it’s also about ensuring that the sound captured is as authentic to your original performance as possible.
Setting Up Your Session in Pro Tools
Initiating a recording session in Pro Tools with the correct setup is crucial for capturing high-quality guitar recordings.
- Create a New Session: Start by launching Pro Tools. Navigate to ‘File’ > ‘New Session,’ then select ‘Create Blank Session.’ Choose a location on your computer where you wish to save this session. This is the foundation of your project, allowing you to organize and manage all subsequent recordings in a dedicated workspace.
- Sample Rate and Bit Depth: In the session setup window, set your sample rate to 44.1kHz and the bit depth to 24 bits. These settings are the industry standard for high-quality audio recordings, ensuring your guitar tracks are captured with clarity and detail. The sample rate in Pro Tools determines how often your audio is sampled per second. Bit depth, on the other hand, affects the dynamic range of your recordings.
- Create Tracks: Next, click ‘Track’ > ‘New’ to add new tracks to your session. You’ll typically need one mono audio track for a basic guitar recording. However, you might add more tracks depending on the complexity of your project. Each track will serve as a separate lane for recording different elements of your guitar performance. This allows for greater flexibility during mixing.
- Naming Tracks: To maintain organization within your session, right-click on the track name area to rename each track. Use descriptive names like “Rhythm Guitar” or “Lead Guitar”. This practice helps quickly identify each track’s role within your project, streamlining the editing and mixing process.
Setting up your session with these steps ensures you’re prepared to record with optimal settings from the start. This preparation enhances the technical quality of your recordings.
It also supports your creative process by allowing you to focus on performance rather than troubleshooting technical issues.
How to Record Guitar Pro Tools
Understanding how to record guitar in Pro Tools is straightforward once your session is appropriately set up. Let’s explore how to connect your guitar to Pro Tools and adjust input levels for the best sound quality.
Connecting Your Guitar to Pro Tools
Connecting your guitar to Pro Tools is the first step in capturing your performance. This process ensures that the signal from your guitar is cleanly and accurately fed into the DAW for recording.
- Direct Connection: Using an electric guitar, you can connect it directly to your audio interface using a standard ¼ inch guitar cable. Ensure the interface is already configured with Pro Tools.
- Using a DI Box: For a cleaner signal or to connect an acoustic guitar with a pickup, use a Direct Injection (DI) box. Connect the guitar to the DI box, then link the box to your interface with an XLR cable.
- Check the Interface: Ensure your audio interface is powered on and recognized by Pro Tools. Go to ‘Setup’ > ‘Playback Engine’ and select your interface from the list.
- Arm the Track: In Pro Tools, create a new track for your guitar (if you still need to do so). Then, arm it for recording by clicking the record button on the track. This signals Pro Tools to prepare the track for recording input from your guitar.
This connection is pivotal for ensuring that the raw sound of your guitar is accurately captured, setting the stage for effective recording.
Adjusting Input Levels for Optimal Sound Quality
Adjusting the input levels once your guitar is connected is critical. This step ensures your recordings are free from distortion or too low to be usable.
- Monitoring Levels: Play your guitar at the level you will use during the recording. Watch the meter in Pro Tools on the armed track.
- Avoid Clipping: Next, adjust the input level on your interface so the signal peaks just below clipping, typically around -6dB. Clipping occurs when the signal is too strong, causing distortion.
- Consistent Levels: Ensure the playing intensity is consistent to set a level that works for the entire track. Variations in playing dynamics should be intentional, not due to improper level setting.
- Fine Tuning: If necessary, adjust the input level slightly as you record different sections accordingly. For instance, some parts might be played more aggressively, requiring slight adjustments to avoid clipping.
Setting the correct input level balances capturing a strong enough signal for quality sound and avoiding distortion. Therefore, properly adjusted levels contribute significantly to the fidelity of your guitar recordings in Pro Tools.
Techniques for Recording Electric Guitar
Recording electric guitar via an audio interface or DI box offers precision and simplicity. This makes it ideal for clean, direct sound capture in Pro Tools.
This method can deliver the truest representation of your guitar’s tone, unaffected by room acoustics or external noise. Here are a few tips to keep in mind when recording electric guitar in Pro Tools:
- Optimal Gain Staging: Firstly, adjust the input gain on your interface or DI box to match your guitar’s output. This ensures the signal is strong enough without causing clipping. This balance is critical for maintaining audio integrity.
- Impedance Matching: Next, pay attention to the impedance matching between your guitar and the interface/DI box. Proper matching is crucial for preserving the full tonal quality of your guitar without loss or distortion.
- Use of Virtual Amps and Effects: Leverage Pro Tools’ vast array of virtual amplifiers and effects to shape your guitar tone post-recording. This approach allows for incredible flexibility, enabling you to experiment with different sounds without needing physical amp settings or pedal configurations.
- Direct Monitoring: Utilize the direct monitoring feature of your interface to reduce latency. Hearing the guitar signal in real-time as you play is also vital for performance accuracy and feeling connected to your instrument.
Mic Placement and Selection for Electric Guitar Amps
When recording an electric guitar, utilizing an audio interface allows direct input of your guitar’s signal into Pro Tools, providing a clean, uncolored tone.
However, there may be times when you want to capture a real amplifier’s unique tone and feel. In this case, you could certainly mic your amp to record your guitar part directly.
This alternative technique allows you to record the unique characteristics of your amp. It offers a warmth and depth that direct recording might lack.
Here are some considerations to keep in mind:
- Microphone Selection: Dynamic microphones are highly recommended for recording amps due to their robust build and capability to handle high volume levels. The Shure SM57 is widely celebrated for its ability to faithfully reproduce electric guitar amps’ sound. It’s known for its ability to capture the nuances of your playing and the amp’s characteristics.
- Positioning the Microphone: Position the microphone directly in front of the amp’s speaker cone, approximately 2-3 inches away. This proximity emphasizes the amp’s immediate response and the detailed textures of your guitar’s tone.
- Angle and Distance Adjustments: To fine-tune the captured sound, adjust the microphone’s angle and distance from the speaker. Angling it off-center can soften the highs for a smoother sound. Alternatively, distancing the mic adds ambient room sounds, enriching the recording.
- Combining Microphones: Employing a combination of microphones, such as pairing a dynamic mic for the direct amp sound with a condenser mic placed farther away, captures both the direct signal and the room’s acoustics. This layered approach enriches the final mix with a blend of clarity and spatial depth.
Incorporating mic techniques to record your amp can add a much sought-after feeling of warmth and character to your tracks.
Acoustic Guitar Recording Tips in Pro Tools

Recording acoustic guitar in Pro Tools requires a nuanced approach to capture the instrument’s natural resonance and depth. With its rich harmonics and dynamic range, the acoustic guitar demands careful consideration of microphone choice and placement.
These tips will guide you through setting up a microphone arrangement optimized for acoustic guitars, ensuring your recordings are as vibrant and lifelike as the performances.
Using a Microphone Setup for Acoustic Guitars
Select the Right Microphone: A large-diaphragm condenser microphone is often the first choice for acoustic guitar because of its sensitivity and wide frequency response. It can capture the delicate nuances of the instrument.
- Find the Sweet Spot: Position the microphone about 6-12 inches away from the guitar, aiming it at the 12th fret. This location is a good starting point to achieve a balanced sound that captures both the brightness of the strings and the body’s resonance.
- Experiment with Placement: While the 12th fret is a reliable starting position, move the microphone closer to the soundhole for more bass or towards the neck for enhanced clarity. Be mindful of the proximity effect, which increases bass frequencies the closer you are to the source.
- Consider a Stereo Setup: Conversely, you can use two microphones in a stereo configuration for a richer, more dimensional sound. A common technique is X/Y (coincident pair), where two cardioid microphones are placed together at a 90-degree angle. This setup captures a wide stereo image while maintaining phase coherence.
- Check for Phase Issues: If using multiple microphones, ensure they are in phase with each other. This means the microphones should capture sound waves at similar times. Misalignment can result in a thin or hollow sound. You can check phase coherence visually in Pro Tools by looking at the waveforms and listening for any phase cancellation.
- Monitor Levels Closely: As with any recording, keep a close eye on your input levels to avoid clipping while ensuring the signal is strong enough for a good signal-to-noise ratio. Aim for peaks around -6 dB to -12 dB on your metering in Pro Tools.
Remember, the key is experimenting and listening critically to find the best setup for your instrument and recording environment.
Enhancing Your Guitar Tracks with Pro Tools Plugins
After capturing your performance, you must refine and enhance the tracks using Pro Tools’ powerful suite of plugins. This phase is crucial for achieving a polished, professional sound that stands out.
Pro Tools offers a wide array of plugins designed to improve your guitar recordings, with EQ and compression being fundamental tools for shaping your sound.
Applying EQ and Compression for Polished Guitar Sounds
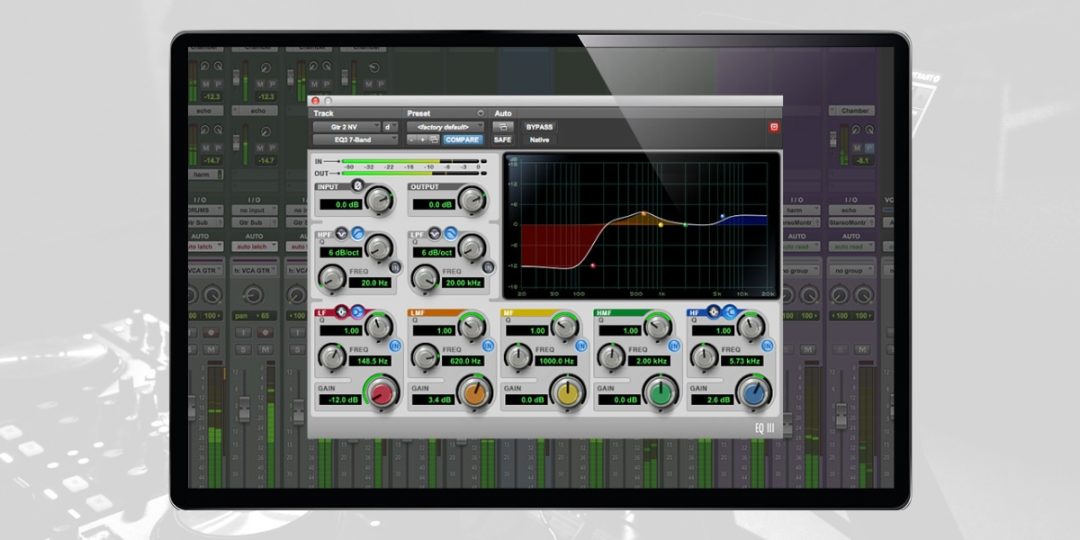
Enhancing guitar tracks with EQ and compression involves careful adjustment to bring out the best in your recording. EQ allows you to shape the tone by amplifying or diminishing specific frequency ranges, making the guitar sit well in the mix.
Compression helps maintain a consistent level throughout the performance, adding punch and presence.
Applying EQ:
To locate EQ in Pro Tools, navigate to the “Mix” window. Here, insert an EQ plugin on your guitar track by clicking on an empty insert slot and selecting your desired EQ from the “EQ” submenu. This prepares you for precise tone shaping.
- Listen for Problem Areas: To begin with, identify any frequencies that need adjustment. Look for ones that are either too prominent or lacking.
- Apply Subtractive EQ: At this time, you should aim to cut frequencies that muddy the sound before considering any boosts.
- Implement High-Pass Filtering: For clarity, apply a high-pass filter to remove low-end frequencies not essential to the guitar’s character.
- Adjust for Clarity and Presence: If necessary, boost high-mid frequencies gently to enhance articulation.
EQ aims to ensure the guitar blends seamlessly with other track elements. You want to achieve this without losing its distinct qualities or overpowering the mix.
Applying Compression:
You can apply compression via the “Mix” window by selecting an empty insert slot on your guitar track. Choose a compressor from the “Dynamics” submenu to start controlling dynamics.
- Set Threshold and Ratio: Determine the level at which compression begins (threshold) and the intensity of compression (ratio).
- Adjust Attack and Release: Fine-tune how quickly compression engages and disengages to preserve the guitar’s natural dynamics.
- Monitor the Gain Reduction: Also, keep an eye on how much the signal is being compressed to avoid overdoing it.
- Use Makeup Gain: Finally, if the process lowers the overall volume, use makeup gain to compensate.
Proper compression ensures that your guitar maintains a consistent presence, enhancing its energy and impact within the track while preserving the nuances of the performance.
Common Problems and Solutions When Recording Guitar
Recording guitar tracks can introduce several challenges, from unwanted noise to inconsistencies in the performance.
By identifying common issues and implementing targeted solutions, you can significantly improve the quality of your recordings, ensuring a cleaner, more professional sound.
- Noise and Interference: To begin with, shielding cables and choosing a quiet recording environment can mitigate unwanted noise. For electric guitars, ensuring proper grounding reduces hum.
- Inconsistent Levels: Using compression thoughtfully can even out dynamic fluctuations without compromising the expressiveness of the performance.
- Muddiness in the Mix: Applying EQ to clear low-end clutter helps each instrument to stand out clearly.
- Phase Issues: When using multiple microphones, aligning them correctly prevents phase cancellation, preserving the fullness of the sound.
Addressing these common problems enhances the individual guitar tracks and ensures they contribute effectively to the overall mix. It results in a more cohesive and engaging listening experience.
Download our most popular resource: 6 Steps for Creating Radio Ready songs to learn the fundamentals of what goes into a professional mix from renowned Producer, Songwriter & Mixer Warren Huart, who has worked on several Grammy-nominated albums!
Final Thoughts on Recording Guitar in Pro Tools
In conclusion, we’ve shown how to record guitar Pro Tools, from choosing the right interface to fine-tuning input levels. We’ve covered essential steps, including setting up your session and recording techniques.
By applying these insights, you’ll generally achieve professional-quality guitar recordings. Remember, practice and experimentation are essential to mastering guitar recording in Pro Tools.
Now that you know how to record guitar in Pro Tools, you can take your Pro Tools skills to new heights. At this point, we recommend enrolling in our best-selling Ultimate Guide to Pro Tools course today! Guided by renowned Pro Tools expert Jon Connolly, this course offers seven hours of in-depth Pro Tools instruction.
You’ll learn everything from system setup to advanced recording and mixing techniques, ensuring your tracks sound polished and professional.
Sign up today for this training is your next step towards mastering Pro Tools and elevating your music production capabilities!


