Reaper is an incredible DAW at a fraction of the price of most other major players. But with the amount of hype around this DAW, we wanted to answer a very important question that prospective users (just like you) are looking for: does reaper come with drums?
Does Reaper Come With Drums? (Answered)
Reaper does NOT come with drums as a built-in virtual instrument. But, that doesn’t mean you can’t make drums in Reaper! Reaper does not come preloaded with an extensive library of drum sounds like some other DAWs. But it offers a couple of basic virtual instruments that can help you create drums.
This article will explore Reaper’s built-in virtual instruments and how you can craft drum sounds. I’ll even share some of my favorite third-party plugin options for you to expand your drum library within Reaper.
You Can Still Use Reaper To Create Solid Drum Sounds
Reaper offers two stripped-back virtual instruments: ReaSynth and ReaSamplOmatic5000. While these virtual instruments are basic, they can serve as a starting point for your drum creation. However, the easiest option if you’re a beginner is going to be downloading a free drum VST and using this to create your drums.
Download our most popular resource: 6 Steps for Creating Radio Ready songs to learn the fundamentals of what goes into a professional mix from renowned Producer, Songwriter & Mixer Warren Huart, who has worked on several Grammy-nominated albums!
How To Create Drum Sounds In Reaper
Option #1) You Can Use VST Drums In Reaper
To expand your drum library in Reaper, you can incorporate third-party Virtual Studio Technology (VST) drum plugins. There is a vast array of VST drum plugins available online, both free and paid, that can significantly enhance your drum sound collection.
To help get you started I suggested using MT Power Drum Kit 2: A versatile and high-quality drum plugin with a range of realistic drum sounds.
If you’re looking for a paid drum program to integrate I highly recommend using Addictive Drums 2. It is a drum VST I use regularly in my productions. It’s a great asset for us non-drummers out there, since it includes drum midi patterns, in addition to the drum sounds.
- RELATED: Setting Up the Metronome in Reaper
How to Install A VST in Reaper
If you want to install a VST or plugins into Reaper, follow these steps below:
- Find and download the VST plugin: Ensure you get the correct version (Mac orWindows)
- Locate the VST Plugin Folder in Reaper: From the top menu, go to Options > Preferences. Then, in the preferences window, click “Plug-ins”. Find the “VST” section – then take note of the location path for the VST plugin folder
- Install the VST: extract the downloaded VST file (if it’s a .zip or .rar file) and then move the plugin file (either .dll or .vst) to the VST plugin folder you located in step 2.
- Rescan for New Plugins: in Preferences, go to “Plug-ins” and click “Re-Scan”. This will force Reaper to search the folder and add any new plugins to the list.
- Check For the Plugin: the last step is simply to check that the plugin works. To do that, click on the “FX” button on the track to open the FX chain window. In the FX chain window, you should see the list of available plugins, including the newly installed VST. Click on the VST plugin to open its interface and start using it in your project.
Experiment with these free drum VSTs to find the perfect sounds for your Reaper projects. If you’re looking for a paid drum program to integrate I highly recommend using Addictive Drums. It is drum VST I use regularly in many of my productions. It’s a great asset for us non-drummers out there, since it includes drum midi patterns, in addition to the drum sounds.
Option #2) Set Up Your Midi Editor For Drum Sounds
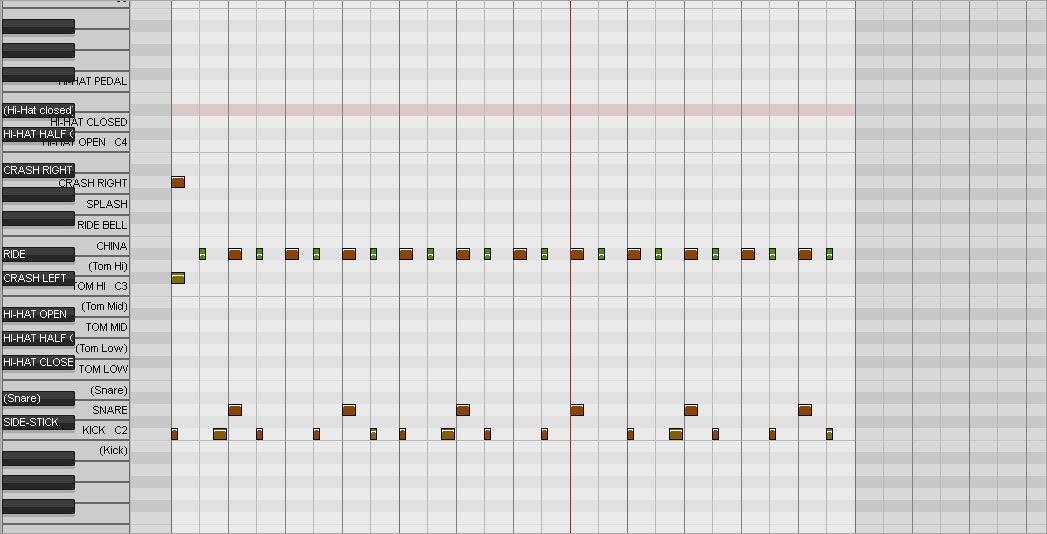
Reaper’s MIDI editor also provides a powerful tool for creating custom drum sounds. By using MIDI notes and programming drum patterns, you have complete control over the rhythm and feel of your beats. With the right drum samples and careful editing, you can achieve professional-grade drum tracks that fit perfectly into your mix. We’ve also included a free MIDI drum map courtesy of MT Power Drum Kit. Before you start, download the drum map file, then open and unzip the file. We’ll show you how to end up with your piano roll named appropriately, making it much easier to create your drums.
1. Insert a New Virtual Instrument Track: right-click in the track area and select “Insert Virtual Instrument Track”, and then chose “ReaSamplOmatic5000”.
2.Access Midi Editor: double-click the new track to open the MIDI editor. This is where you’ll be able to edit MIDI for your drum parts.
3.Add Drum Map: now that the piano roll is open, go to File -> Note Names -> Load Note Names From File -> Choose File. Then select the file you just downloaded. This will load the names into the piano roll.

4. Choose Your Samples: Click View -> Media Explorer, to open up your media and audition samples. Ensure you leave the tempo match off so you don’t time stretch your sample. Now just drag and drop that sample into ReaSamplOmatic5000.
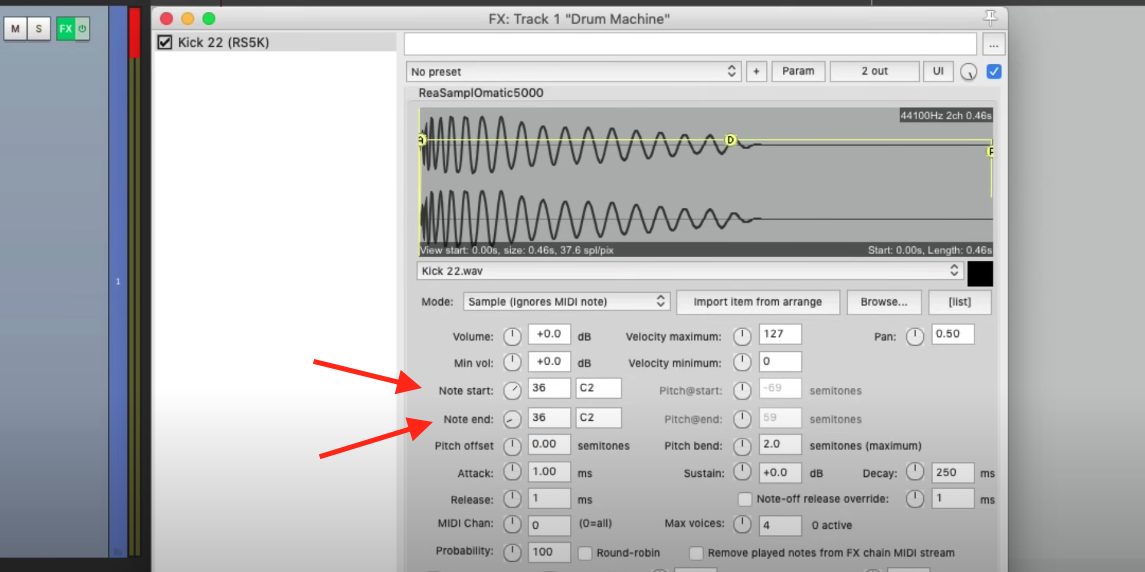
5. Set Note Start/Note End: That’s going to apply the sample to the entire Piano Roll, but now this is where you’ll want to select the corresponding midi notes on your piano roll. For this example, you’ll want 36 which corresponds to C2 (noted as your kick in the map). 
5. Repeat with Other Samples: find samples for the rest of the drum kit, and add them the same way you did in step 4, only swapping the note start and end for the correct value that corresponds to the drum map.
Pro Tip: Save Your Midi Drum Track As A Template For Use In Other Tracks & Projects
Once you’ve created a drum pattern that you like, consider saving it as a template. Templates save time and effort by allowing you to reuse your custom drum arrangements across multiple tracks and projects. It’s a fantastic way to maintain consistency and coherence in your drum tracks.
Option #3) Use ReaSynth to Create Your Own Drum Sounds
ReaSynth is a basic synthesizer included with Reaper, and while it may not be specifically designed for drum sounds, you can still use it to create some simple drum-like tones. Here’s a step-by-step guide on how to use ReaSynth for drum creation in Reaper:
- Insert ReaSynth: To get started, open up your Reaper project and create a new track by right-clicking in the track area and selecting “Insert virtual instrument on new track.” From the list of instruments, choose ReaSynth.
- Select the “Percussion” Preset: Once ReaSynth is loaded onto the track, click on the drop-down menu in the top-left corner of the plugin window and select the “Percussion” preset. This preset is specifically designed for creating drum-like sounds.
- Adjust Parameters: With the “Percussion” preset selected, you’ll see various parameters that you can tweak to shape the drum sound. Experiment with the “Tone,” “Decay,” and “Filter” settings to achieve the desired character and length of your drum sound.
- Use Modulation and Envelopes: ReaSynth also allows you to modulate parameters over time using envelopes. You can use the “Volume Envelope” to shape the volume of the drum sound, adding more punch or tail to the sound.
- Combine with Effects: To further enhance your drum sound, you can add audio effects to the track. Try adding some compression, EQ, or reverb to give your drum sound more depth and character.
- Save Your Presets: If you come up with a drum sound that you like, don’t forget to save it as a preset. Click on the “Presets” button in ReaSynth and choose “Save preset as…” This way, you can quickly access your custom drum sounds in future projects.
To learn more about how to edit your drums in Reaper, we recommend checking out this video:
Looking For More Reaper Tutorials?
If you decide to move forward with Reaper, and you’re looking to take the fast track to mastering the DAW – check out our “Ultimate Guide to Reaper” course. This comprehensive course explores the capabilities of Reaper, providing advanced techniques, expert insights, and invaluable tips for achieving exceptional mixes. Expand your Reaper expertise and unlock your full creative potential!


