Understanding how to automate in Logic Pro X is essential for any producer looking to refine their tracks creatively. Automation allows nuanced control over your music, from subtle volume adjustments to dynamic effect changes.
All in all, automation is a handy tool that can help ensure your project evolves as you envision.
Therefore this guide will outline the foundational knowledge and advanced techniques necessary to master automation in Logic.
Introduction to Automation in Logic Pro X
Learning how to automate in Logic Pro X can be a game-changer for music producers and audio engineers. This powerful feature allows you to manipulate various parameters of your tracks over time dynamically.
From adjusting volume levels to changing effects settings, automation adds life and movement to your music. By automating tasks, you can achieve precise control over the mix, enhancing your productions’ emotional impact and professionalism.
Logic Pro X offers a user-friendly interface for implementing automation, making it even more accessible for beginners and seasoned users.
The Role of Automation in Music Production
Automation plays a pivotal role in music production, allowing for detailed manipulation of sound dynamics and effects.
It lets you record changes to parameters such as volume, pan, and plugin settings, enabling these adjustments to occur automatically during playback.
This helps create smooth transitions and variations within your tracks and automates repetitive tasks. Ultimately, this gives you more freedom to focus on the creative aspects of production.
Understanding the Basics of Logic Pro X Automation
Grasping the automation fundamentals in Logic Pro X sets the stage for more advanced production techniques. Let’s explore the different types of automation and operational modes essential for enhancing your tracks.
Types of Automation: Track, Region, and MIDI
In Logic Pro X, automation types are essential tools for dynamic music production, allowing for precise control over various aspects of your project. These types enable producers to apply changes to volume, effects, and other parameters across the entire track, within specific regions, or directly to MIDI performances. Let’s delve into each type:
- Track Automation: Track automation applies to the entire length of a track. It’s perfect for overarching changes like volume fades or pan sweeps. It’s most effective for adjustments that affect the whole track, providing a global approach to automation.
- Region Automation: Alternatively, Region Automation is linked to specific audio or MIDI regions. It is ideal for targeted effects or changes within a particular section of a track. In other words, region automation allows for detailed adjustments without affecting the entire track.
- MIDI Automation: This automation controls MIDI data parameters such as velocity, modulation, and pitch bend. Ideal for shaping the expression and dynamics of MIDI instrument performances, it offers nuanced control over the MIDI data itself.
Automation Modes: Read, Write, Touch, Latch
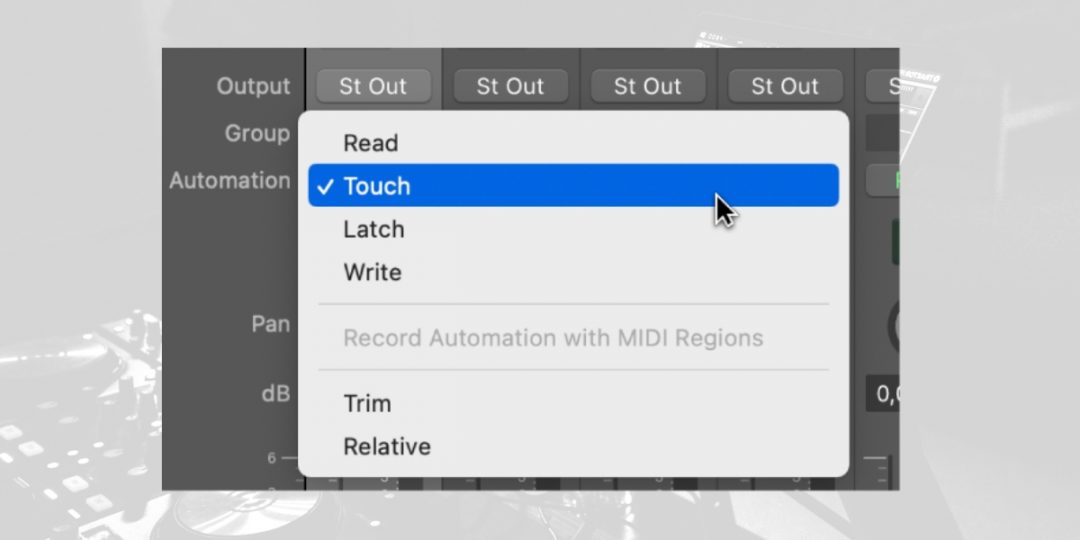
Automation modes in Logic Pro X define how automation data is written to and read from your tracks, each offering a different approach to capturing and playing back your adjustments. Understanding these modes is crucial for applying automation effectively:
- Read Mode: Automatically plays back any existing automation on the track. This is the default mode, used for listening to the effects of your automation without making changes.
- Write Mode: This mode overwrites all existing automation data with new changes as the track plays. It is best used for creating new automation passes from scratch and requires caution as it replaces previous data.
- Touch Mode: Touch mode temporarily writes automation only while a parameter is being adjusted. Upon release, it reverts to the previously written automation. This mode is useful for making quick, on-the-fly adjustments without losing existing automation data.
- Latch Mode: This mode is similar to Touch but continues to write new automation data after the control is released until another change is made. Latch is perfect for extending adjustments over a period of time without continuous manual input.
How to Automate in Logic Pro X
Next, let’s break down the process of how to automate in Logic Pro X, step-by-step. This will involve setting automation points within your tracks.
Automation points are pivotal elements that allow you to specify exact values for parameters at specific moments in your track. Placing these points along an automation lane creates a map for how parameters like volume, pan, or plugin settings should change over time.
This enables dynamic shifts and precise control within your music production.
#1) Setting Up Your First Automation
Starting with automation in Logic Pro X is straightforward. Follow these steps to begin transforming your tracks:
- Select Your Track: Choose the track you want to automate in the main window.
- Open Automation: Press ‘A’ to reveal the automation lanes on each track.
- Choose a Parameter: Click on the automation lane dropdown menu and select the parameter you wish to automate, such as volume or pan.
- Create Automation Points: Finally, click on the automation lane to add points, and drag these to set your desired values at different parts of the track.
By setting up your first automation, you’ll be on your way to creating dynamic mixes that respond to and evolve with your music.
#2) Adjusting Automation Parameters for Precision
After setting up automation, fine-tuning it for precision ensures your musical vision is accurately realized. Here’s how to subsequently adjust your automation parameters effectively:
- Zoom In for Detail: Use the zoom function to view your automation lanes closely for precise editing.
- Modify Points: Click and drag existing automation points to adjust their position and value. Holding down the Command key while dragging allows for finer control.
- Add More Points for Nuance: Place additional points around a section you wish to adjust more delicately, providing a more nuanced automation curve.
- Use Marquee Tool for Bulk Adjustments: Select a range with the Marquee tool and drag up or down to adjust all points within the selection simultaneously.
Adjusting parameters with precision enriches your track’s expressiveness, allowing for detailed sculpting of its sound landscape.
#3) Utilizing Automation Curves for Smooth Transitions
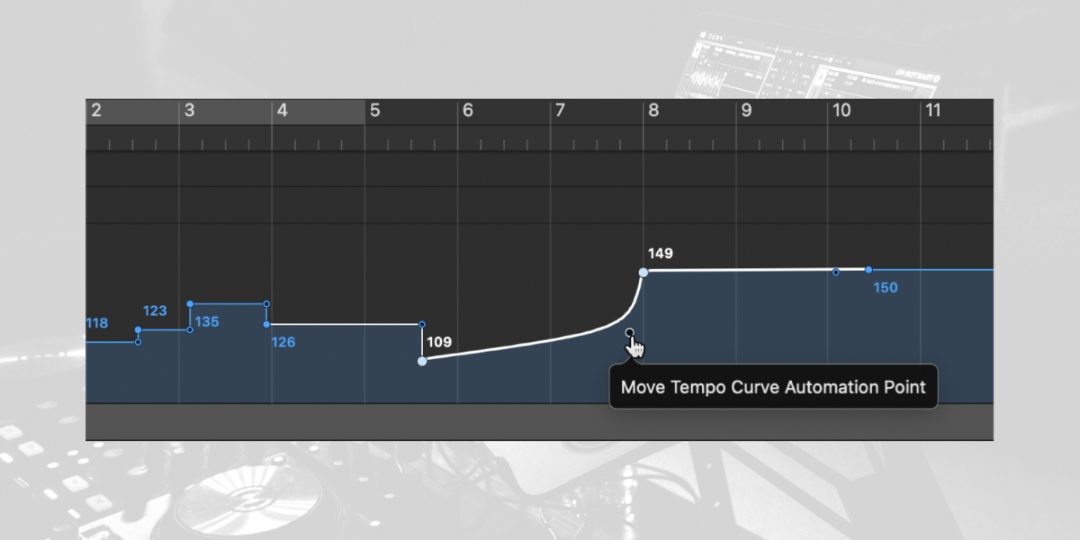
Automation curves in Logic facilitate seamless transitions between automation points, offering a polished and professional sound.
Curves are essential for achieving smooth fades, crescendos, or any nuanced change, enhancing the emotional impact of your music.
Here’s how to apply them:
- Select Two Points: To begin with, click to select two adjacent automation points between which you want a curved transition.
- Curve the Line: After that, hover over the line connecting the points until a curved arrow appears, then click and drag to create a curve.
- Adjust the Curve: Fine-tune the curve’s depth and slope by dragging it up or down, shaping the transition’s smoothness.
- Experiment with Different Curves: Try various curve shapes to discover how they impact the musical transition between sections.
Advanced Automation Techniques in Logic Pro X
After mastering the basics of how to automate in Logic Pro X, advancing your skills with more sophisticated techniques can further refine and enhance your projects.
This section explores tips for efficient automation, looping patterns, and clearing automation data to streamline production processes.
#4) Logic Pro Automation Tips and Tricks for Efficiency
Efficient automation practices can save time and enhance your workflow in Logic Pro X.
Here are several tips to optimize your automation process:
- Use Shortcut Keys: Learn and utilize *Logic shortcuts for automation, such as pressing ‘A’ to toggle the automation view on and off, speeding up your workflow.
- Copy and Paste Automation: Use the Marquee Tool to select an area of automation. Then copy (Command+C) and paste (Command+V) to another section of the track to replicate exact parameter changes.
- Automation Quick Access: Next, right-click on a parameter within a plugin to access its automation options quickly, allowing for fast adjustments without navigating away from your workflow.
- Use Automation Snap Mode: Enable snap mode in the automation settings to align automation points with the grid accordingly, ensuring precise timing and placement.
#5) How to Loop Automation in Logic Pro X
Looping automation in Logic Pro X can create repeating effects or dynamics changes without manually duplicating them. This effect can be used to add rhythmic dynamics or continuous effects to your tracks. In other words, it allows you to enhance the complexity and texture of your songs.
- Select the Region: Firstly, Choose the region with the automation you wish to loop.
- Enable Looping: In the region’s inspector panel, check the “Loop” box to enable looping for the selected region.
- Adjust Loop Length: Following this, drag the loop handle at the end of the region to set your desired loop length. The automation within the region will now repeat for the duration of the loop.
- Fine-tune Loop Points: Finally, adjust the start and end points of the loop for precise timing, ensuring seamless transitions between loops.
#6) How to Delete All Automation in Logic Pro X
There may be times when you need to remove all automation from a track to start fresh.
Clearing automation allows for a clean slate, allowing you to reimagine your track’s dynamics and effects from the ground up.
Here’s how to delete all automation in Logic Pro X:
- Select the Track: To begin with, click on the track header for the track from which you want to remove automation.
- Open Automation: Press ‘A’ to display the automation lanes on the track.
- Select All Automation Data: Use Command+A to select all automation points in the lane.
- Delete: Finally, Press the Delete key to remove all selected automation points.
Creative Uses of Automation in Logic Pro X
Exploring creative avenues with automation in Logic Pro X can elevate your music production to new heights. Let’s explore how you can use automation to harness volume, pan, and effects to enhance the dynamics of your tracks.
Enhancing Dynamics with Volume and Pan Automation
Volume and pan automation are essential for adding depth and movement to your mix. Here’s how to leverage them for dynamic enhancement:
- Volume Automation for Emphasis: Automate volume levels to highlight key moments in your track. Gradual increases can build intensity, while decreases on the other hand can create space for other elements.
- Pan Automation for Movement: Pan automation moves sounds across the stereo field, adding life and interest. Automating panning can simulate the movement of instruments or vocals, enhancing the listener’s experience.
This approach keeps your mix engaging. It also helps achieve a balanced, professional sound by ensuring that each element sits perfectly within the mix.
Automating Effects for Enhanced Sound Design
Utilizing automation to control effects parameters opens up a realm of sound design possibilities. Here’s how to creatively apply this technique:
- Filter Sweeps: Automate a filter’s cutoff frequency for classic sweep effects, which can create tension and release in electronic music genres.
- Reverb and Delay Throws: You can also automate the wet/dry mix of reverb or delay effects to add depth or emphasis to specific words or notes, creating a dramatic impact.
- Dynamic EQ Changes: Automate EQ settings to change the tonal balance of instruments or vocals at specific moments, enhancing clarity or smoothly blending elements.
Troubleshooting Common Automation Issues in Logic Pro X
Encountering challenges with automation is a normal part of the music production process in Logic Pro X. This section aims to provide solutions for common automation issues.
Fixing Unresponsive Automation
Of course, when an automation fails to respond as expected, the music production process can hit a snag. Following these steps can help revive unresponsive automation, ensuring your project’s dynamics and effects behave as intended.
- Check Automation Mode: Firstly, ensure the track is set to the correct automation mode (e.g., Read, Touch, Latch, Write). Incorrect modes can prevent automation from playing back correctly.
- Inspect Automation Lock: Logic Pro X has an automation lock feature. Verify it’s not activated, as it can prevent changes to automation data.
- Region vs. Track Automation: It’s also important to understand the difference between region and track automation. If automation is applied at the region level, it might not reflect on the track level, and vice versa.
- Update Logic Pro X: Finally, ensure you are using the latest version of Logic Pro X. Occasionally, Recent updates might have fixed Bugs causing unresponsive automation.
Managing Overlapping Automation Data
Overlapping automation data can create confusion and unintended changes in your mix. Managing overlapping automation data carefully ensures that your project’s dynamics and effects are precise.
Here’s how to manage and resolve overlaps:
- Identify Overlaps: Zoom in on the automation lanes to identify where automation data overlaps visually. Logic Pro X will display overlapped automation in a lighter shade.
- Merge Automation Data: The “Merge Automation” feature combines overlapping automation, harmonizing their effects. To do this, select the regions and choose Edit > Automation > Merge Automation in the Arrange window.
- Manual Adjustment: For finer control, manually adjust overlapping automation points. You can delete redundant points or adjust their values to ensure smooth transitions.
- Use Automation Snap Mode: Enable snap mode to align automation points accurately, reducing the chances of unintended overlaps.
Download our most popular resource: 6 Steps for Creating Radio Ready songs to learn the fundamentals of what goes into a professional mix from renowned Producer, Songwriter & Mixer Warren Huart, who has worked on several Grammy-nominated albums!
Conclusion: Mastering Automation to Elevate Your Logic Pro X Projects
In conclusion, this guide has shown you how to automate in Logic Pro X. We’ve covered everything from automation setup to utilizing advanced techniques. We’ve also walked through different types of automation, modes, and their creative applications. Hopefully, these techniques will ultimately help you bring more depth and expression to your music.
Now, with these skills in hand, you’re ready to take your productions to the next level.
And if you’re ready to really transform your Logic Pro X skills, enroll in our best-selling course: Music Production In Logic Pro X with Rob Mayzes.
This meticulously crafted course is designed to unquestionably elevate your music production to professional standards. In just 8 hours, you’ll journey through every feature of Logic Pro X. Along the way, you’ll learn the art of creating, editing, mixing, mastering and overall producing music that resonates with quality and professionalism.
Rob brings years of industry experience and a passion for teaching. He also offers direct, personalized guidance to specifically address your questions.
Whether you’re starting your music production journey or looking to refine your skills, this course ensures you’ll confidently harness the full potential of Logic Pro X!
*Common shortcut keys when learning how to automate in Logic Pro X:
- A: Toggle the automation view on and off. This key allows you to quickly switch between seeing your automation lanes and the regular track view.
- Command + Control + A: Show/Hide all automation on all tracks. This is a quick way to clean up your view or dive deep into editing automation across your project.
- Command + A (when in automation view): This command selects all automation points on the selected track. It is helpful for quick edits or deletions.
- Command + C / Command + V (after selecting automation points): Copy and paste selected automation data. This can significantly save you time when replicating complex automation curves.
- T + T opens the automation select tool, which allows you to select specific automation points or curves for editing.
- Command + Delete (after selecting automation points): Delete selected automation points. This is an essential shortcut for quickly removing unwanted automation.
- Shift + Control + Drag: To draw in automation data in a straight line. Perfect for creating precise volume ramps or any parameter changes that need to be linear.
- Command + Drag (on an automation point): Temporarily bypasses snap to grid for fine-tuned adjustment of automation points. Great for making precise adjustments when the grid doesn’t align with your needs.

